- Introduction
- Creating the low poly base model in 3Ds Max
- High poly sculpting in Zbrush
- High poly painting in Zbrush
- Retopology of Zbrush mesh
- Maps extraction from Zbrush mesh to game mesh
- Creating the game texture map
- Creating a biped skeleton and adding skin modifier to the game mesh
- Transferring motion capture animations to biped animations
- Tweak and export animation for ingame usage

Head of Game Development at ASSIST
"We are all failures- at least the best of us are" - J. M. Barrie
Read time: 7 minutes
Introduction
Developing a game ready character requires creating and personalizing your own modeling, texturing and animation pipeline, composed of the following tools: a computer graphics program (3d Studio Max), a digital sculpting tool (ZBrush), a resurfacing software (Topogun), a bake and projection of textures software (xNormal), a 2d graphics editing program (Photoshop) and last but not least a character animation software ( MotionBuilder).
Of course for each of these tools there is at least one similar program with the same core features but with slightly different approaches and workflows. With this in mind, the following presentation will focus on the general pipeline system and not on which program does the job better, faster or easier.
To get things started, I divided the pipeline by colors (each represents software used in the development) and added a total of nine unique steps in the building process. At the same time the length of each segment represents the time spent in each step. (Fig. Character creation pipeline image)

Creating the low poly base model in 3Ds Max
The first step in any modeling project is to create a base mesh (3d object) with a good topology for high quality sculpting. So what is topology?
Topology refers to the structure of the mesh and the way the mesh flows around the surface and details of the model. No matter whether you’re preparing a model for animation, modeling clean hard surfaces, making an organic model with smooth curves, or simply modeling something that is easy for other artists to work with, topology is key to each of these.
For a base model that will be exported to a sculpting software the main rules are to use polygons, avoid creating triangles and test the subdivision levels and turbosmooth modifier to see how the models topology acts at higher resolutions. The tessellation modifier subdivides faces in the current mesh and the turbosmooth modifiers subdivides the geometry while interpolating the angles of new faces at corners and edges, and apply a single smoothing group to all faces in the object.(fig. Low poly topology subdivision)

High poly sculpting in Zbrush
The next step is to import the meshes in Zbrush, convert them to polymeshes(in ZBrush, only polymeshes can be sculpted ) split them in subtools and start sculpting. This process is quite different from the standard poly modeling due to the tools used and the structure of the mesh that acts more like clay than a hard surface.
Once the subtool is divided to decent level for adding details, the sculpting can start. Basically there are 4 major tools that are used at this stage:
- 3d brushes are the main tool for sculpting and come in a wide range of categories from sculpting, smooth, clip to insert brushes each with their own settings and customization options.
- masking is one of the key tools, easy to use but with endless possibilities in its effectiveness at creating details and/or subcomponents in a mesh.
- deformation is a pallet of tools that provide unique effects and ways to sculpt the 3d object.
So, we have the tools but what footsteps must be taken in the process of sculpting a realistic looking model?
First of all, if we are talking about a real life object some references are needed to determinate the size and materials (color, surface texture) used in the specific item. The second rule is to understand that perfect modeling (flawless symmetry, straight lines, angles and so on) does not mean a photorealistic object, but the contrary in many cases. At the same time combining in a natural way the 3d texture details with colors and material shaders can bring the object on step closer to realism or break it as easily. (more about this in the “poly paint step”).( fig. Sculpting and polypainting the pouch)

High poly painting in Zbrush
Polypainting allows painting on a model's surface without first assigning a texture map. A texture map can be created at a later time, and the painted surface can be transferred to the map. Polypainting offers significant advantages compared to standard workflow. In other words for each vertex of the model a color can be assigned.
To understand how polypainting works, first consider a 2048 by 2048 texture map, which provides reasonable resolution. It has a total of a little over 4 million pixels. If you work with a 4 million polygon model, then in terms of surface painting, simply assigning each polygon a uniform color gives the same amount of information as the 4 million pixel texture map.
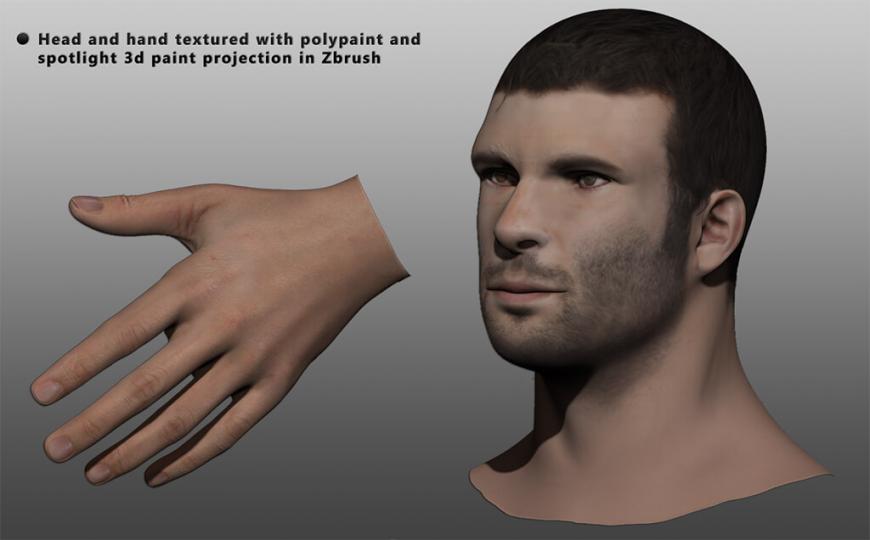
Another sub method for adding extra details alongside polypainting is spotlight. This is a projection texturing system which allows you to prepare your source texture directly in ZBrush as 3d paint. The hands and face of the soldier have been textured with polypaint and spotlight painting to achieve a natural look.(fig. Head and hands polypaint)
Retopology of Zbrush mesh
Once the high resolution model is ready, its exported in Topogun( a retopology tools) for creating the low poly game ready mesh. Basically you create a low poly mesh on top of the high poly mesh optimized for animation and of course with a much smaller number of polygons. On this mesh the bone structure will be applied and the textures maps that will be extracted in the next step. At this point it’s critical to create a good topology for the animations and understand how the human body moves and how its bone structure affects the muscle system (in our case the low poly mesh).(fig. Hand retopology)

Maps extraction from Zbrush mesh to game mesh
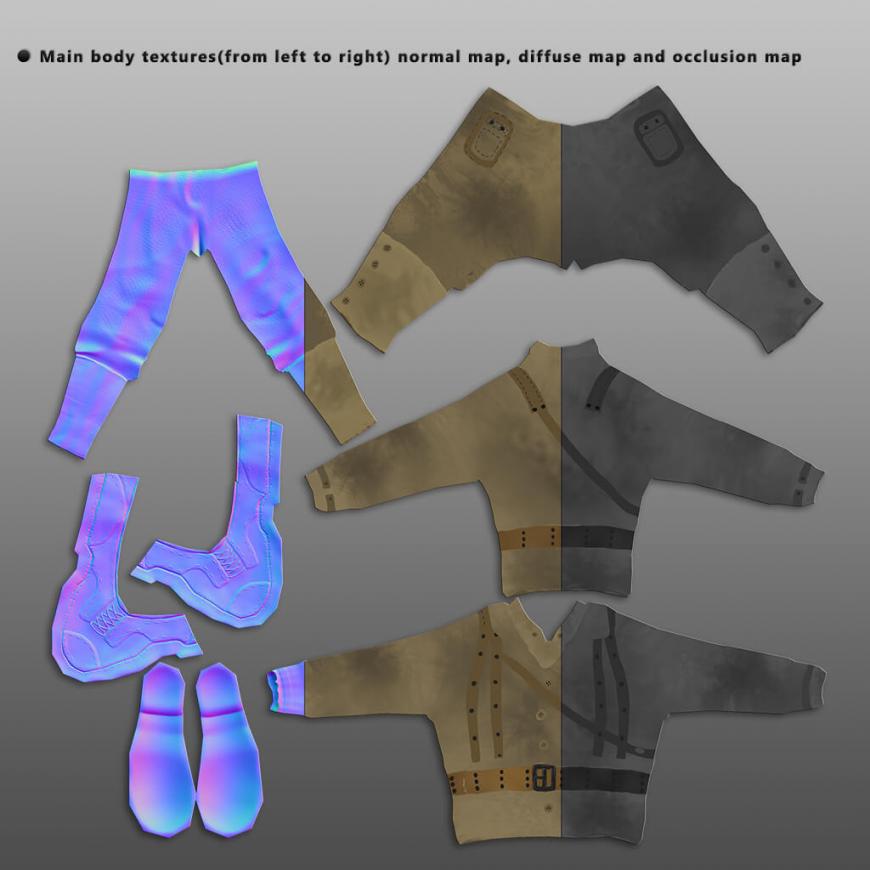
Because of the hardware limitations we need to extract all the details from the high poly model to the low poly game model. For this we need to generate the normal map( for extracting the 3d details), diffuse map( for the colors) and the occlusion map( the way the light radiates in real life). Once a UV map( 2d representation of a 3d model) is created on the low poly models then with the help of xNormal the three maps are generated at the required resolution( usually a 2048*2048 is enough for tweaking and repair the rendering errors in a 2d editing program) .( fig. Normal, diffuse and occlusion texture)
Creating the game texture map
So we have the three textures maps but in the case of mobile games, using complex shaders really hurt the performance especially on intricate scenes with a high number of objects. For optimizing purpose the three maps are combined in one complete map and the 11*3 textures are made in 3 main textures (accessories, body, face hand) of 1024*1024 resolutions each.(fig. accessories full map)

Creating a biped skeleton and adding skin modifier to the game mesh
Once we have to final mesh and textures, it’s time to animate the soldier. The first step is to create a biped bone system with a custom structure (number of splines, joints, finger segments and so on) and modify the shape and position to tightly fit the mesh. At the same time a key step is to place the joints at the exact spots on the splines so that the animation will be natural and the mesh will not break.
Once the bone structure is ready the final step is to add a skin modifier to the mesh. The purpose of this modifier is to add weight/tension to each vertex of the mesh to its assigned bone. This can be compared to the muscle and skin of the human body that reacts to the movement/rotation of the bones. This process is done manually for each bone and of course the leg, arms and hands bones can be mirrored to the other side for faster skinning. (Fig. Biped bone and skin modifier)

Transferring motion capture animations to biped animations
Once the game mesh is rigged, with the help of Motion builder we can convert TRC files (it contains not only the raw data from the full body motion capture system but also the output data coming from their face tracker) to biped animation files that can be loaded to our game mesh. For this we need to export the biped skeleton into Motion Builder and attach the required points to transfer the animation sequence.

Tweak and export animation for ingame usage
Once we have a library of biped animation the final step in the pipeline is to tweak the animations. This process is done by creating new layers of animations for tweaking small errors in the main animation (a shoulder that is too high, a twisted finger and so on). After this last step the mesh is exported as an fbx file and it’s ready for game usage.
This presentation tried and hopefully achieved its purpose of drawing the big picture behind the pipeline used for creating a game ready character for the game industry. In our case the final product was intended for a mobile game but the same principles and steps apply for console or pc games alike.

→ If you want to find out more about the author of the article click play on the below video.
Subscribe on YouTube