3D Designer at ASSIST
"Never tell people how to do things. Tell them what to do and they will surprise you with their ingenuity." -- George S. Patton
Read time: 6 minutes
Introduction
Animation is the process of creating the illusion of motion and shape change by creating a series of static images with minimal changes which the human brain perceives as a sequence of animations.
In traditional animation pipeline, the animators have to draw each frame manually, usually starting with the first and last image of the sequence. The next step is to create the frames that link the two states together.
Depending on the requirements the number and the flow of the frames can vary dramatically depending on the motion that the artist wants to reproduce.
In the next picture we can visualize a simple frame sequence that simulates a bouncing ball animation loop. With a play speed of 12 frames per second you can see a real-time representation of the bouncing speed of the ball. Changing the speed, adding or deleting frames can alter dramatically the way we perceive this simple animation and create completely new effects.

Computer generated animations have a wide range of methods and solutions for creating the content but the main difference from the 2d techniques is that once created the 3d assets can be treated much like physical objects or actors.
The process of generating an animation starts with building a humanoid or custom skeleton frame for the 3d model so that the mesh can be linked to it with the help of a weight system. The weights create a link between each vertex of the mesh to their allocated bones. Depending on the values this association can create organic or mechanical links form the bones to the 3d mesh.
The rigging process is just one step required before delivering an animation ready model. The final step is to create a set of controls, helpers and constraints that greatly benefits and simplifies the work of the animation artist in creating and/or tweaking the animations.
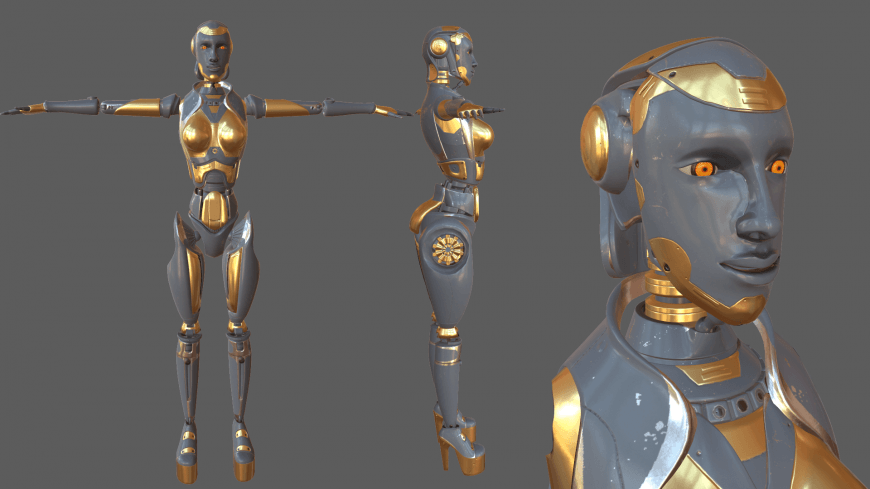
Modelling the low poly model in Maya
The low poly model was designed and modeled in Autodesk Maya. Maya is a compressive toolset designed for 3D modeling, special effects, simulations and animations. The software is used on large scale in production environments for the entertainment industry ranging from the Hollywood blockbusters to the AAA games.
The main technique used for creating this model was box modelling. This technique enables the creation of complex 3d models starting from a primitive shape such as a cube or a sphere.
This technique uses a number of repetitive steps to reach the final product and that lead to a more efficient and a more controlled modeling process.

Adding the high poly details and maps extraction
After the low poly modeling and UVW mapping process has been done, the 3D mesh is imported in Zbrush where the final details are created.
Once the model is devided to an approiate polygon density the sculpting process can be started . The next step is the polypainting of the model for extracting an ID map that will be used for the final texturing process. After this I extracted the id and normal maps as input maps in the low poly model texturing.
Normal mapping is a technique used for faking the lighting of bumps and dests and is used for projecting the details from a high poly to a low poly model. (This is really awesome).

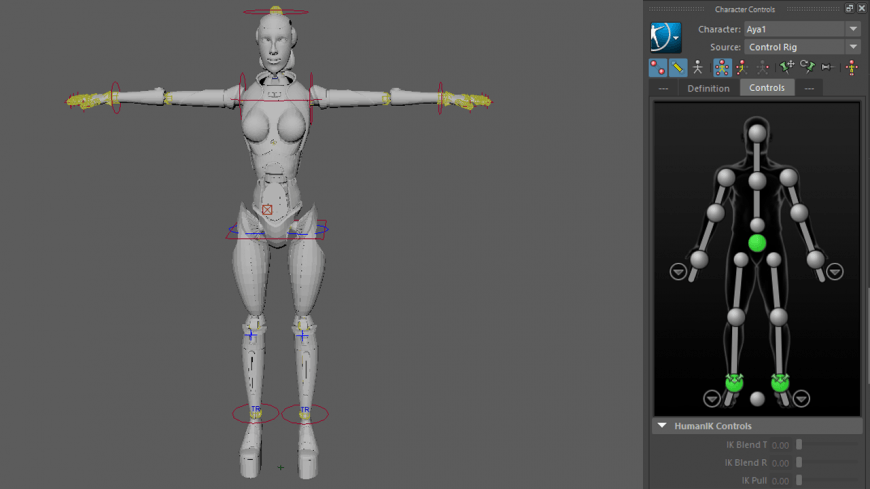
Set up a Human FK character
Before starting the core rigging process I focused on creating a set of constraints and helpers for the eyes and the pistons of the robot.
The eyes rotation was established by constraining them to look at two helpers that are parent to a third one for easy control. This movement can be key framed or parented to a camera so that the eyes will follow the cameras movement.

The pistons are linked with the help of dummy objects that are parented to the chest and head bones.With the help of the aim constraints the pistons heads are always looking at each other to give the efect of a mechanical system.

For this model I decided to use Human FK (full kinematic) to control the character. The first step was to create and define a Human FK skeleton. The human FK is very similar to the default Maya skeleton but it has just two splines instead of three. The final step was to scale the skeleton to fit perfectly the 3d model.

For the skinning process I used a set of solutions provided by Maya such as Joint Hierarchy, Geodesic Voxel, Weight blended, normalize weight Interactive.
Every piece of the mesh is influenced by just one bone because this character is an android and the model is not stretching or squashing. So the weight of the vertices are 100 % for each corresponding bone.
Human IK/FK Control rig
After the rigging process, a Control Rig is automatically created due to the use of the Human FK character.
Key frame animation
Key frame animation is a standard for creating animation sequences. Keys store a value at a given time in animation. It can store information about (position, rotation, scaling) and this keys can incorporate one or a set of information about individual parts or entire models.
Between frames transition is made using mathematical functions, due to its scientific nature of creating animations, it’s require a good understanding of the physics involved in the process to generate a natural motion.
Due to its precise workflow, key frames help the animation artist repair, tweak or even accentuate different aspects of the animations. At the same time the final overview of the animation process involves this kind of animation technique.
MOCAP animation
What is MOCAP?
Motion capture animations is a standard industry for recording the real-life movements of objects, humans and even cameras by a computer using a series of sensors, transferring the data to digital characters.
It’s used in the filmmaking, videogames, military, sports and entertainment industry and do to the lower costs of motion capture technology it slowly becomes available to a wider range of customers.
The internal pipeline for MOCAP animation is the following:
- Building the required moves list
- Preparing the scene and the actor for the motion capture process
- Rigging the 3d characters
- Capturing the raw motion data
- Cleaning up the motion data
- Mapping the data to your character
- Editing the final animations on the character
Conclusion
The animation process has always been well-known as an art form that springs life in motionless characters. From the humble beginnings of hand drawn animations to the complex motion capture systems the main focus is to create the perfect relation between the characters personality and their animations.
Despite the growing automation of the process it always requires an animation artist to give personality and originality to the animations.