Software Development Engineer I at ASSIST
"The best performance improvement is the transition from the nonworking state to the working state". (J. Osterhout)
Read time: 9 minutes

1. Introduction
Use them right and bots can enhance user experience on many platforms such as Discord, Slack, Skype, or Microsoft Teams. With a term such as bots for business, companies exploit the advantages that bots offer and incorporate them into their daily workflow. Statistically, bots surpassed social tech in terms of user engagement and are still growing at a fast pace, as pointed out by Gartner.
However, using bots only in sales would mean ignoring their great potential. Bots can enhance your employees' experience with the in-house communication channels. In this article, you will learn how to easily create a serverless bot for MS Teams that will send messages to a specific channel every day.
You do not need to be a big business to reap the advantages of bots. Let's see how.
1.1 What is Microsoft Teams?
Microsoft Teams is a commercial communication tool that includes document sharing, online meetings, and a slew of other capabilities. Meetings, notes, chats, attachments, and other Microsoft and non-Microsoft extensions are all available, and it is easily integrated into the Office 365 productivity package. Big and small companies use MS Teams especially in the context of solving remote-working problems.
1.2 What is a bot?
A bot (Internet robot) is a software application that is programmed to do certain tasks. Bots are automated, which means they run according to their instructions without a human user needing to start them up. Bots often imitate or replace a human user's behavior. Typically, they do repetitive tasks, and they can do them much faster than a human user could. This is the reason why we now have everything from Twitter bots to Twitch bots to Discord bots. They are available on various platforms.
1.3 What is serverless computing?
Serverless computing is an execution model in which the cloud provider (AWS, Azure, or Google Cloud) is in charge of dynamically assigning resources and running a piece of code. The code is usually executed in stateless containers that may be triggered by a number of events such as HTTP requests, database events, monitoring alerts, file uploads, and scheduled events (cron tasks), among others. A function is the most common type of code delivered to the cloud provider for execution.
2. Installation
To create a serverless bot for Microsoft Teams, you will need the following:
- Python 3.7
- Virtualenv (optional) - package for managing multiple Python projects
- Pip - package installer for Python
- Serverless - framework for developing and deploying AWS Lambda functions
The first step (which is optional) is to create a virtual environment for your project to avoid conflicts with the requirements of other projects:
virtualenv -p python3.7 botenv
The next step is to install serverless framework and create your project:
npm install -g serverless
serverless create --template aws-python3 --name bot-teams --path bot-teams
If you created a virtual environment, the next step is to activate it and install the requirements:
source botenv/bin/activate - Run this command only if you created the environment.
pip install botbuilder-core - Microsoft Bot Framework SDK - used to create the logic for the bot
pip install boto3 - AWS SDK - used for managing AWS services
pip install requests - used to make HTTP requests
3. Create the logic for the bot
After creating the serverless project, create a new src directory in the project folder. In this directory, create the bot.py file. In this file, write the class for the bot:
import logging
import json
import asyncio
import re

from botbuilder.core import ActivityHandler, MessageFactory, TurnContext
from botbuilder.schema import ChannelAccount, Activity, Mention


# Create the loop
LOOP = asyncio.get_event_loop()


class AssistBot(ActivityHandler):

    def cleanup(self, text):
        # Remove new lines, unnecessary characters and mentions
        # to bot
        replace = ['\n', '\\', '']
        for item in replace:
            text = text.replace(item, '')
        re.sub(r'<at>\w*<\/at>', '', text)
        return text

    def respond(self, ctx, msg, mentions=[]):
        activity = MessageFactory.text(msg)
        activity.entities = mentions
        return ctx.send_activity(activity)

    async def on_message_activity(self, ctx: TurnContext):
        text = self.cleanup(ctx.activity.text)
        msg = f'You typed: {text}'
        mentions = []
        return await self.respond(ctx, msg, mentions)
To increase security, all of the bot credentials will be stored in AWS S3. Therefore, you need to implement the logic to get all the credentials and the connection to Microsoft Teams. An alternative solution (not recommended) would be to put the credentials directly in this file.
Create another file lib.py in the same src directory. In this file, create the connections logic to AWS S3 and Microsoft Teams.
import boto3
import json
import logging
import os
import sys
from types import MethodType

from botbuilder.core import BotFrameworkAdapterSettings, \
    BotFrameworkAdapter, TurnContext
from botbuilder.schema import Activity, ActivityTypes, \
    TextFormatTypes, DeliveryModes, ChannelAccount
from botframework.connector import ConnectorClient
from botframework.connector.auth import MicrosoftAppCredentials


ssm = boto3.client('ssm')

bot_creds = json.loads(ssm.get_parameter(
    Name=os.environ['SSM_BOT_CREDENTIALS'],
    WithDecryption=True)['Parameter']['Value']
)

# Bot credentials
CHANNEL_ID = 'msteams'
SERVICE_URL = 'https://smba.trafficmanager.net/emea/'

BOT_ID = bot_creds['BOT_ID']
BOT_APP_ID = bot_creds['APP_ID']
BOT_APP_SECRET = bot_creds['APP_SECRET']
CONVERSATION_ID = os.environ['CONVERSATION_ID']


# Bot functions
async def on_bot_error(
       self, context: TurnContext, error: Exception):
    ''' Catch all exceptions from bot '''
    print(f"\n [on_turn_error] unhandled error: {error}",
       file=sys.stderr)

    # Send a message to the user
    await context.send_activity(
        "The bot encountered an error or bug.")
    await context.send_activity(
        "To continue to run this bot, please fix the bot source "
        "code.")


def get_bot_adapter():
    settings = BotFrameworkAdapterSettings(
        BOT_APP_ID, BOT_APP_SECRET)
    adapter = BotFrameworkAdapter(settings)
    adapter.on_turn_error = MethodType(on_bot_error, adapter)
    return adapter


def get_teams_connector():
    credentials = MicrosoftAppCredentials(
        BOT_APP_ID, BOT_APP_SECRET)
    return ConnectorClient(credentials, base_url=SERVICE_URL)
The next step is to create a function for an endpoint that will be used by Microsoft Teams to turn on the bot and check if it is running. In the bot.py file, add the following function:
def on_message(event, context):
    logger.info("Event %s" % event)

    body = json.loads(event['body'])
    activity = Activity().deserialize(body)

    # Retrieve authorization HMAC information
    auth_header = event['headers'].get('Authorization', "")
    if not auth_header:
        auth_header = event['headers'].get('authorization', "")

    task = LOOP.create_task(
        get_bot_adapter().process_activity(
        activity, auth_header, AssistBot().on_turn)
    )
    LOOP.run_until_complete(task)
    return {'statusCode': 201, 'body': '{}', 'headers': {}}
Create the logic to send a message text to the channel id that is stored in the variable CHANNEL_ID. Then the following functions should be added to the lib.py file.
def send_teams_channel_message(connector, message):
    activity = Activity(
            type=ActivityTypes.message,
            text_format=TextFormatTypes.markdown,
            delivery_mode=DeliveryModes.notification,
            channel_id=CHANNEL_ID,
            from_property=ChannelAccount(id=BOT_APP_ID),
            text=message)

    connector.conversations.send_to_conversation(
            CONVERSATION_ID, activity
    )
def send_motivational_text(event, context):
    message = 'Have a great day!'
    connector = get_teams_connector()
    send_teams_channel_message(connector, message)
    return {'statusCode': 201, 'body': '{}', 'headers': {}}
Now you should configure the serverless.yml file:
service: assist-bot

plugins:
  - serverless-python-requirements
  - serverless-offline-python

provider:
  name: aws
  runtime: python3.7
  profile: assist
  timeout: 90
  environment:
    SSM_BOT_CREDENTIALS: '<your_AWS_S3_path>'
    CONVERSATION_ID: '<your_conservastion_id>'
  iamRoleStatements:
      - Effect: Allow
        Action:
          - ssm:GetParameter
          - ssm:GetParametersByPath
        Resource:
          Fn::Join:
            - ':'
              - 'arn:aws:ssm'
              - Ref: 'AWS::Region'
              - Ref: 'AWS::AccountId'
  layers:
    - {Ref: PythonRequirementsLambdaLayer}

functions:
bot:
  handler: src/bot.on_message
  events:
    - http:
        path: api/messages
        method: post
        cors: true
send_text:
  handler: src/bot.send_motivational_text
  events:
    - schedule:
        rate: cron(0 9 * * ? *)
        enabled: true
    - http:
        path: api/send
        method: post
        cors: true

# you can add packaging information here
package:
 include:
   - "**"
   - '!node_modules/**'
   - '!.serverless/**'
   - '!build/**'
   - '!teams_package/**'
   - '!teams_package.zip'

custom:
  pythonRequirements:
    dockerizePip: true
    slim: true
    layer: true
    useDownloadCache: true
    useStaticCache: true
The CONVERSATION_ID variable should be updated with your team’s channel id or conversation id. The SSM_BOT_CREDENTIALS variable should be updated with the AWS S3 path to the credentials for your project.
4. Register the bot
In order to integrate your bot with Microsoft Teams, you need to register it at https://dev.botframework.com/bots/new and create a Microsoft App ID and Password.
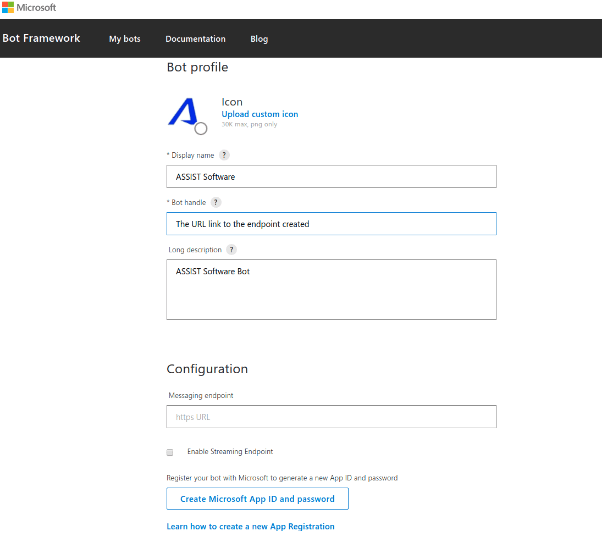
Figure 1 - Bot profile for MS Teams
After you register the bot, you need to create an application and get the app’s credentials.
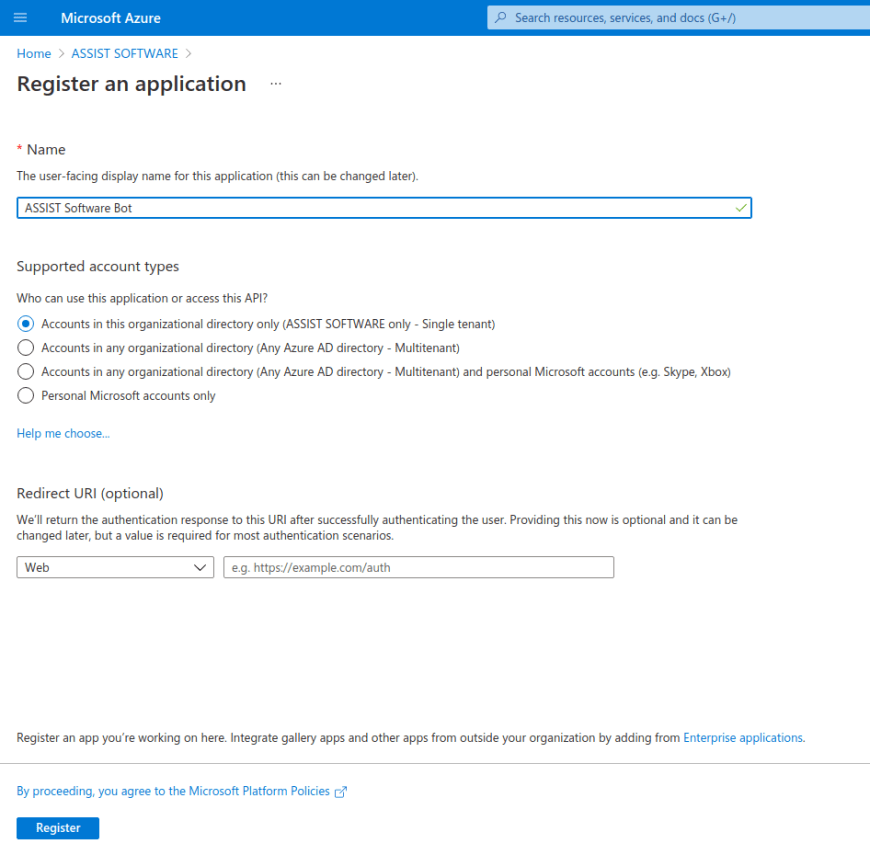
Figure 2 - Register an application screen Microsoft Azure
After the Application ID is generated, add it to the bot profile and get the bot id.
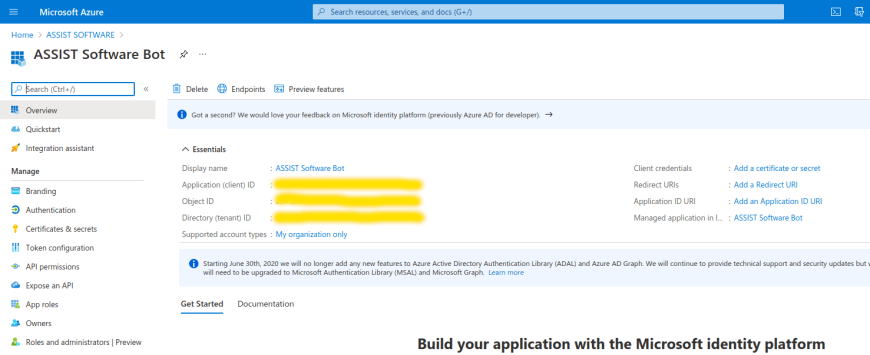
Figure 3 - Application ID and Bot ID in Microsoft Azure
5. Upload the bot to Microsoft Teams
The last step is to create the package for Microsoft Teams. You will need to create a manifest.json file. You can find the schema for this file here:
https://docs.microsoft.com/en-us/microsoftteams/platform/resources/schema/manifest-schema.
In our case, the content for this file is the following:
{
  "$schema": "https://developer.microsoft.com/en-us/json-schemas/teams/v1.5/MicrosoftTeams.schema.json",
  "manifestVersion": "1.5",
  "version": "1.1.0",
  "id": "<BOT ID>",
  "packageName": "com.assist.assist-bot",
  "devicePermissions": [],
  "developer": {
    "name": "Andronic Tudor",
    "websiteUrl": "https://assist-software.net/",
    "privacyUrl": "https://assist-software.net/",
    "termsOfUseUrl": "https://assist-software.net/"
  },
  "name": {
    "short": "ASSIST Software",
    "full": "ASSIST Software Bot"
  },
  "description": {
    "short": "ASSIST Software",
    "full": "ASSIST Software Bot"
  },
  "icons": {
    "outline": "assist-logo-outline.png",
    "color": "assist-logo-color.png"
  },
  "bots": [
    {
      "botId": "<BOT ID>",
      "isNotificationOnly": true,
      "scopes": [
        "team",
        "groupchat"
      ]
    }
  ]
}
You should replace BOT ID with your bot ID. For the bot, you will need two icons with the following specifications:
- outline - a relative file path to a transparent 32x32 PNG outline icon
- color - a relative file path to a full-color 192x192 PNG icon
After this, you should zip all of the files (manifest.json, assist-logo-outline.png, assist-logo-color.png), but be careful not to zip them in a folder; the files should be in the root of the zip file.
To upload the bot, you should have admin permissions for your Microsoft Teams account. In the Apps section, you will find an Upload a custom app button where you can upload your zip file. After that, the bot will appear in the app list. If you click on it, you will see the Add to a team button where you can select the team channel to which you want to add the bot.
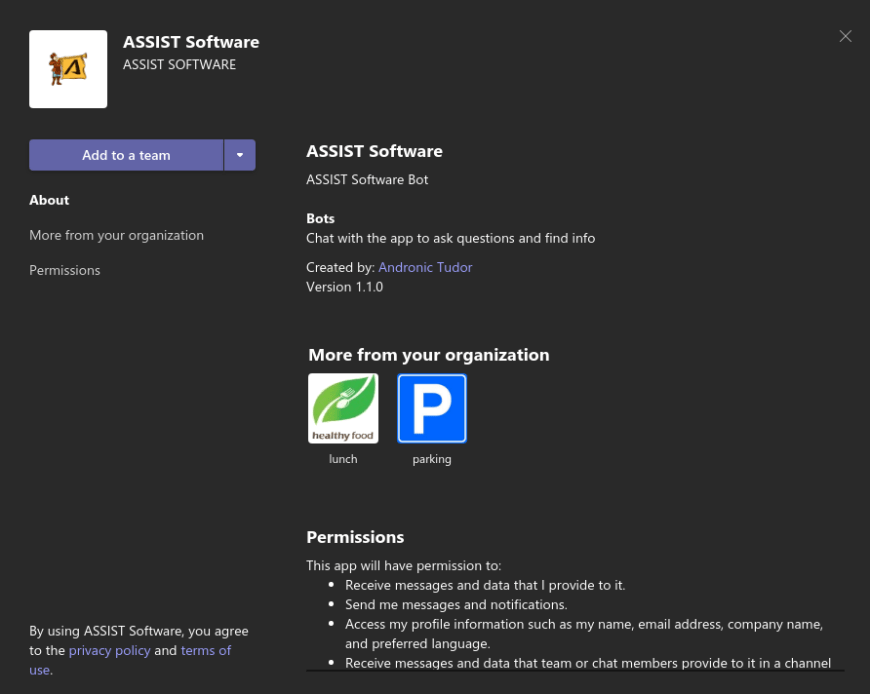
Figure 4 - Add a custom bot to Microsoft Teams
That's all! Your bot should now be working and it will post the “Have a great day!” message every day at 9 am to the selected team channel.
6. Conclusions
In conclusion, if you want to create a custom task, automate tasks, or integrate Microsoft Teams with a web platform (to make some requests directly from a Teams channel), a bot can be your solution. Bots can save your time and help you to not do repetitive tasks, to provide information to people that are in your organization. As a bonus, bots can be really cheap if you use serverless technology.
On our website, you can learn more about the pros and cons of serverless computing but can also find out how to create a custom Alexa skill using AWS Lambda and serverless framework. Leave us comments and questions about serverless in the comment section or on our Facebook page.