
How to Integrate Facebook API in Unity 3D

I hope it will be easy for you to follow the instructions in this tutorial. I tried to make things easier for you, that's why I included a lot of pictures that will help you understand better what you need to do. I want to ensure that you focus on coding your game, instead of losing time configuring APIs.
So let’s start!
→ If you already have a Unity 3D account and Unity 3D installed, skip this step!
First, go to https://unity3d.com/get-unity/download and start downloading Unity 3D. Create an account and then select the Free version.
While Unity 3D is being installed or after it has been installed, we will go to the next step.
Go to https://developers.facebook.com/ and create an account (if you don’t have one already). Go to the My Apps Menu like in Picture 1.
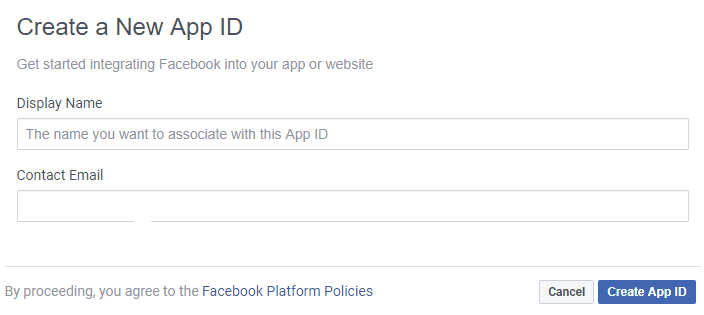
In Picture 2 choose a name for your app and enter your e-mail address (the e-mail address connected to your Facebook account).
Then click on the Create App ID button.
Tips: Don’t use negative words… anyway, you will receive an alert if you do something wrong here :).
Ok, now that the hardest part is done, we can go to the next step!
Now select your app from the right panel. Select Settings and then select Basic.
(My apps→ Settings → Basic)
Here you will see some information about your app. You can edit some parameters, but for now, we will minimize the page, so that we can continue with the rest of the steps in this tutorial.
Now we will need Facebook SDK for Unity 3D.
Here is the link: https://developers.facebook.com/docs/unity/downloads/
Download the latest version. For me, it is 7.14.1
Download the content, save the files in a new folder on your computer and after all folders have been extracted, open the Facebook SDK folder. There you will see a type of unity package file. Don’t open it yet, because we will need to open a project of Unity 3D.
Open Unity 3D, log in with your account (if you want to do this), create a 3D app (for now it doesn't matter if is 2D or 3D) and open the project. If you want to have a similar layout as mine, please check Picture 3.

Picture 3
First, we must import the Facebook SDK in our empty project. Find the folder where you saved the SDK and double-click on it.
And now you should see a panel like in Picture 4.
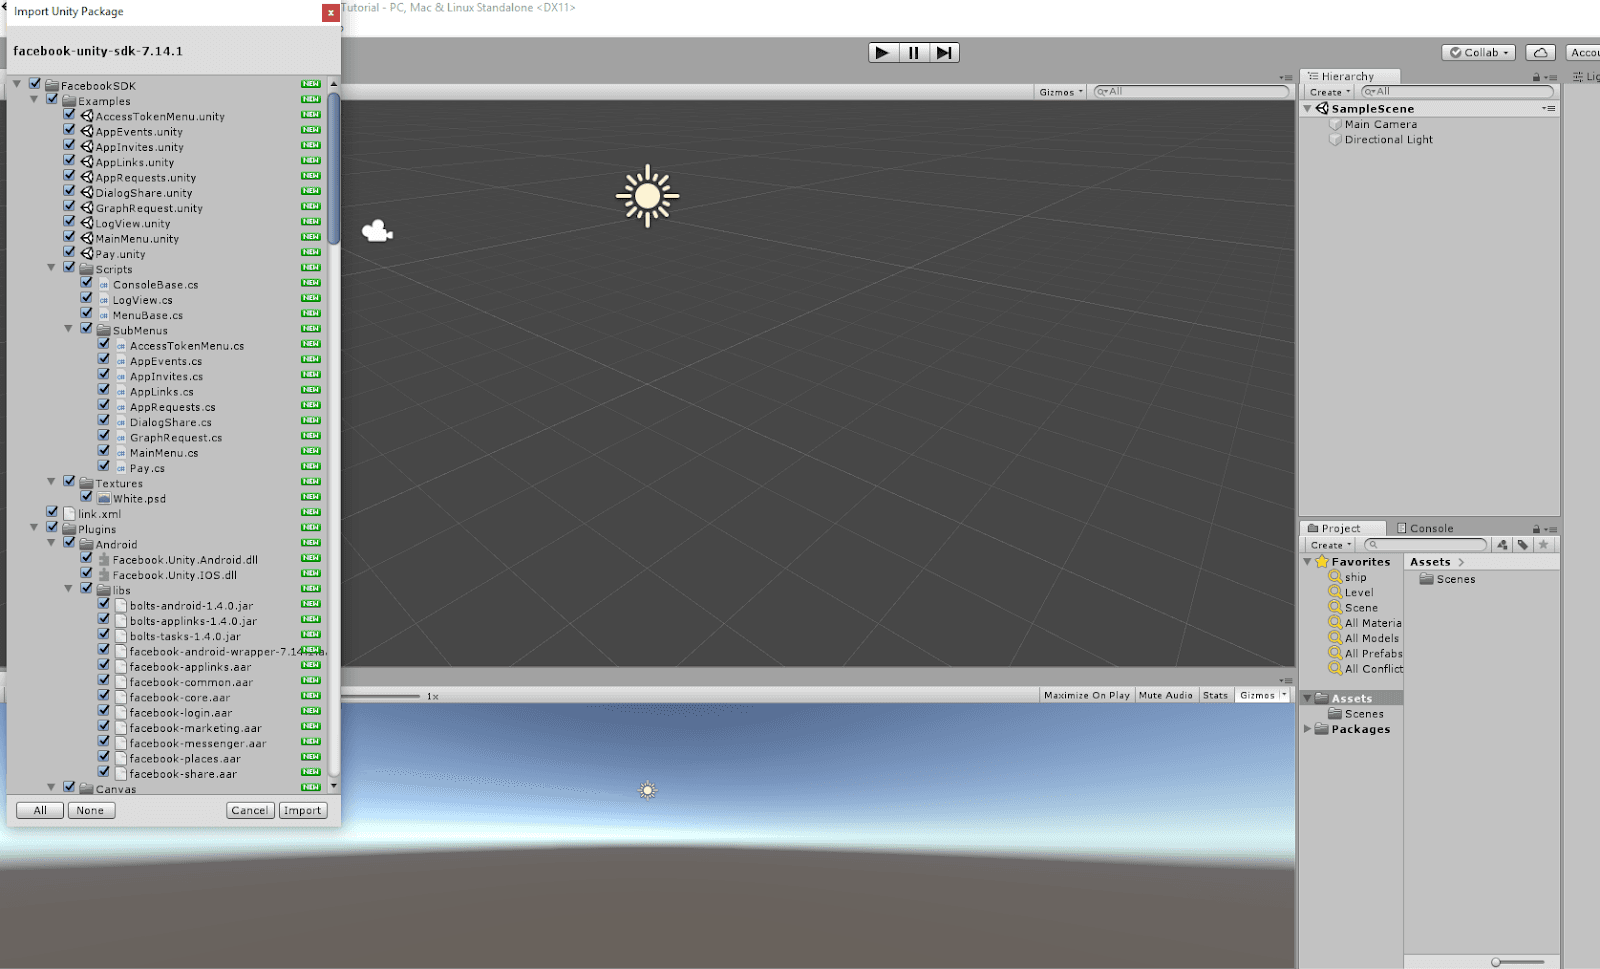
Picture 4
Click Import and wait for the SDK to be installed.
Now we must set some parameters in Unity 3D.
Up in the menu items, you will see Facebook as shown in Picture 5. Click on it and then click Edit Settings.
Picture 5
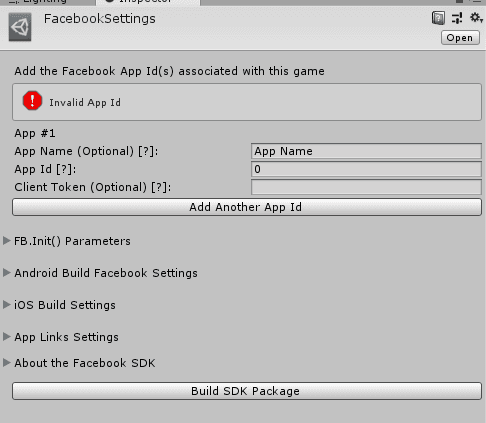
Picture 6
Here we must enter the app name (Facebook app name) and the app ID.
After you complete the app ID, the warning message will disappear. The next step is to create a basic UI.
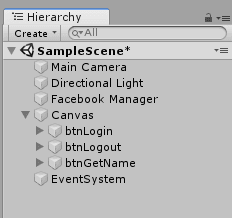
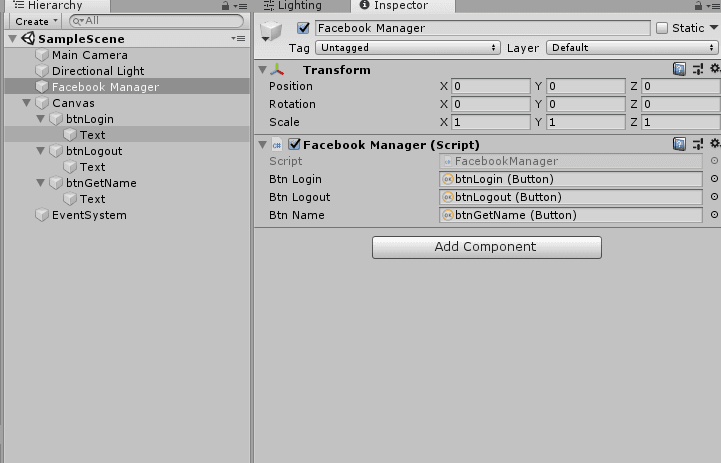
In the Hierarchy tab, right-click and select Create Empty. And because we are good developers, we must rename this GameObject with “Facebook Manager”.
In the same tab, right-click again and select UI and create three buttons. Select each button and rename them (e.g. “btnLogin”, ”btnLogout”, and ”btnGetName”).
If you are done, wait for me to do the same…
Picture 7
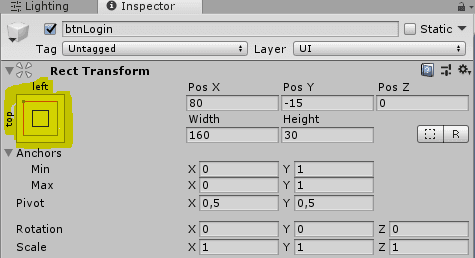
Voila! To see all three buttons in the game view tab, we must select btnLogin for example and click on the desired elements (e.g. like in Picture 8) to access the different positions and then use alt to drag and drop the elements.
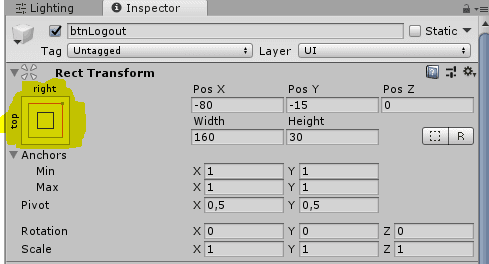
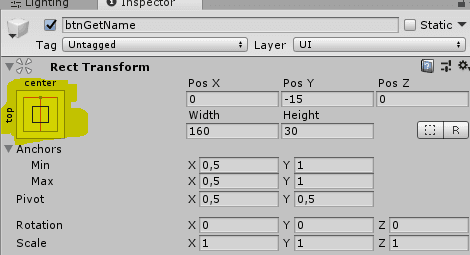
See Picture 9 for Logout, and Picture 10 for GetName.
Picture 8
Picture 9
Picture 10
Now the game view must look like Picture 11.
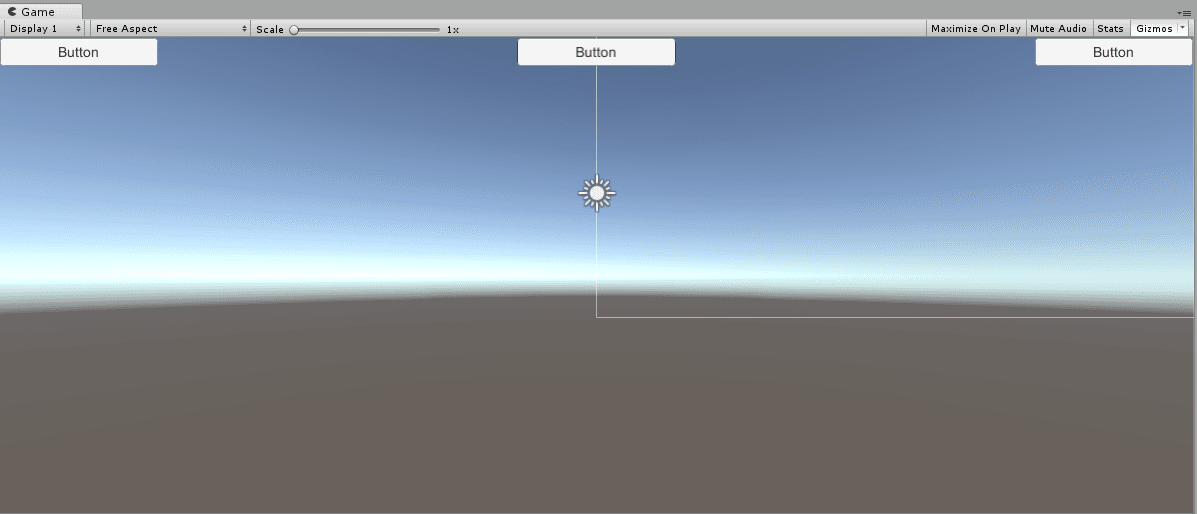
Picture 11
Because we don’t like to see three buttons with the same name, we will change them. To do this, select each button in the Hierarchy tab, click on the drop-down arrow and select text. In the right panel, you will see a text tab. Change the names to "Login", "Logout", and "Name".
Now we’ve arrived at the fun part.
In the Project View, select Assets. Right-click on it, and select create, then folder. Name the folder “Scripts” and double-click on it.
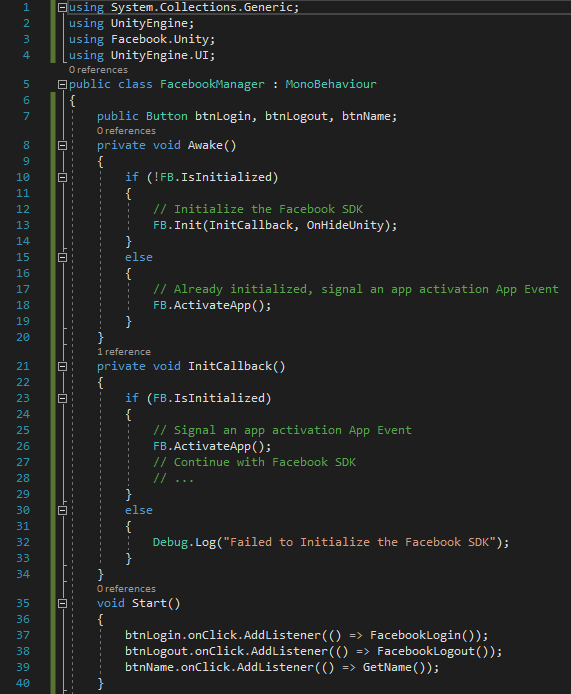
In the “Scripts” folder, right click on empty space and create a C# script. Name it FacebookManager and open it. I use visual studio for editing scripts.
First of all, add the libraries that are necessary for your script to work. In our case, this is what we used:
using System.Collections.Generic;
using UnityEngine;
using Facebook.Unity;
using UnityEngine.UI;
Next, you must create button variables.
public class FacebookManager : MonoBehaviour
{
    public Button btnLogin, btnLogout, btnName;
Moving on, you must initialize the Facebook API. For this, the following function is required:
 private void Awake()
    {
        if (!FB.IsInitialized)
        {
            // Initialize the Facebook SDK
            FB.Init(InitCallback, OnHideUnity);
        }
        else
        {
            // Already initialized, signal an app activation App Event
            FB.ActivateApp();
        }
    }
Then you must create these two functions: InitCallback and OnHideUnity.
  private void InitCallback()
    {
        if (FB.IsInitialized)
        {
            // Signal an app activation App Event
            FB.ActivateApp();
            // Continue with Facebook SDK
            // ...
        }
        else
        {
            Debug.Log("Failed to Initialize the Facebook SDK");
        }
    }

    private void OnHideUnity(bool isGameShown)
    {
        if (!isGameShown)
            Time.timeScale = 0;
        else
            Time.timeScale = 1;
    }
Cool, if you don’t have any errors, let’s start to create the login and logout functions:
  public void FacebookLogin()
    {
        var permissions = new List<string>() { "public_profile", "email", "user_friends" };
        FB.LogInWithReadPermissions(permissions, AuthCallback);
    }
If you want more permissions, check Facebook developers documents and search for what you want to use.
private void AuthCallback(ILoginResult result)
    {
        if (FB.IsLoggedIn)
        {
            // AccessToken class will have session details
            var aToken = Facebook.Unity.AccessToken.CurrentAccessToken;
            // Print current access token's User ID
            Debug.Log(aToken.UserId);
            // Print current access token's granted permissions
            foreach (string perm in aToken.Permissions)
                Debug.Log(perm);
        }
        else
        {
            Debug.Log("User cancelled login");
        }
    }
    public void FacebookLogout()
    {
        FB.LogOut();
    }
And for your profile name, use this function:
public void GetName()
    {
        FB.API("me?fields=name", Facebook.Unity.HttpMethod.GET, delegate (IGraphResult result)
        {
            if (result.ResultDictionary != null)
            {
                foreach (string key in result.ResultDictionary.Keys)
                {
                    Debug.Log(key + " : " + result.ResultDictionary[key].ToString());
                    if (key == "name")
                        btnName.GetComponentInChildren<Text>().text = result.ResultDictionary[key].ToString();
                }
            }
        });
    }
And the last function is the Start function for our buttons:
  void Start()
    {
        btnLogin.onClick.AddListener(() => FacebookLogin());
        btnLogout.onClick.AddListener(() => FacebookLogout());
        btnName.onClick.AddListener(() => GetName());
    }
}
And now our scripts are complete. For a better understanding, you can also see how my entire script looks like (Pictures 12 and 13).
Now start the project. When the Start project button is blue, click on the Login button. Because we are doing this project on a PC, you will receive a warning message.
Don’t panic - your code is correct! But if you want to create another project in Android or iOS, you will see the same warning in the editor, but not on the final build.
So now, we must complete the User Access Token input tab. For this, you must click on the Find Access Token button. Then click on the button on the right of the User Token field, and copy the string and put it in Unity. After this, click on the Send Success button.
Now click on the Name button. The final view should be like Picture 15:
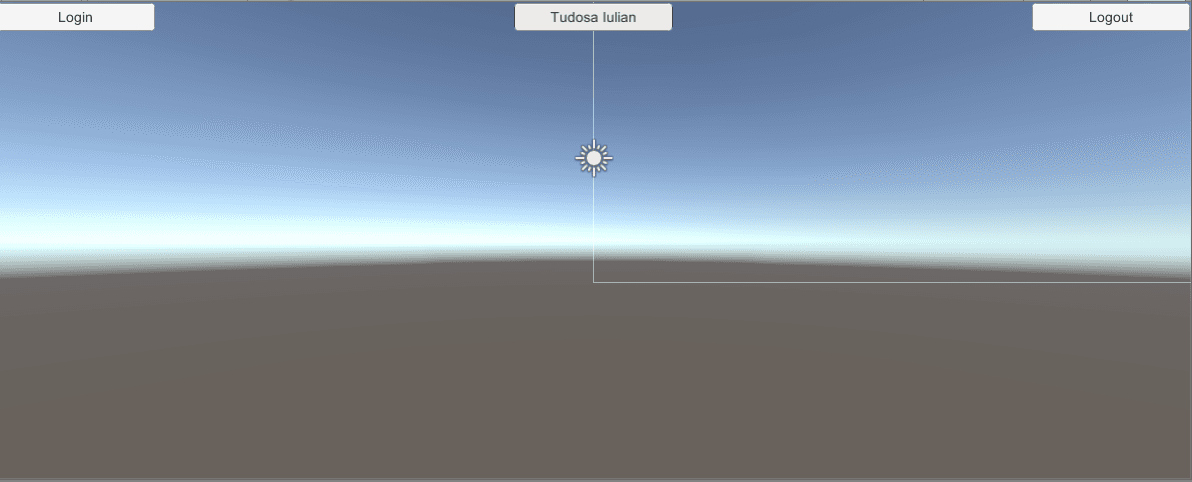
Picture 15
Now you can sleep tonight without any worries. Good job! :)
If you want to learn how to share, invite, get a friends list and much more, subscribe to our YouTube channel and like our Facebook page to keep up with our latest tutorials and company news.
I hope that my article about Unity 3D was useful to you and you enjoyed it!
P.S. In 2019, I will create a series with tutorials about how to create a game in Unity 3D. So, stay tuned!


