
Texturing a CGI stylized character
Date published: August 24, 2020
10 min read
1. Introduction
Creating a CGI character was a new challenge for our Game Development department as we decided to get out of our comfort zone and do something new with the software we use to perform our daily tasks. So, what’s a CGI in the first place if you ask?
CGI is the application of computer graphics that helps you create visual arts like video games, movies, commercials, simulations, and much more. There are many stages involved in creating a CGI character, but I will focus this presentation on the texturing component using two of the most powerful pieces of software in the industry: Photoshop and Substance Painter.
CGI is the application of computer graphics that helps you create visual arts like video games, movies, commercials, simulations, and much more. There are many stages involved in creating a CGI character, but I will focus this presentation on the texturing component using two of the most powerful pieces of software in the industry: Photoshop and Substance Painter.
2. Texturing
Before you can start to work on the textures for your game character, you will have to create a concept. The concept can simply be a pencil sketch on a piece of paper that you can clean afterward in Photoshop, add color to and even create quick variations of. The concept [Fig. 1], was made by our colleague, Andrei Barbă, a 2D Artist.
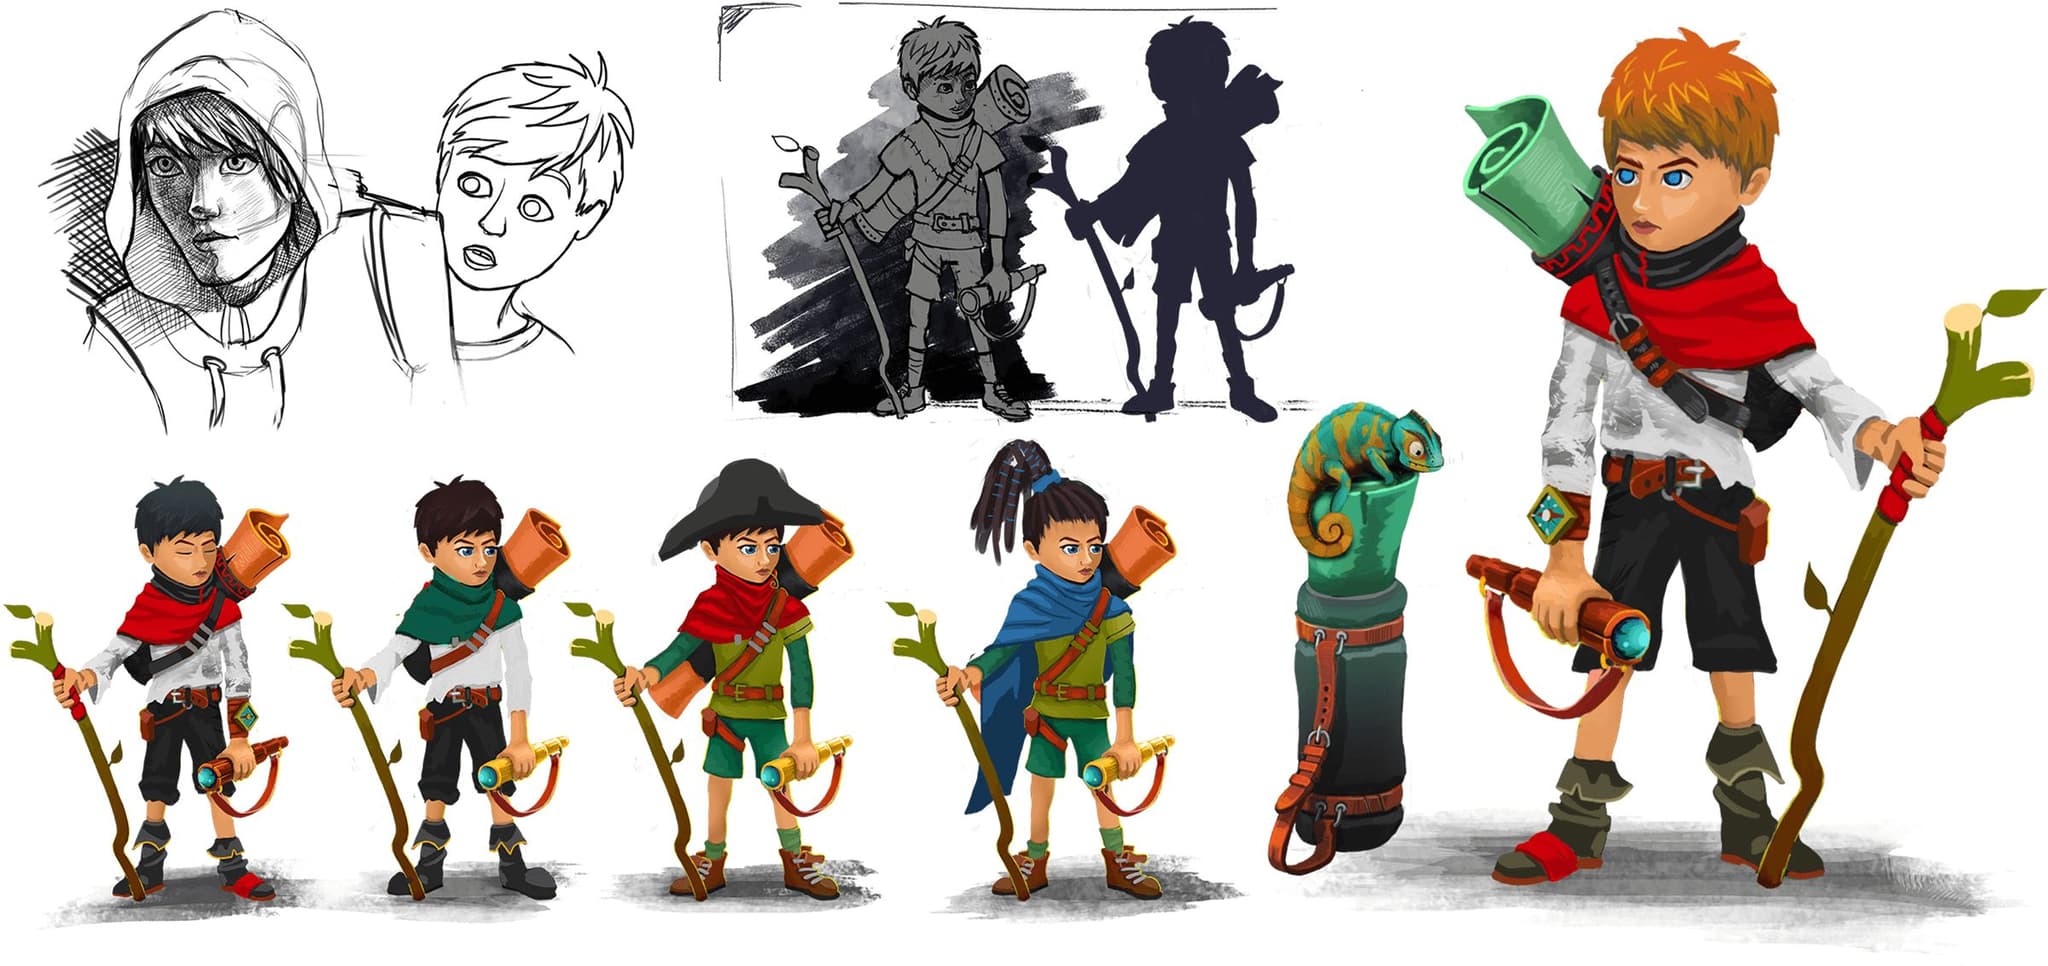
Fig. 1 – 2D concept.
After the concept is finished and approved, you can start to turn it from something imaginary into something real using software that you feel comfortable with. The 3D model was created by Tudor Moldovan, our Art Director, who also baked the input maps and prepared the project so I could start working on it right away. In figures 2 and 3, you can see different stages of the sculpted model in Zbrush and the low-poly model with and without input maps.
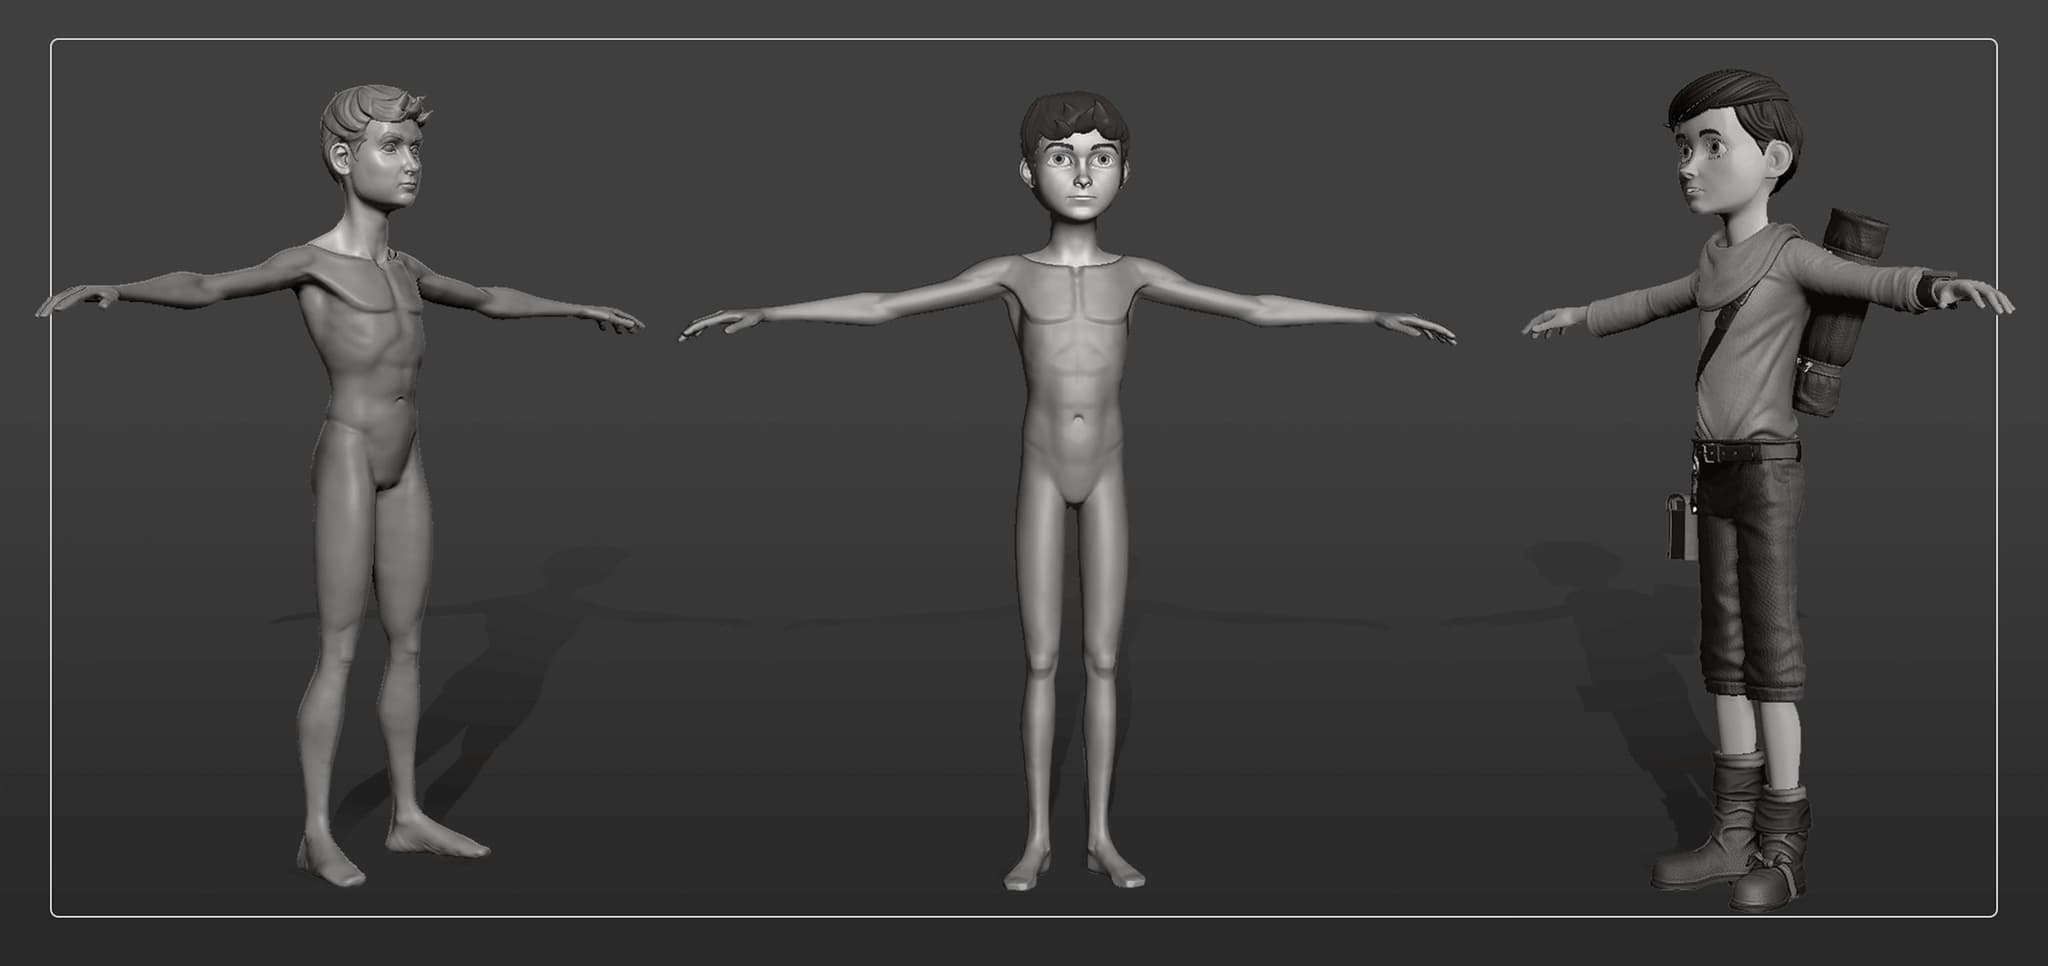
Fig. 2 – High-poly model.
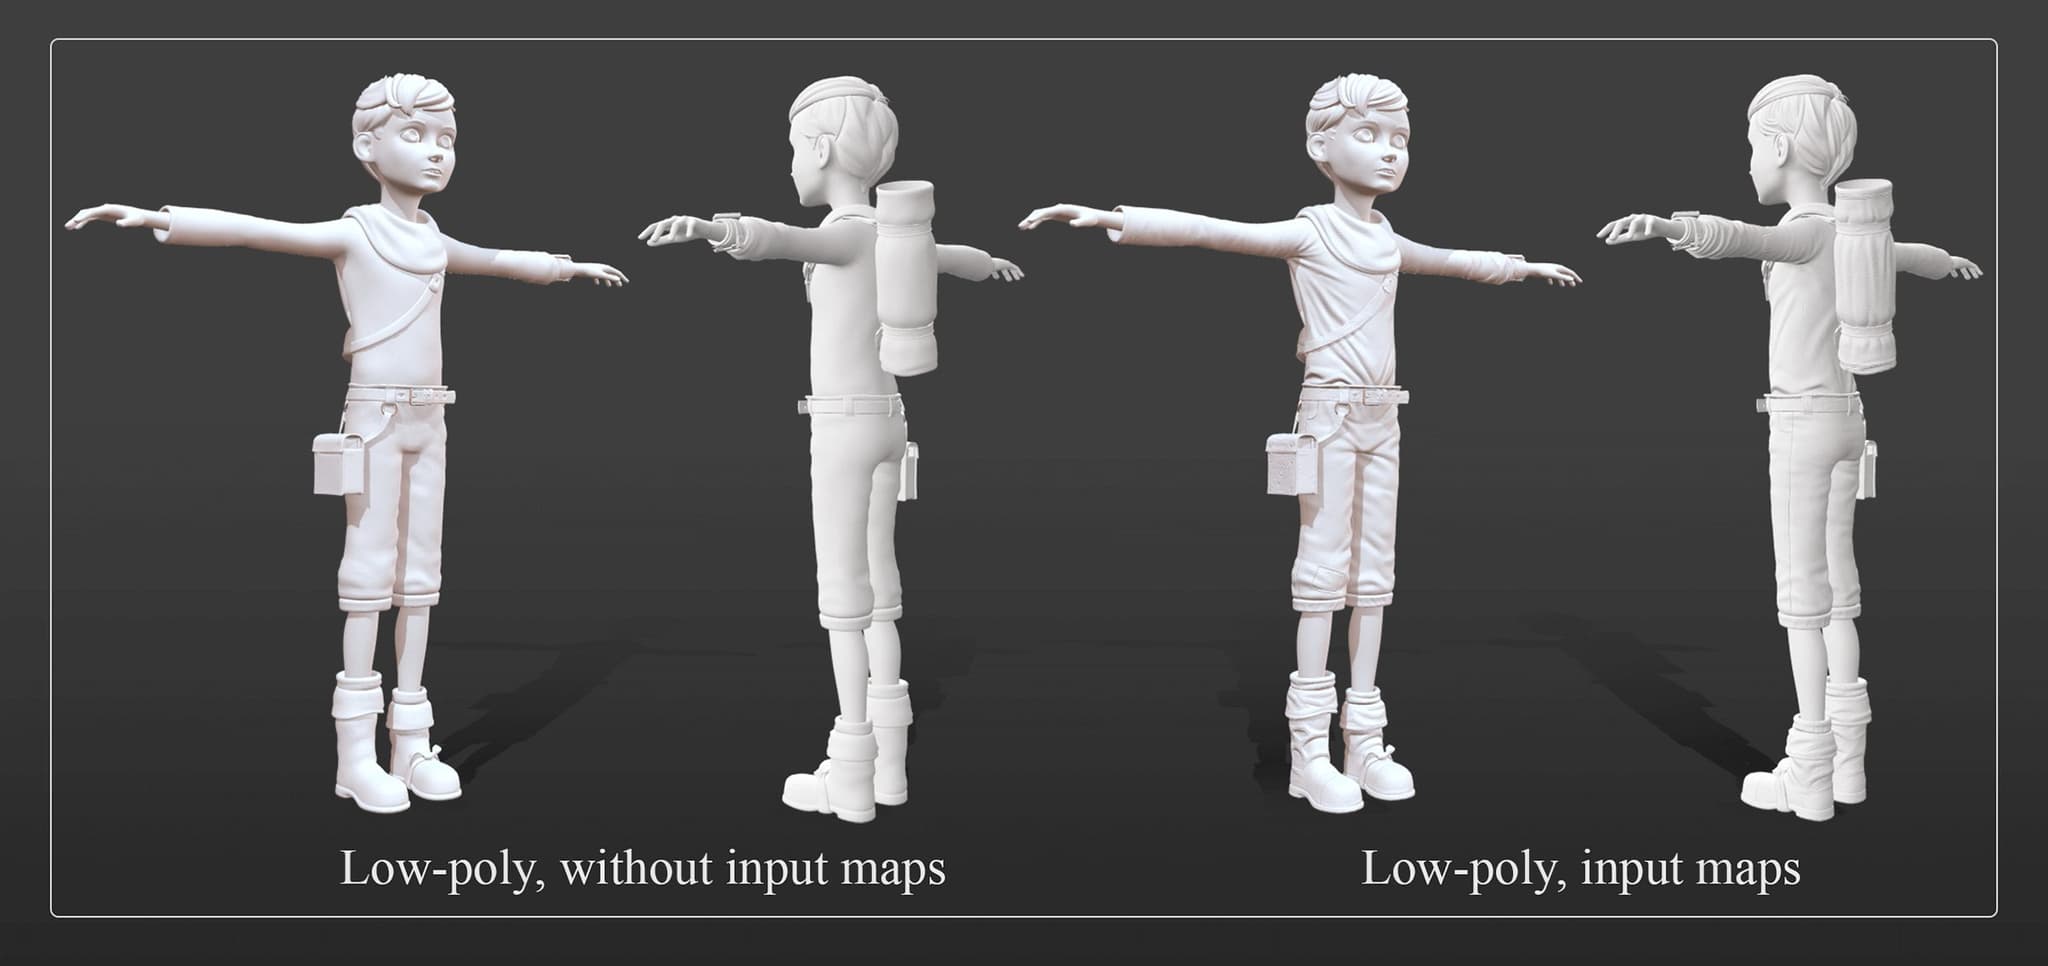
Fig. 3 – Low-poly model, with and without input maps.
For the texturing process, I used Substance Painter, one of the most used and powerful tools in the graphic design industry, and Photoshop to create some fine details, like the hair texture. You can use Substance Painter to create textures for video games, simulations, movies, etc., and the PBR (Physically Based Rendering) is exactly what you need in order to create realistic materials and textures for your game development project.
Basically, texturing has two steps:
1. baking the input maps – you extract from the high-poly mesh a set of textures (normal map, curvature, ambient occlusion, position, thickness) that you will use to add the fine details created to the low-poly mesh;
2. PBR texturing – the physical texturing process.
The process of texturing is rather easy: you start with a base layer that contains the properties of the material that you are trying to create and add different layers where you can change the color, roughness, metallic properties and much more until you achieve the required level of realism. In the next figure [Fig. 4], you can see the 3D model for the game character, with no textures, just with input maps.
In Substance Painter, you have a few default channels, but you can add more from the Texture Set Settings panel. The most commonly used channels are the following:
• Base Color (Albedo) – This contains the information about color (RGB);
• Metallic – This contains information about the metallic properties of an object. If the map is fully covered in white, then you have a material that is 100% made out of metal and will reflect light very easily, but if you have a map covered in black, that means that the material is not made out of metal and will reflect less light, depending on the other properties. The best result would be when you have a balanced map that is not entirely white or black because, in real life, even a new object gets dirty or has impurities that will make it reflect or absorb less light.
• Roughness –This property works in a similar way to the metallic property: if your map is fully white, the object will be very smooth and shiny, and if the map is completely black, the material will be very rough.
• Normal – This channel is used to add details from the high-poly mesh on the low-poly mesh, without using extra polygons;
• Height –With a smaller value, you can obtain some fine details, like small scratches, and with a higher value (positive or negative), you can get some rough details.
The next figure shows the model with all the input maps baked and assigned to the required texture material.
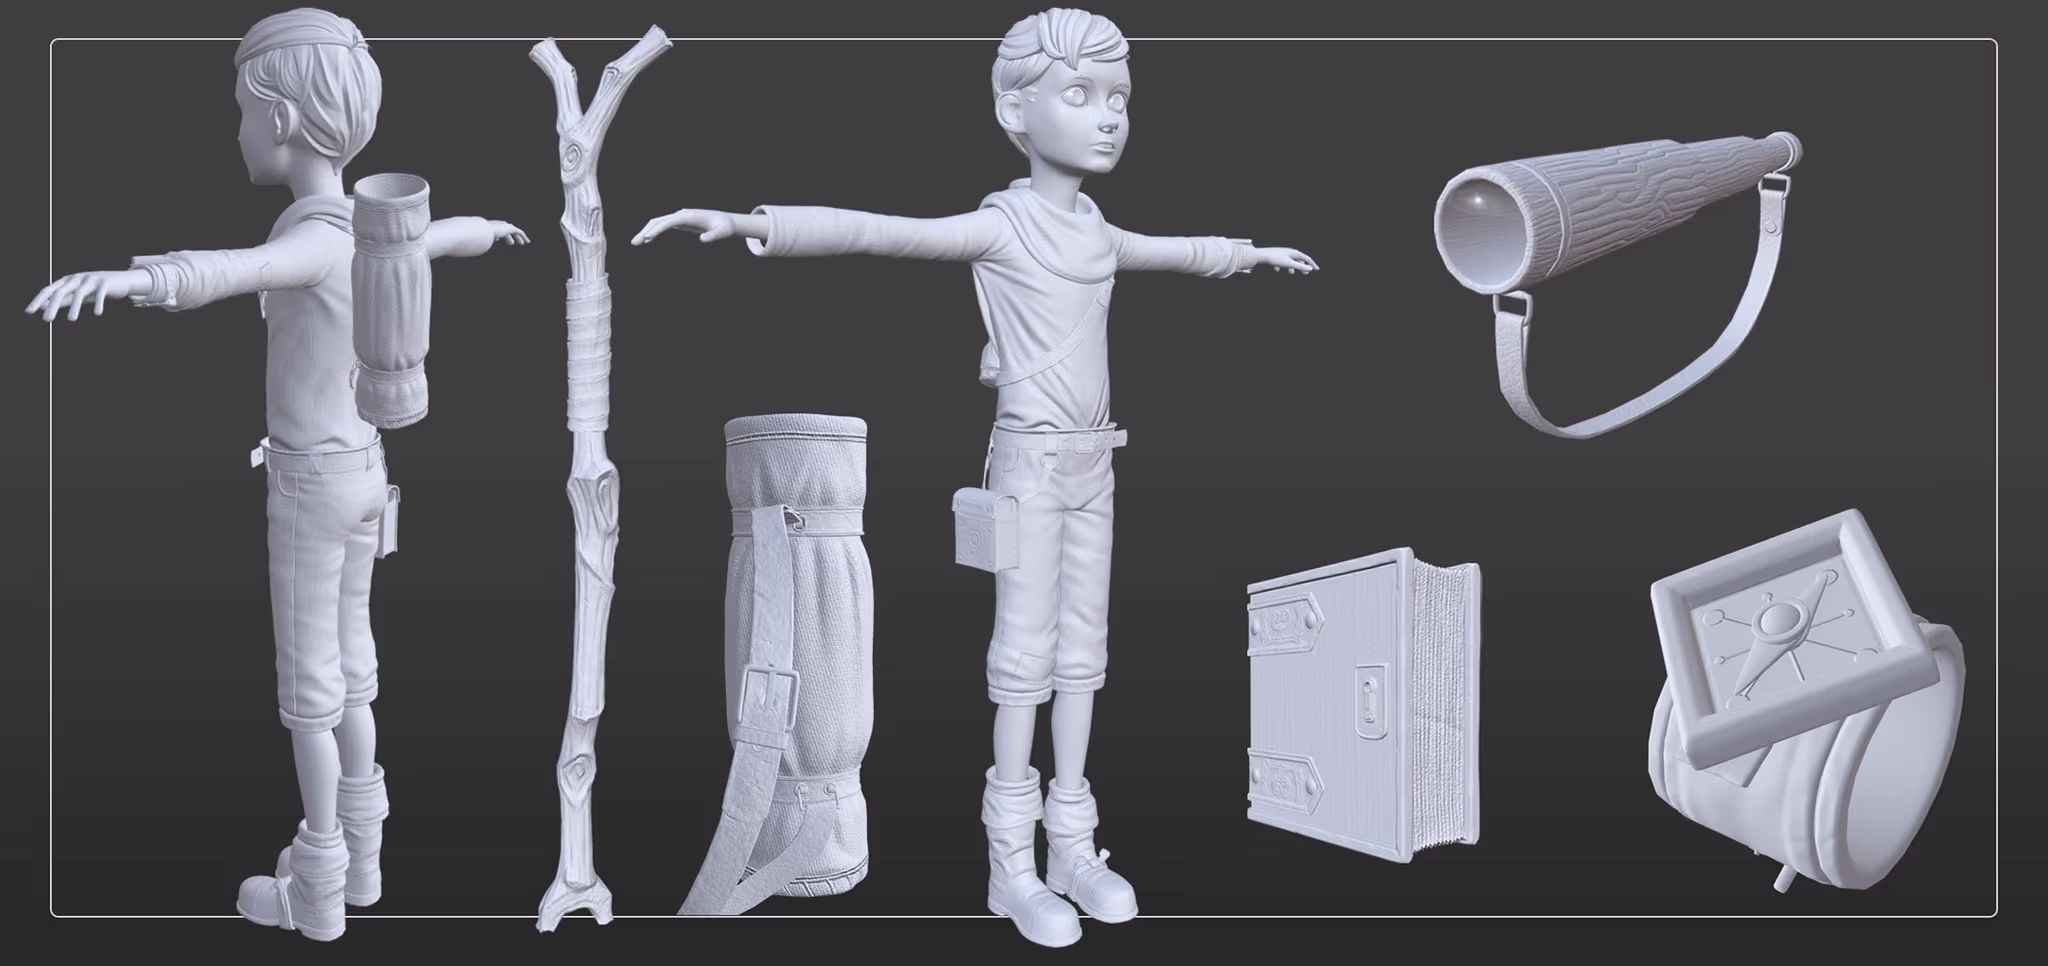
Fig. 4 – 3D Model.
Once the setup was done, I started to get my hands dirty by painting the character. As mentioned before, I added a base layer with the common properties for the skin because the first thing I started to texture was the body. The material used was Human Facial Hair Skin, with a roughness value set at 0.63. After that, I added different fill layers and used masks to add small details, to make it look more realistic. To do that, I chose ratio_fractal_sum_3 and ratio_gaussian_spots_2 on two different layers and used blending modes to get the best result.
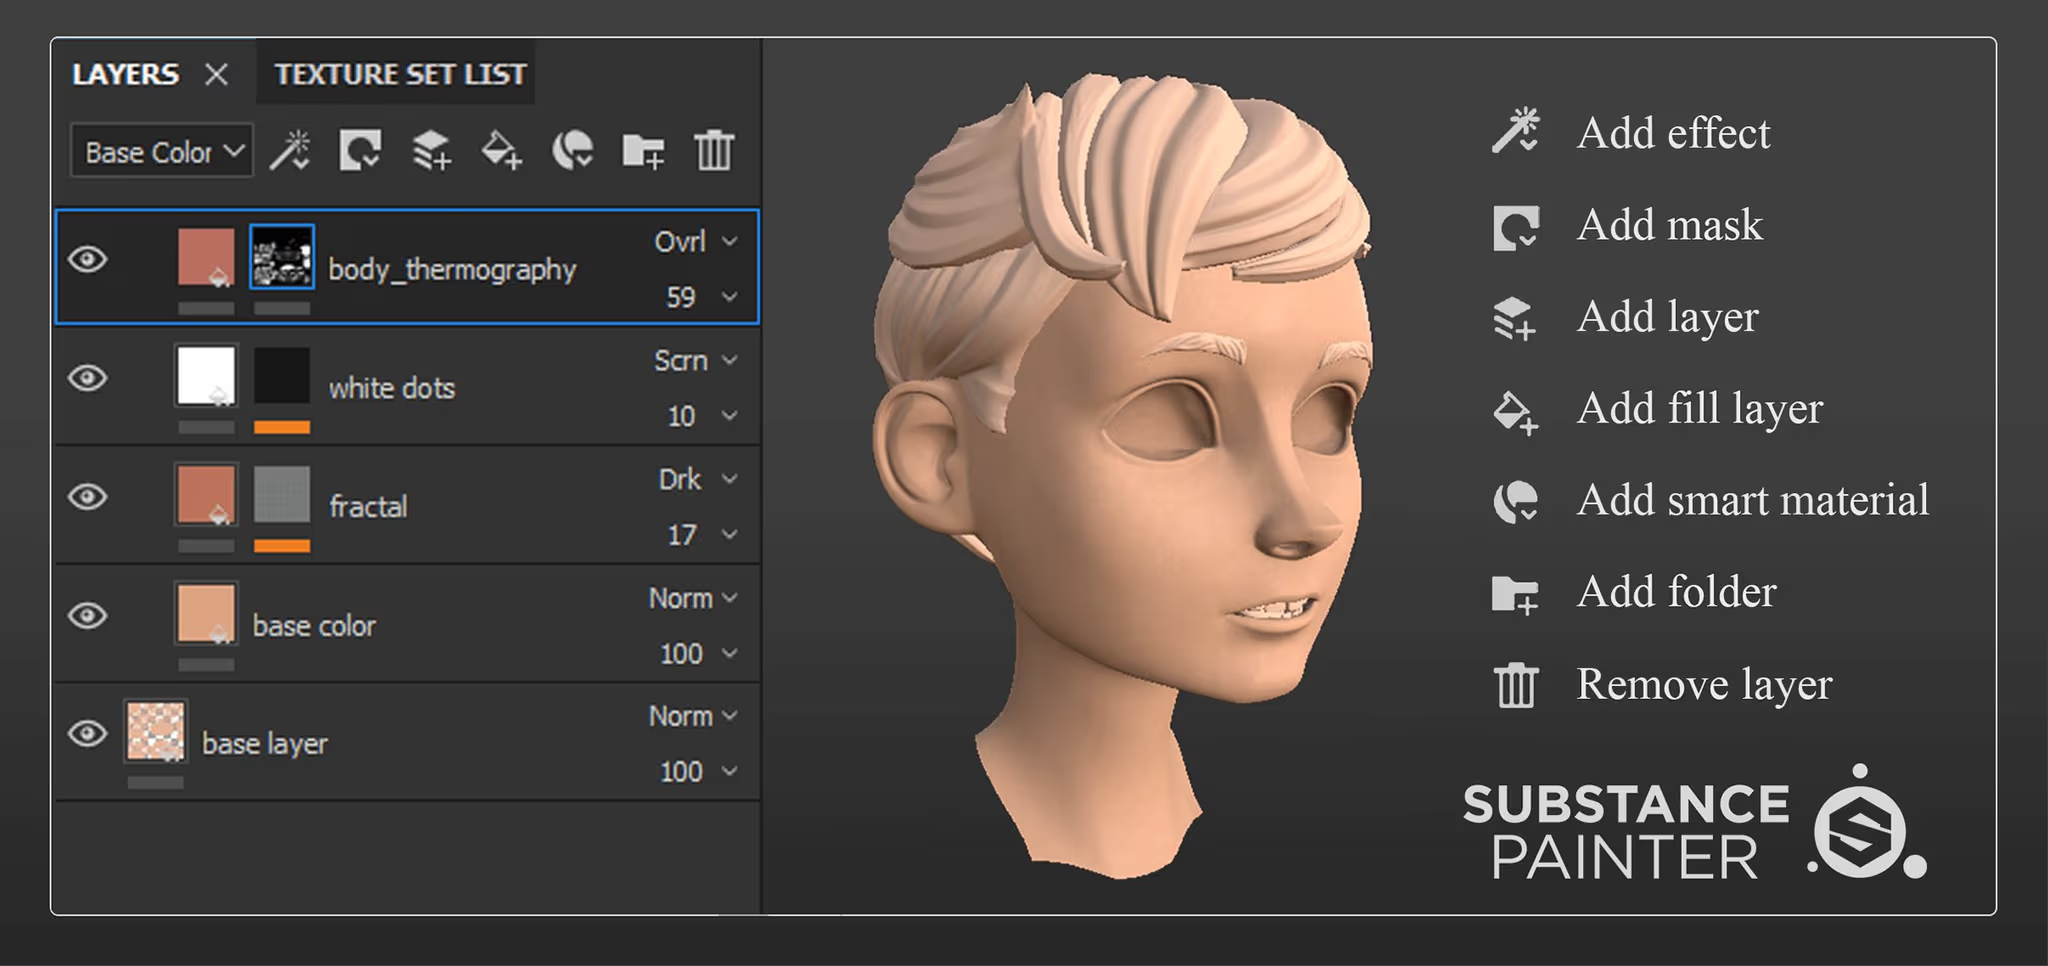
Fig. 5 – Adding layers in Substance Painter.
Now that the model has a basic skin texture, we need to make it look more human by adding some color to indicate good blood flow. This is very easy to do because we can use a simple fill layer with color and roughness channels. Using body thermography and a black mask, I painted with an airbrush some red zones that indicate blood flow. Next, I added some fine details, like freckles, and I experimented with the roughness to add more realism to the texture, for example, to the fingernails and the lips.
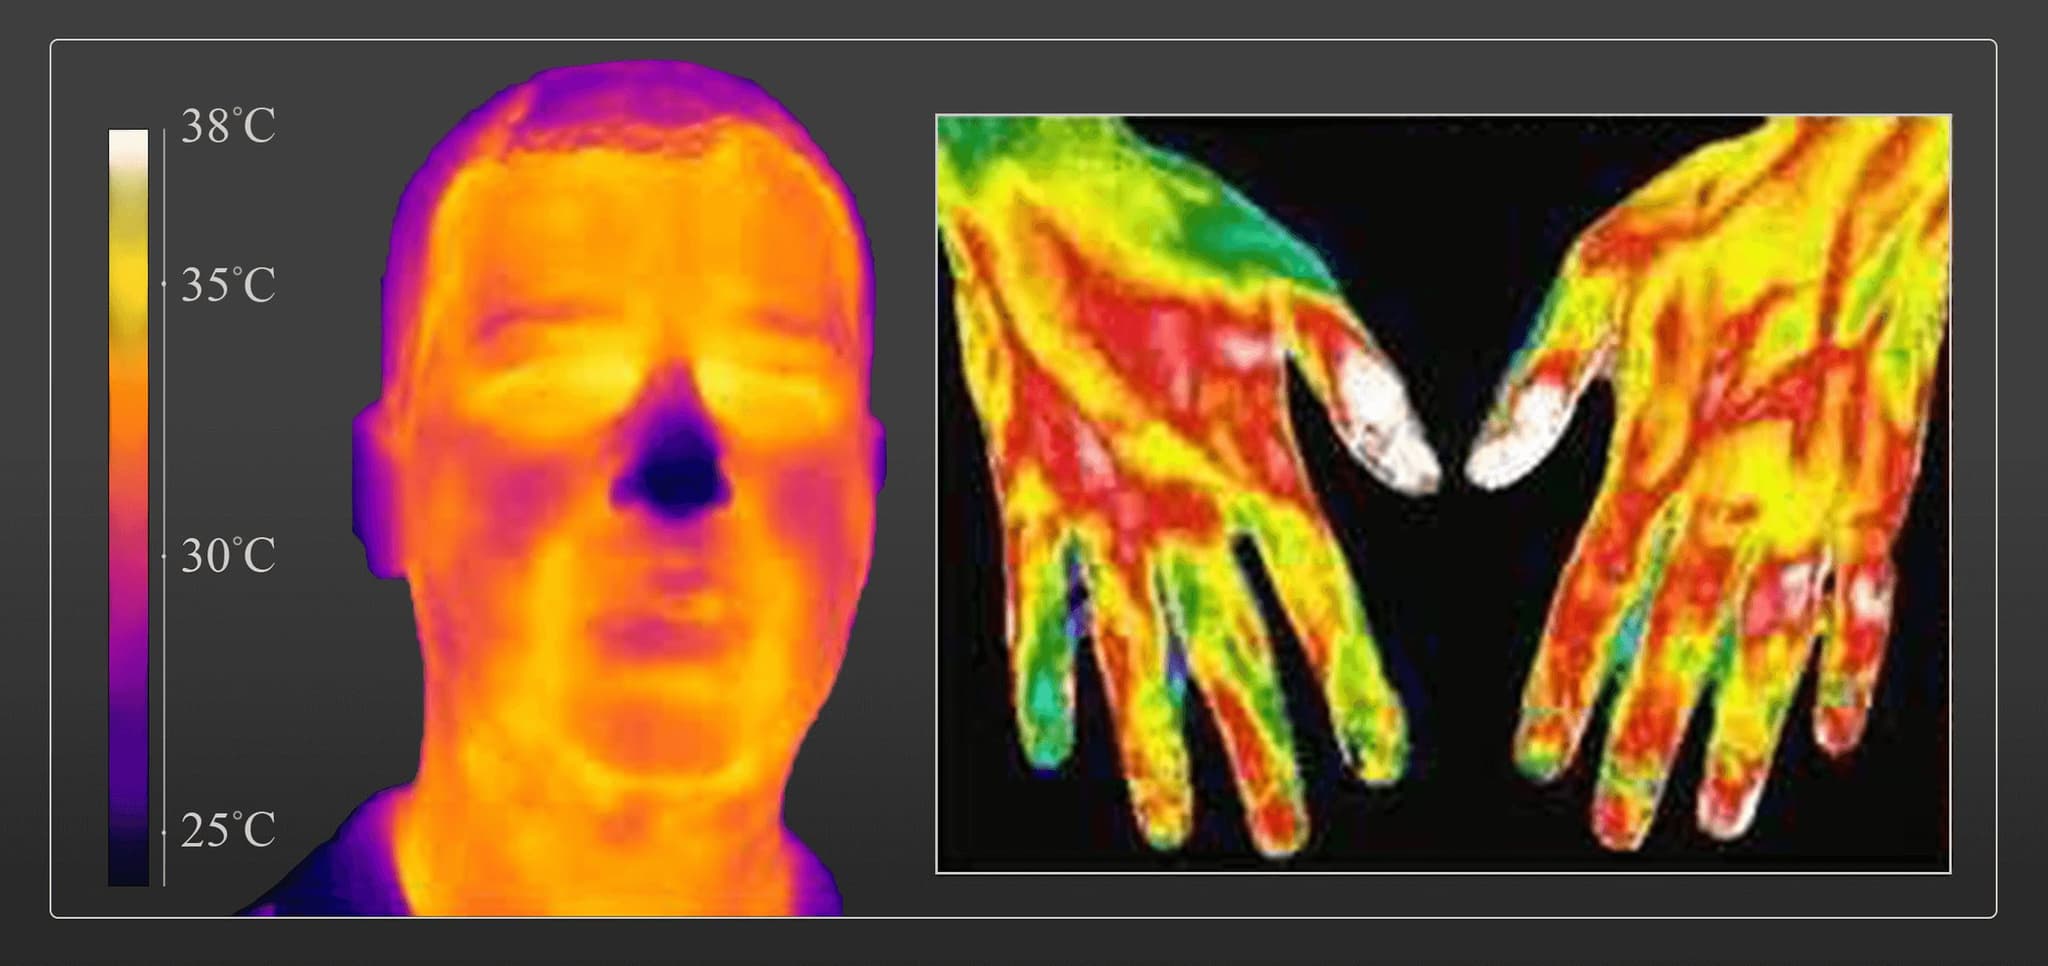
Fig. 6 – Body thermography.
When the skin texture was finished, I started to work on the hair, where I used Photoshop because I found it easier to do such fine details. I used the input maps and the UVW map to guide the highlights and the shadows to the texture. After I hand-painted the hair, I imported the texture in Substance Painter.
In figure 7, you can see the four different channels and their effects on the mesh. You will notice that the metallic channel is black, which means that it is empty because the skin doesn’t contain metallic elements so there was no point in using this channel this time.
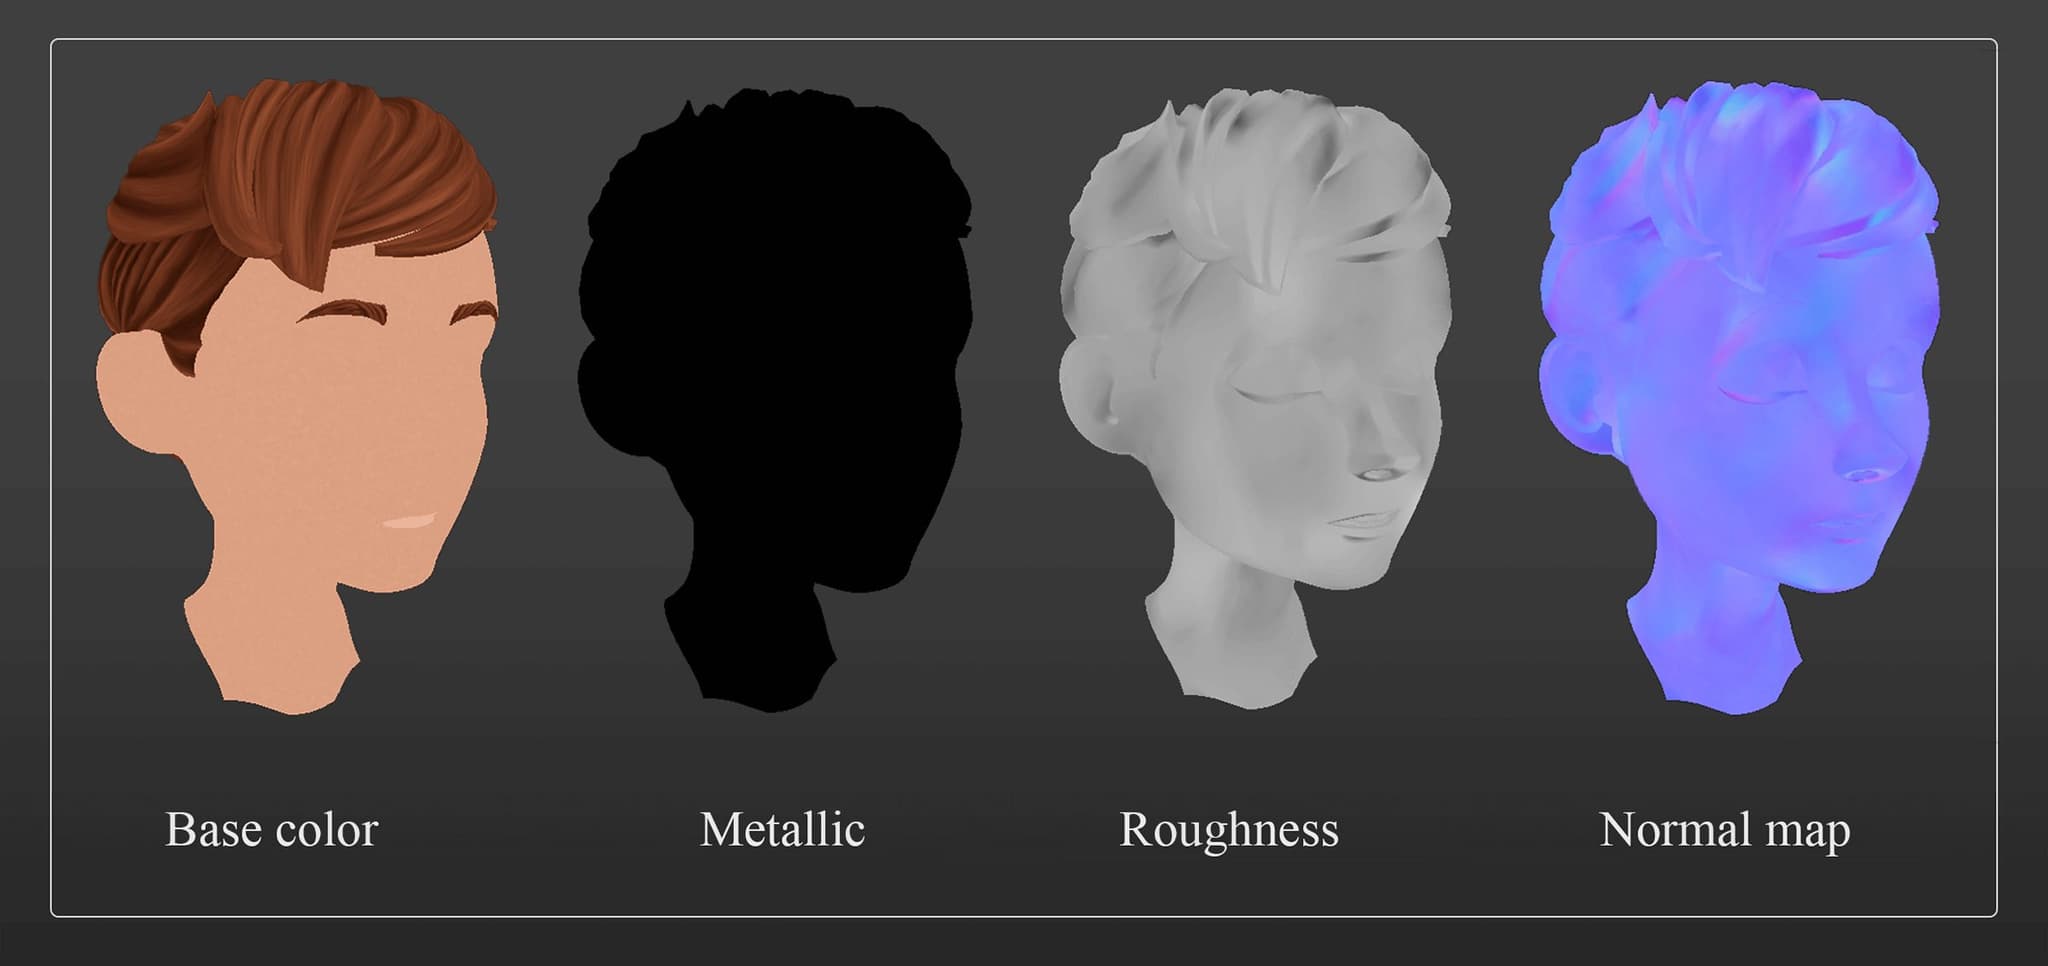
Fig. 7 – Texture channels
After I finished the hair, I started to texture the teeth and the mouth. The teeth were quite easy to bring to the final stage because I just had to use two fill layers, one with the base color and one with some details. The process for the mouth textures was easy as well; I used different grunge maps like ratio_bnw_spots to indicate the color variation and to make the noise as real as possible.
The next step was texturing the eyes to be able to see the whole face of the designed character. The cornea was a simple fill layer where I added two new channels for opacity and reflection. For the eyeball, I used a basic material with the same name, Eyeball, and I experimented with its properties until I got what I wanted. In figure 8, you can see the texture layers I added and the effects they have on the 3D model.
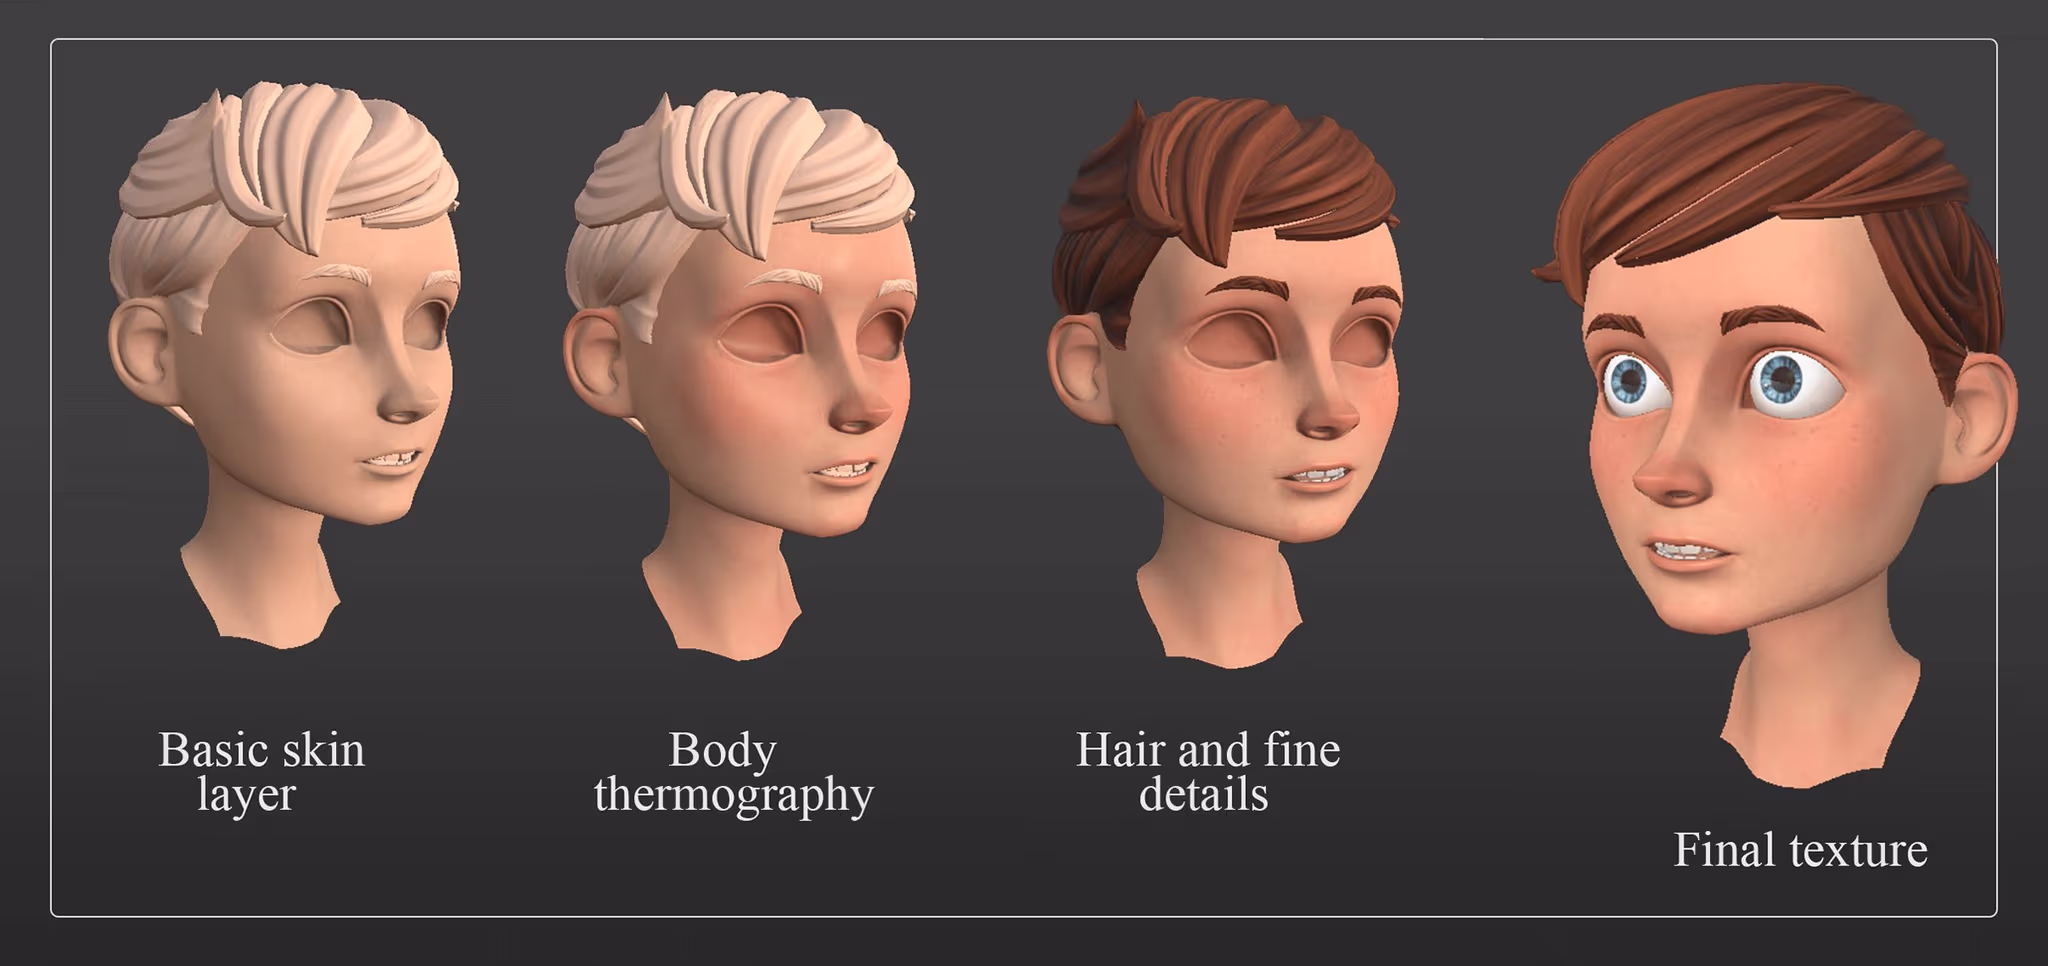
Fig. 8 – Face and hair texture.
Later, I started to work on the clothes and the accessories. His clothes are quite common for a teen and so are the materials. The process was straightforward: I added a base layer for every element created, and with a variety of fill layers and materials, I was able to bring the character very close to the concept. Also, I had to keep in mind that the clothes and accessories were worn rather than new, so I added small elements like patches, stitches, and wear layers in order to show this. In the next image, you can see the final version of the textured clothes and accessories and the basic materials I used.
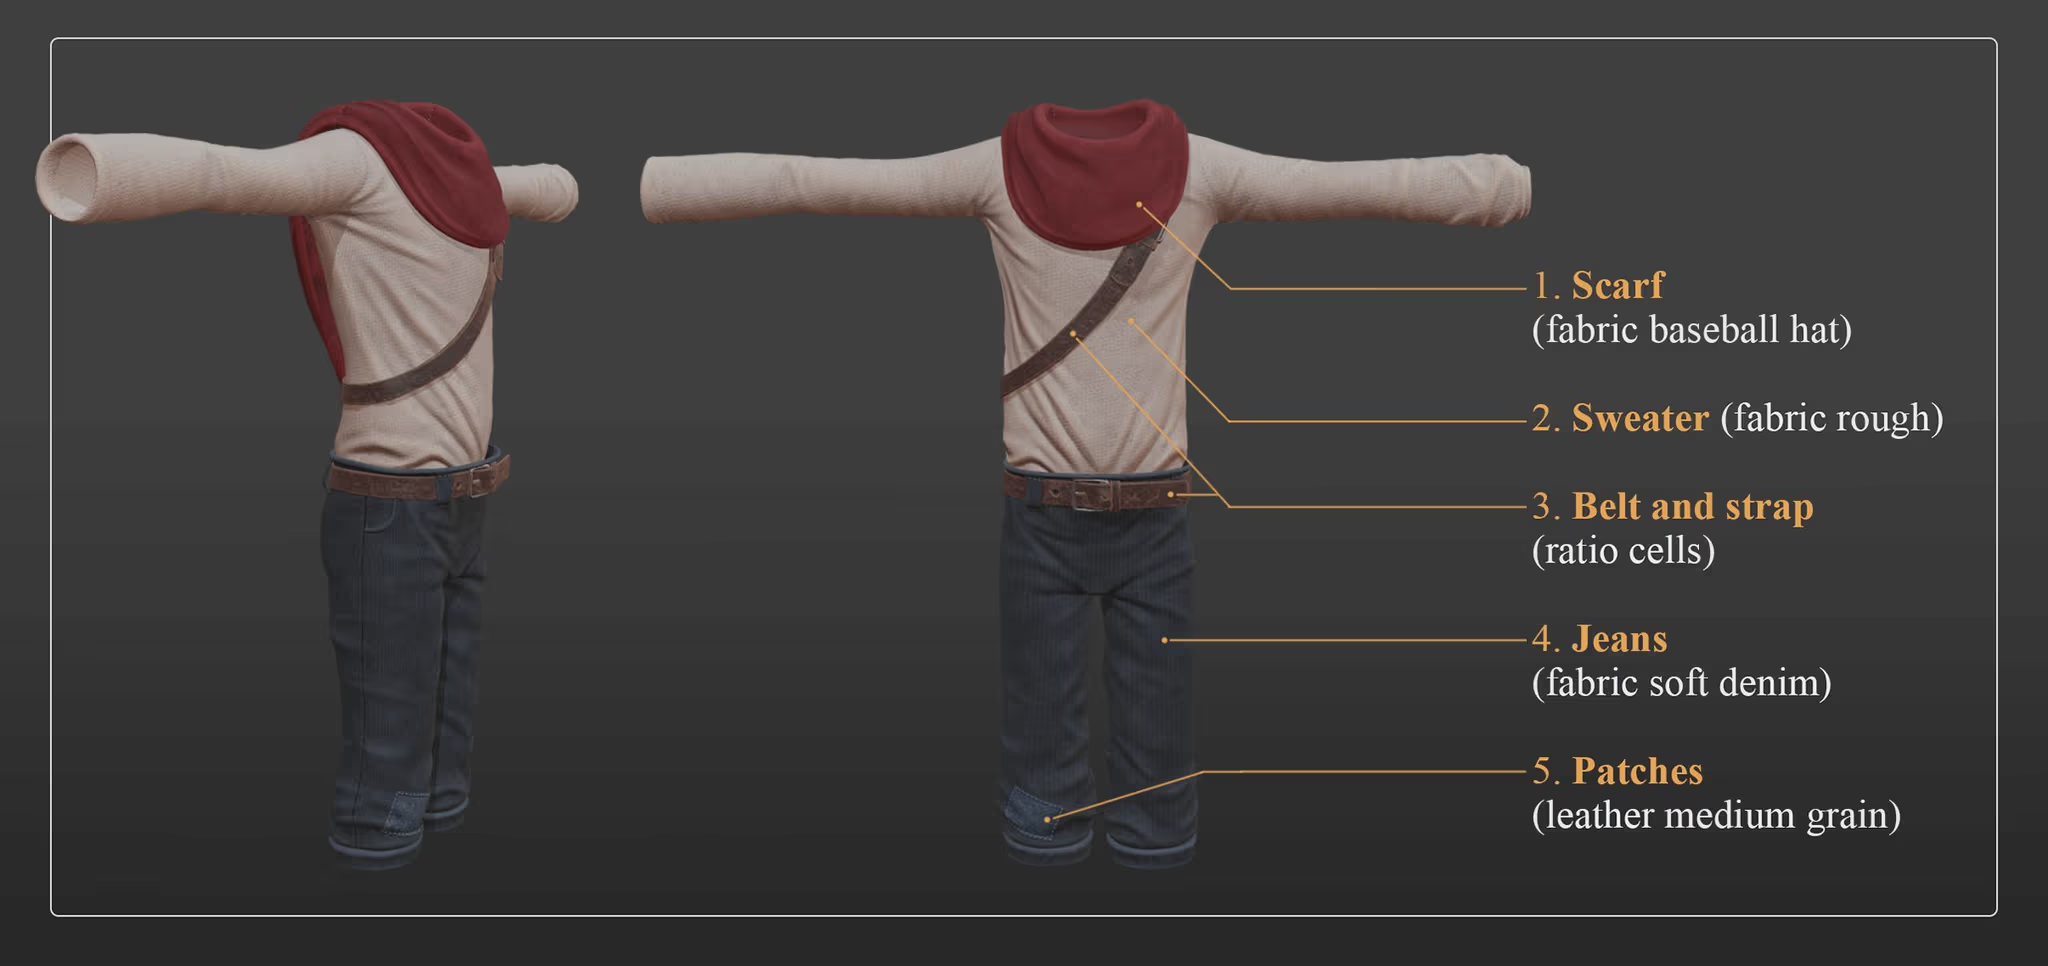
Fig. 9 – Clothing & accessories – material textures.
Now, to give you a spoiler, this kid will be an explorer in the story, so he will need proper accessories to help him on his adventures. I will focus on presenting the texturing process for one element, although all of them are equally important.
In order to create the stick, which can be seen in figure 4, I used a basic material called wood_rough for the first layer and I changed the properties until I was pleased with the result. The mesh was composed of two materials - wood and fabric. I used a white mask for the basic material, and then I selected the fabric area from the UVW map and masked it with black color so that the materials I used on the stick would not apply on it.
Next, I started to work on the details to make it look realistic yet stylized because this is the style we decided to go with. I made a copy of the first material used, I changed its color into a brighter and more vibrant one to get more variation, and after that, I used a black mask and mg_mask_editor to use the selected layer as the edge color. Additionally, I added more edge wear layers with different colors, which made the material look more real.
When I finished the wood layer, I placed a mask on it and then I inverted the mask from the previous material. To create the fabric material, I placed a basic material, fabric_rough, on the object and then I added edge wear layers and dirt to make the material look used. Finally, I added a new channel, Emissive, and I began to paint the areas where the light will come from because the character will use this stick to protect and guide himself through dark areas, such as caves and at night. In the next figure, you can see the order in which I added the materials and the final result.
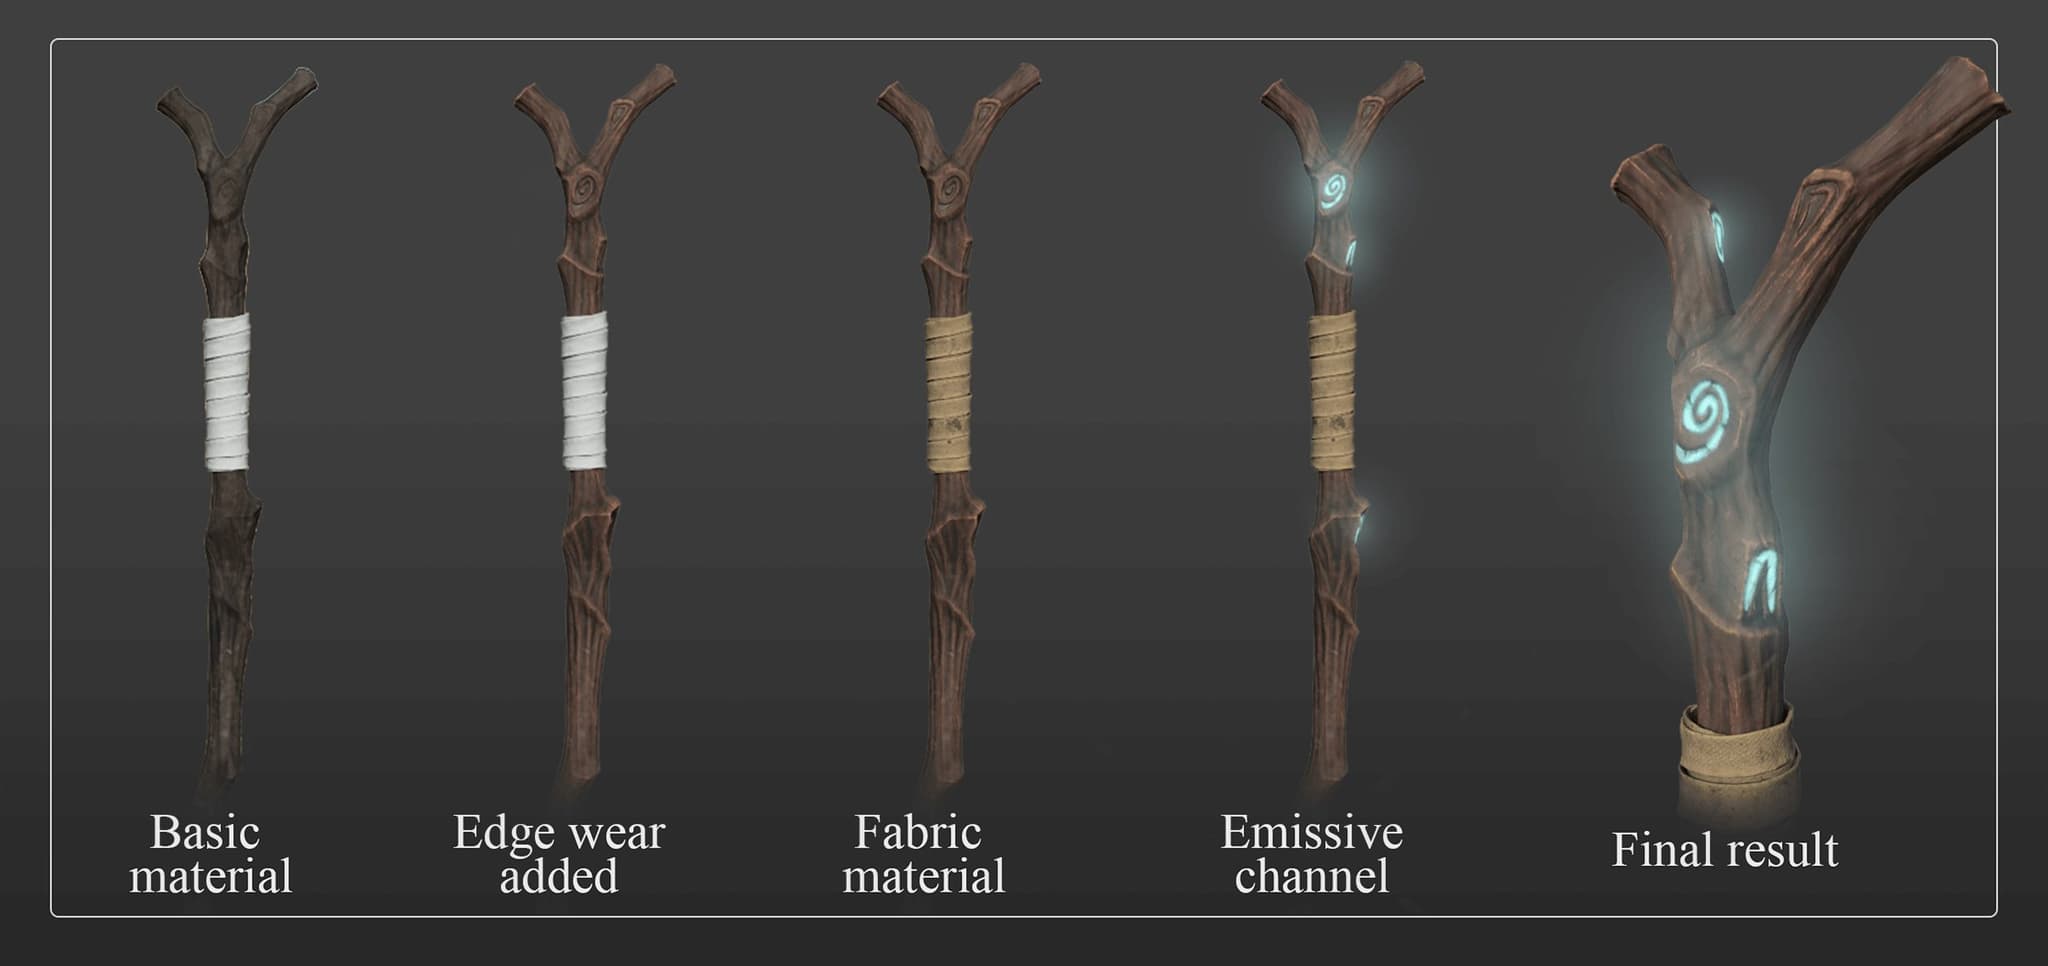
Fig. 10 – Textured accessory
For the rest of the accessories, the process was the same: start with a basic layer and then add fill layers, generators, masks and more to finish the textures.
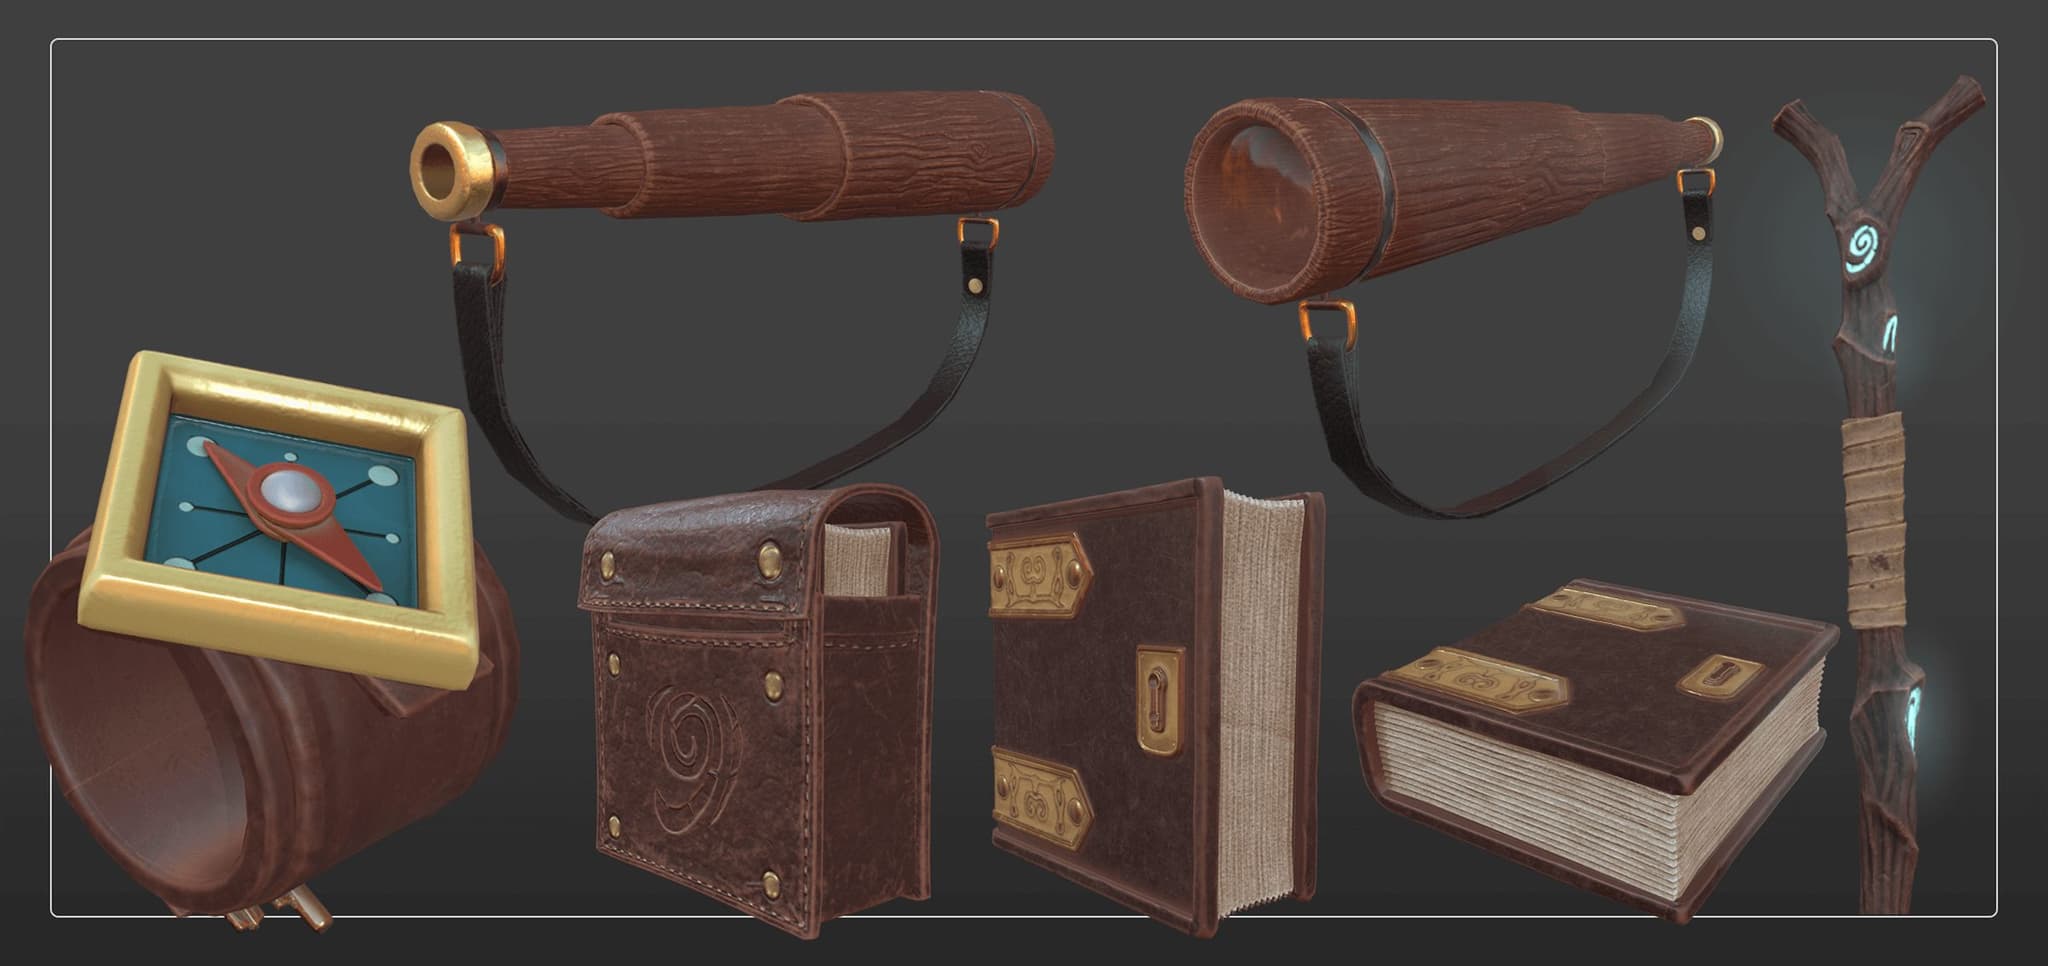
Fig. 11 – Textured accessories.
3. Conclusion
Substance Painter is a great piece of software that will take your assets and graphic design projects to another level and the good part is that it is very easy to use and fun, adding layers of information and manipulating the material properties until you get the result that you need.
The challenge was to keep the character stylized because this type of art was new to me. From the concept phase, the character went through different stages of stylization. For example, as you saw in figure 1, the concept was highly stylized with a vibrant color palette and stylized materials to have a good view of the shapes and silhouette. In the modeling phase, it went through the most changes and was transformed from a very stylized character into a stylized model with realistic proportions and shapes.
In the final phase, texturing, I had to use different materials and experiment with their properties until I found a balance between stylization and realism. To do so, I had to keep the materials as clean as possible and not use too many details so that I wouldn’t take the attention away from the shapes and silhouette. Also, the color palette is close to the concept, yet less vibrant to create a realistic vibe.
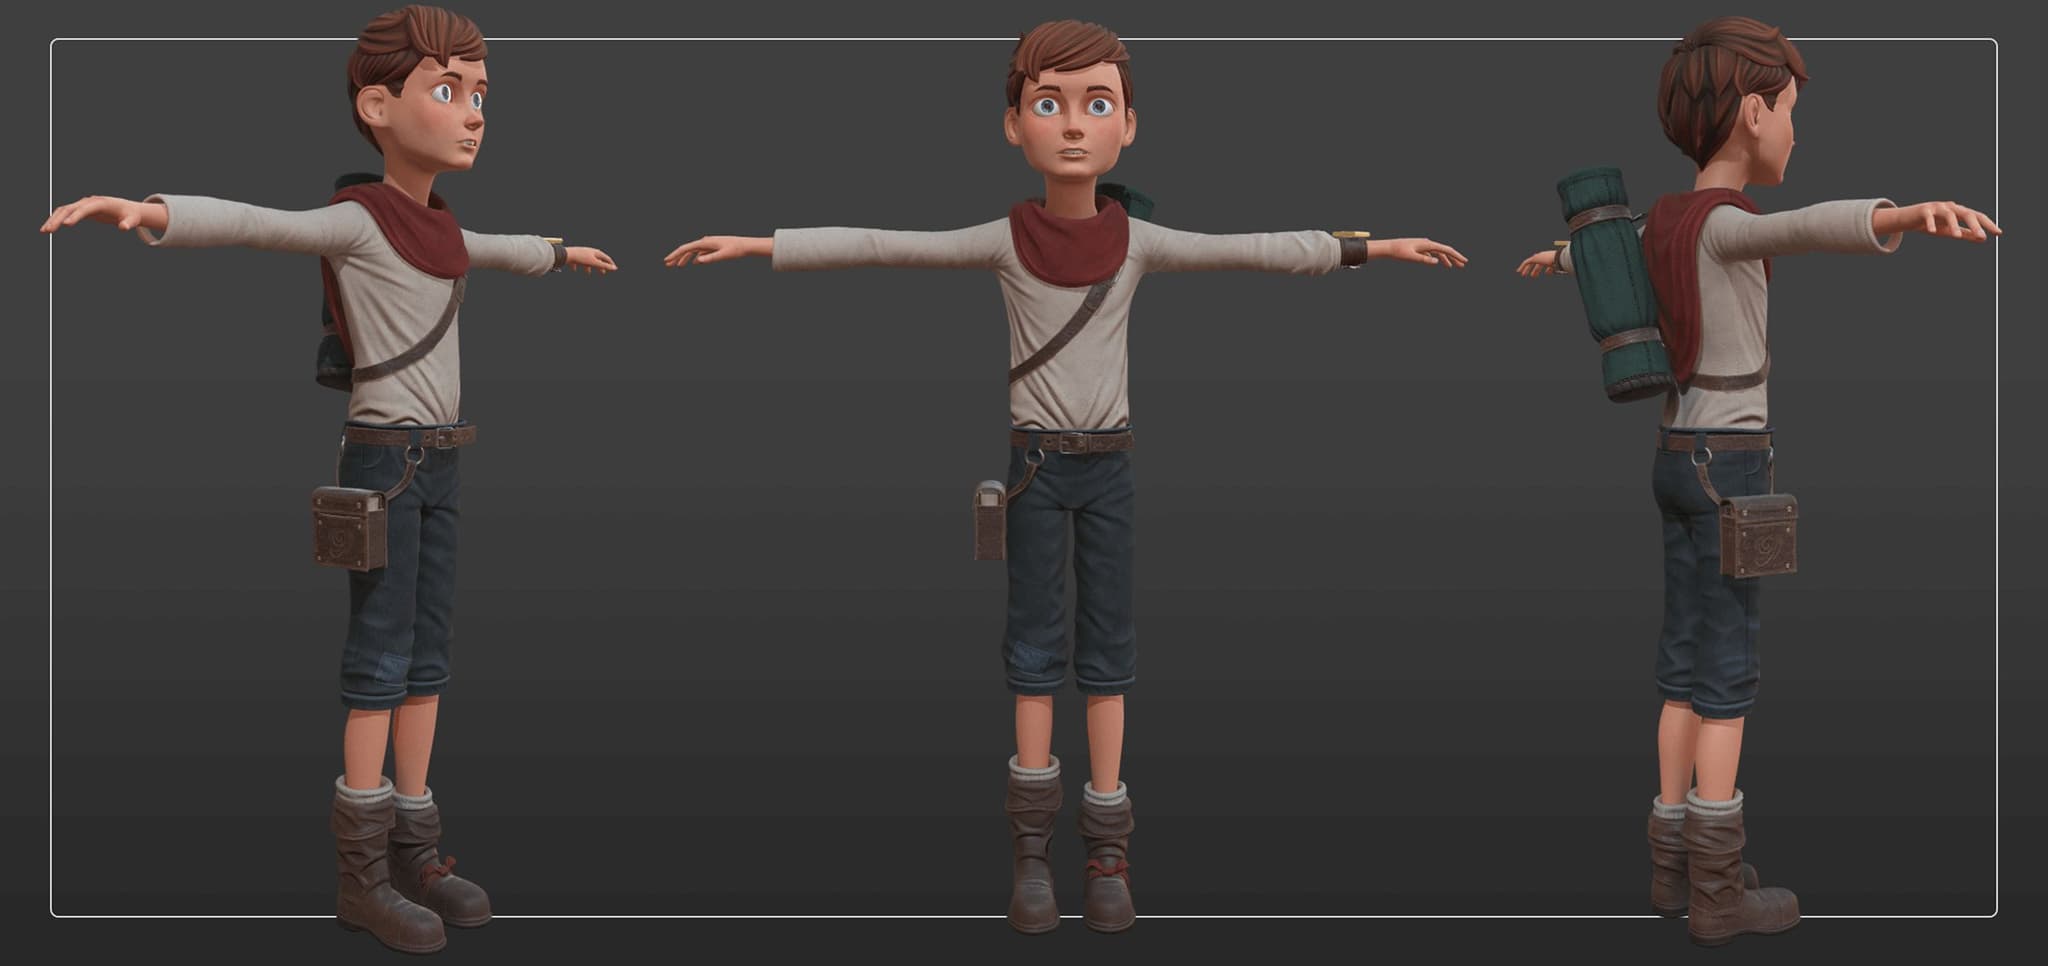
Fig. 12 – Stylized Character.
I learned a lot in the process of texturing this game character and I hope you found this article useful. If you want to find more about our projects, CGI, and game development, please read the following articles:


