
When do you stop using someone else’s library and start making your own

Everyone loves libraries; it’s nice to type a few lines and expect a lot of functionality that is tested and works out of the box, but that is not always the case. My view is that every piece of code has bugs; whether or not they are revealed just depends on the environment they are used in.
While working on a long-term angular project, I ended up needing a few libraries and occasionally they would require hacking to work as needed. Seeing libraries that would just refuse to work or had some annoying bugs, I started thinking more and more often, “do I really need a library for this?”.
I needed a datepicker that had “ok” and “cancel” buttons. The “ok” button would insert the date and the “cancel” button would not change the input field. Also the datepicker’s window would only close upon pressing the “ok”/“cancel” buttons and ignore any click state outside of it. As always there was a custom design. Now I had the option to take an already made datepicker about which I had no assurance that the css could be easily adjusted to the design, and it would have all the aforementioned functionality, or start making my own component.
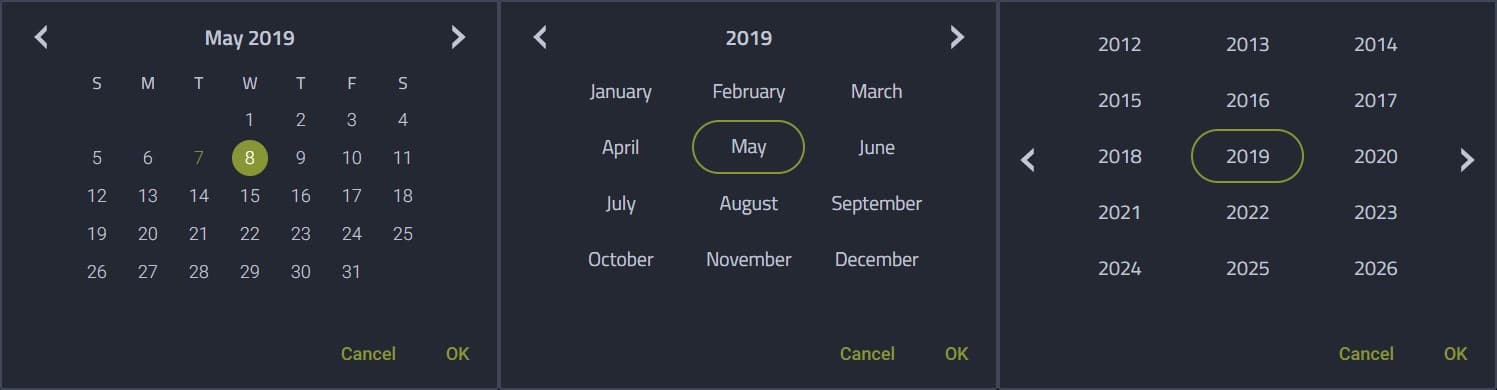
The decision had to take into account the amount of time and effort spent on implementation. Not having made anything similar in the past and being curious, I chose moment.js (yes, I know it’s a library but this one is just too good to ignore) to handle validation, formatting and anything date related, after which I started to build my own datepicker.
The only thing that I wasn’t sure how to do was getting the days of the week, like which day of the week is the first day of the month, but by using moment.js, I was able to accomplish just that.
 class datePicker {

   public dates = {
       dayName: ['S', 'M', 'T', 'W', 'T', 'F', 'S'],
       monthsOfYear: [],
       nrOfYears: [],
       dayWeekData: [],
       currentMonth: '',
       currentYear: ''
   };
   public inputDate;
   private selectedDate = '';
   private currentDay = moment(new Date(), 'MM/DD/YYYY', true)
       .format('MM/DD/YYYY');

   constructor() {
       this.inputDate = moment(new Date(), 'MM/DD/YYYY', true);
       this.selectedDate = this.inputDate.format('MM/DD/YYYY');
       this.dates.currentMonth = this.inputDate.format('MMMM');
       this.dates.currentYear = this.inputDate.format('YYYY');
       this.makeYears(parseInt(this.dates.currentYear, 10) - 7);
       this.makeMonthOfYear(0);
       this.makePickerData();
   }

   makePickerData() {
       const monthData = [];
       const correctMonth = this.inputDate.month() + 1;
       const totalDaysInMonth = this.inputDate.daysInMonth();
       const thisYear = this.inputDate.format('YYYY');
       for (let i = 1; i <= totalDaysInMonth; i++) {
           const dayDate = ((correctMonth.toString(10).length === 1)
               ? ('0' + correctMonth) : correctMonth)
               + '/' + ((i.toString(10).length === 1) ? ('0' + i) : i)
               + '/' + thisYear;
           const dayWeek = moment(dayDate, 'MM/DD/YYYY', true).weekday();
           monthData.push({
               dayNR: i, date: dayDate, dayOfWeek: dayWeek,
               defaultDay: (this.currentDay === dayDate),
               Selected: (this.selectedDate === dayDate)
           });
       }
       this.dates.dayWeekData = [];
       this.makeDaysOfMonth(monthData);
   }

   makeDaysOfMonth(monthData) {
       const tempWeek = [];
       for (let i = 0; i <= 6; i++) {
           if ((monthData.length !== 0) &&
               (monthData[0].dayOfWeek === i)) {
               tempWeek.push(monthData[0]);
               monthData.shift();
           } else {
               tempWeek.push({ date: '' });
           }
       }
       this.dates.dayWeekData.push(tempWeek);
       if (monthData.length !== 0) {
           this.makeDaysOfMonth(monthData);
       }
   }

   makeMonthOfYear(monthNR) {
       const setOfMonths = [];
       for (let i = 0; i <= 2; i++) {
           setOfMonths.push({
               name: moment(this.selectedDate, 'MM/DD/YYYY', true)
                   .month(monthNR + i).format('MMMM'),
               nr: monthNR + i,
               Selected:
                   ((moment(this.selectedDate, 'MM/DD/YYYY', true)
                       .month(monthNR + i).format('MMMM') ===
                       moment(this.selectedDate, 'MM/DD/YYYY', true)
                           .format('MMMM')) &&
                       (moment(this.selectedDate, 'MM/DD/YYYY', true)
                           .format('YYYY') === this.dates.currentYear))
           });
       }
       this.dates.monthsOfYear.push(setOfMonths);
       monthNR += 3;
       if (monthNR <= 11) {
           this.makeMonthOfYear(monthNR);
       }
   }

   makeYears(year) {
       const setOfYears = [];
       for (let i = 0; i <= 2; i++) {
           setOfYears.push({
               name: moment(this.selectedDate, 'MM/DD/YYYY', true)
                   .year(year + i).format('YYYY'),
               Selected: (moment(this.selectedDate, 'MM/DD/YYYY', true)
                   .format('YYYY') ===
                   moment(this.selectedDate, 'MM/DD/YYYY', true)
                       .year(year + i).format('YYYY'))
           });
       }
       this.dates.nrOfYears.push(setOfYears);
       year += 3;
       if (year <= parseInt(this.dates.currentYear, 10) + 7) {
           this.makeYears(year);
       }
   }
}
Moment.js outputs the number of days in a given month and the day of the week for each day in each month. Having built all data for days, months and years, everything else is just *ngFor statements and css.
Selecting the day, month or year and the rest of the buttons are no big deal either and making the data to be displayed is just a call away with the above functions. Checking whether the date in the input field is a valid format is extremely simple using the isValid function from moment.js.
Another example is a “stepper”, which is a series of screens that you would navigate using “back” and “next” buttons, with an indicator at the top for displaying the current step, completed steps and remaining steps.
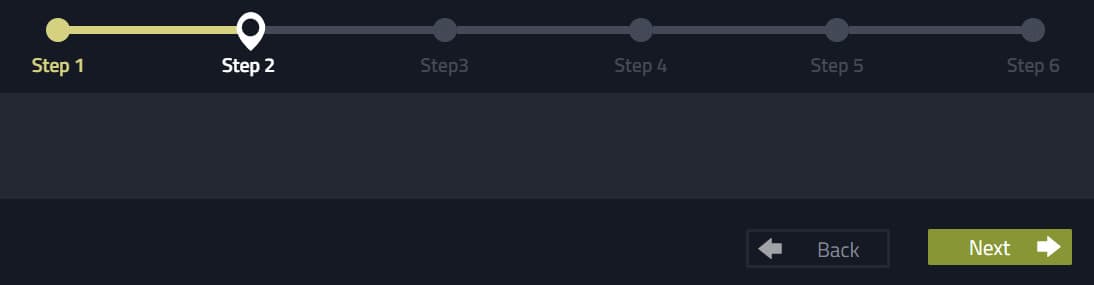
Sounds simple, right? Well, it should have been, but we got mixed up with the “stepper” from angular material, which at the moment of implementation was quite beta (angular 4 environments).
Long story short, there was hacking involved to achieve the desired result. So let’s think a bit on what a stepper should be… basically, we need an integer to hold our current step and a component that displays the steps (the steps should be generated in a function to make the “stepper” dynamic so we can show as many steps as needed); since we used angular, some simple *ngIf statements to show/hide our content based on the current step is about all that is needed.
Below is a simple proof of concept in “vanilla JS” for the “stepper”.
let currentStep = 1;
const inputValue = 5;
function GettingStarted() {
   const theContainer = document
       .getElementById('stepperContainer');
   let theContent = '';
   for (i = 1; i <= inputValue; i++) {
       theContent += `<div class="stepDot" data-step="`
           + i + `" data-dot="yes"></div>`;
       theContent += (i < inputValue) ?
           `<div class="conectingLine" data-step="`
           + (i + 1) + `" data-dot="no"></div>` : '';
   }
   theContent += '<div id="checkedIcon">✅</div>'
   theContainer.innerHTML = theContent;
   checkStepper();
}

function nextStep() {
   currentStep = (currentStep === inputValue) ?
       currentStep : (currentStep + 1);
}

function backStep() {
   currentStep = (currentStep === 1) ?
       currentStep : (currentStep - 1);
}

function checkStepper() {
   const theContainer = document
       .getElementById('stepperContainer');
   const theIcon = document.getElementById('checkedIcon');
   const childrenOfContainer = theContainer.children;
   for (i = 0; i < (childrenOfContainer.length - 1); i++) {
       const selectedChild = childrenOfContainer.item(i);
       const childStepValue = parseInt(selectedChild
           .attributes.getNamedItem('data-step').value);
       const childDotValue = selectedChild
           .attributes.getNamedItem('data-dot').value;
       if (childStepValue > currentStep) {
           selectedChild.classList.remove('checkedStep');
       } else {
           selectedChild.classList.add('checkedStep');
       }
       if ((childStepValue === currentStep) &&
           (childDotValue === 'yes')) {
           theIcon.style.left = selectedChild.offsetLeft;
       }
   }
   setTimeout(() => {
       checkStepper();
   }, 100);
}
There are more examples that I could write about, but hopefully, you get the idea and I just wanted to show that sometimes the best solution is to just write your own code; I think it’s much more satisfying to have built something rather than to just copy-paste code.


