I. Introduction to Redux
Redux is a library that works great with single page applications. It is often used with React because they go together very well, but it is also compatible with other frameworks such as Angular.
When using React, different parts of a project are split into components. Each component has its own information and data in memory, called State. Regardless of the complexity of the application, the architecture is always the same.
II. Architecture
A React application is broken up into components. These are parts of the application and each of them has some data in their memory, which is called state. The responsibility of the state is to store data, which will be used by the component to display information.
II.1 Store
With the help of Redux, you can centralize the data into a single JavaScript Object, which will manage the data in a better way. Redux has a store and its data can be reused in many components.
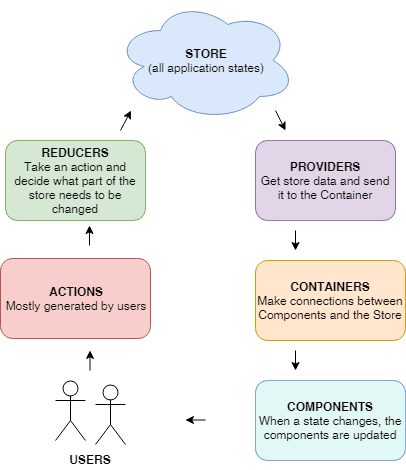
The store holds many application states. In order to change data inside it, you must dispatch an action. Redux does not exclude the State and Props concepts but it works on concepts of single state. For this, you should use the mapStateToProps function, which allows you to extract props and to pass the state to the components.
Instead of directly populating data from the store into components, you can pass it into a Container.
A Componentis a term specific to React and storeis specific to Redux. To make a connection between these two, you have to use a container.
Containers fetch the application state data and use it to render (display) components. This data will become the component’s props. Whenever the application state changes, components are re-rendered.
The provider makes the store available to all containers.
II.2 Action
Whenever a change is made to the application state, an action will be called. In Redux, actions are JavaScript objects and they have a type property, whose role is to tell the type of action that was dispatched. The second action property, the payload, represents the data that will be handled, e.g. it can be an index if you want to make changes in an array.
II.3 Reducers
To return a new state, reducers have to take the previous state and action. Inside the reducer, you should not make any API requests, you only need to handle data and return a new state because reducers must be pure functions.
For example, if you want to delete an item, create a button which will emit an event and a function that will handle this event. Inside the function, the action to delete the item will be dispatched and then this action will be fed to the reducer. In the reducer, the action will be handled, the item will be removed, and the store will get updated.
III. Benefits
One benefit of Redux is that all of the states are kept in one central location called
Store. In
React the standard method for making connections with components is by using the parent-child architecture, so you must send properties from the parent to the child and handle child events in the parent. The approach in Redux is easier because all of the states are combined into a single store.
If you change something on a page and you want to reload only that part of the application without refreshing the entire page, you must use Redux. By using the Webpack tool, you can manage the source files on the disk. You can set an event “file-reloaded” and when this event is received, the application will replace the old code version with updated code.
IV. The Flow of a Redux Application

V. Create an Application
First, you have to create a simple
React application by running the
create-react-app app-redux command. The next step is to
integrate Redux into the system and in the end, you will have a simple book cart application, which will confirm that Redux actually works.
By running these two commands, you will integrate react-redux libraries and these libraries will be visible in the package.json file:
To start the application, you need to run the following command:
According to the community convention, a project needs to include three folders: actions, components, reducers and one file named store.
The first step is to create a store that will hold all of the application states.
import { createStore } from "redux";
import rootReducer from "./reducers";

export default initialState => {
  return createStore(rootReducer, initialState);
};
V.1 Reducers Folder
Define the cart reducer in the cart.js file. Here the “add” payload type will be handled to add an item to the cart state; a new state will be returned containing the payload item.
export default (state = [], payload) => {
  switch (payload.type) {
    case "add":
      return [...state, payload.item];
    default:
      return state;
  }
};
A better approach is to create a file that will take all of the reducers from the folder and combine them into a root reducer. In this case, there is a single reducer, so it is not mandatory, but it is
good practice because usually, applications have more than one reducer.
import cart from "./cart";
import { combineReducers } from "redux";

const rootReducers = combineReducers({
  cart
});

export default rootReducers;
V.2 Actions Folder
The cart.js file contains a function whose purpose is to add a book into the cart. It expects a parameter, which in this case will be a book name. It is necessary to dispatch an action before it is handled by the reducer. The store cannot be updated directly from the view.
export const addToCart = item => {
  console.log("adding item ", item);
  return {
    type: "add",
    item
  };
};
V.3 Components Folder
The Book component gets a list of books in its state, and the list is rendered in the render function. You need to add a unique key property if you want to render a list in React. Adding a book into the cart is easy, all you have to do is click the button which will call the onClickAdd method.
import React, { Component } from "react";

class Book extends Component {
   state = {
      booksItems: ["Book 1", "Book 2", "Book 3"]
   };

  onClickAdd(item) {
    this.props.addItem(item);
  }

  render() {
    const booksItems = this.state.booksItems.map((item, idx) => {
      return (
        <li key={idx}>
          <button onClick={() => this.onClickAdd(item)}>[+]</button>
          {item}
        </li>
      );
    });
    return (
      <div>
        <h2>Books</h2>
        <ul>{booksItems}</ul>
      </div>
    );
  }
}

export default Book;
A Cart component is a container component and it is used to display the cart’s lists. After you create the Cart component, the mapStateToProps function will pipe the store data to a props object, which will be used by the component.
In order to dispatch actions that may cause changes to the application’s state, you have to call the mapDispachToProps function.
import React, { Component } from "react";
import { bindActionCreators } from "redux";
import { connect } from "react-redux";
import * as CartActions from "../actions/cart";
import Books from "./book";

class Cart extends Component {
  render() {
    const CartItem = this.props.cart.map((item, idx) => {
      return <li key={idx}>{item}</li>;
    });

    return (
      <div className="Cart">
        <Books addItem={this.props.action.addToCart} />
        <h2>Cart Item</h2>
        <ol>{CartItem}</ol>
      </div>
    );
  }
}

function mapStateToProps(state, prop) {
  return {
    cart: state.cart
  };
}

function mapDispachToProps(dispach) {
  return {
    action: bindActionCreators(CartActions, dispach)
  };
}

export default connect(
  mapStateToProps,
  mapDispachToProps
)(Cart);
Finally, to see the result of the code, you have to render the Cart component, so make sure to include it in the App.js component.
import React, { Component } from "react";
import "./App.css";

import Cart from "./components/cart";

class App extends Component {
  render() {
    return (
      <div className="App">
        <Cart />
      </div>
    );
  }
}

export default App;
VI. Conclusion
Redux is a library that can be integrated with
React and many other JavaScript libraries and frameworks. Redux can help us manage the application state easily and it can also help us keep all the data centralized in a store, which improves rendering performance.
Even though Redux has many advantages, you should avoid using it if you have a simple application or if you do not have experience with at least one framework.
You can easily create your application without including Redux in the project. It is worth integrating Redux in your applications, but it is your decision. I would recommend studying and adding it to your knowledge regarding Front End technology.


