
How to Use SelectionGrid Function in Unity 3D
Unity 3D integrates an ecosystem of tools highly used lately for mobile game development: a powerful rendering engine fully integrated with a complete set of intuitive tools and rapid workflows to create interactive 3D and 2D content; easy multiplatform publishing; thousands of quality, ready-made assets in the Asset Store and a knowledge-sharing community.
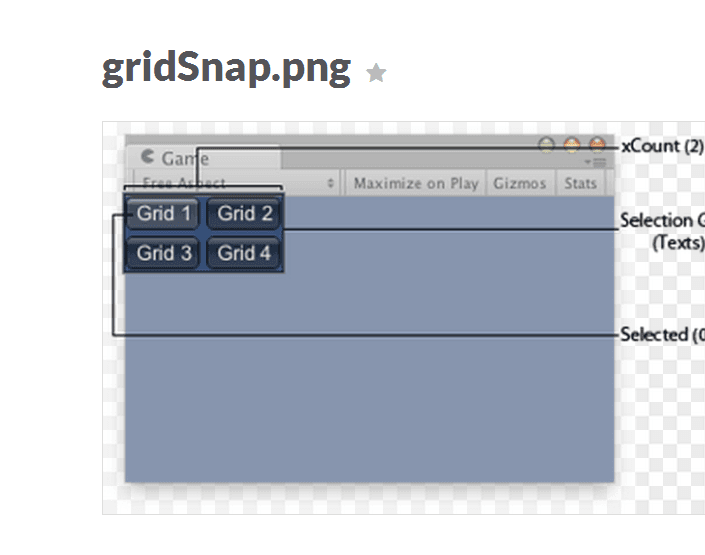
GUI.SelectionGrid

static function SelectionGrid(position: Rect, selected: int, texts: string[], xCount: int) :int;
static function SelectionGrid(position: Rect, selected: int, images: Texture[], xCount: int) :int;
static function SelectionGrid(position: Rect, selected: int, content: GUIContent[], xCount: int) :int;
static function SelectionGrid(position: Rect, selected: int, texts: string[], xCount: int, style: GUIStyle) :int;
static function SelectionGrid(position: Rect, selected: int, images: Texture[], xCount: int, style: GUIStyle) :int;
static function SelectionGrid(position: Rect, selected: int, content: GUIContent[], xCount: int, style: GUIStyle) :int;

Parameters
position		Rectangle on the screen to use for the grid.
selected 		The index of the selected grid button.
texts  			An array of strings to show on the grid buttons.
images 			An array of textures on the grid buttons.
contents 		An array of text, image and tooltips for the grid button.
xCount 	How many elements to fit in the horizontal direction. The controls will be scaled   to fit unless the    style defines a fixedWidth to use.
Style 	The style to use. If left out, the button style from the current GUISkin is used.
In all types of games you will find a Graphical User Interface (GUI), designed to be as attractive as possible. One of the many functions that Unity has to help design a spectacular GUI is the SelectionGrid. With this you can make a grid of buttons very easily.
In the following snippet, you can find an easy way to center the grid on screen and, if you don’t want to use the SelectionGrid, you can always use the plain old Button.
#pragma strict
//Public Variables
public var selectionGrid			: Boolean;

//Private Variables
private var selGridInt				: int =0;
private var selectionStrings			: String[];
private var btnPos				: Rect;
private var btnWidth				: int;
private var btnHeight				: int;

function Start(){
	selectionStrings = [“Grid1”, “Grid2”, “Grid3”, “Grid4”];
	btnWidth = 200;
	btnHeight = 60;
	btnPos = Rect(Screen.width/2 – btnWidth – 10, Screen.height/2 – 65, btnWidth, btnHeight);
}

function OnGUI(){
	if(selectionGrid){
		selGridInt = GUI.SelectionGrid( Rect (Screen.width/2 – btnWidth/2, Screen.height/2 – btnHeight – 5, btnWidth, btnHeight), selGridInt, selectionStrings, 2);
	}
	else{
		GUI.Button(btnPos, “Grid1”);
		GUI.Button(Rect(btnPos.x + btnWidth + , btnPos.y, btnWidth, btnHeight), “Grid2”);
		GUI.Button(Rect(btnPos.x, btnPos.y + 65, btnWidth, btnHeight), “Grid3”);
		GUI.Butoon(Rect(btnPos.x + btnWidth + 5, btnPos.y + 65, btnWidth, btnHeight), “Grid4”);
	}
}
As displayed, using the SelectionGrid you can create a grid of buttons with only one line of code.
→ If you want to find out more about the author of this snippet click play on the below video.


