1. The importance of writing tests in projects
If you ask someone what the role of a developer is, their answer would probably be to write code for an application. This is partially true. A developer picks a ticket from a list, analyzes and writes code for it, then assigns it to a person that is responsible for the final validation.
The point is that the developer is responsible for the code as well. How can a developer validate that code is written well before passing it? By testing it, of course!
What if I told you that a developer should test their code before assigning a ticket to a QA engineer? The thought that probably crosses your mind is that you do not have time to test your code. What if you could test your code by writing code for it? Would you then be more interested?
There are many benefits of testing your code before you send it to the QA team: it prevents regression and it reduces the number of bugs returned, so the QA Engineer will allocate less time for testing. Unit tests should cover more scenarios to reduce the probability of breaking the application.
2. What are Jest and Enzyme?
There are many libraries for unit testing, but
Jest is a JavaScript testing framework, and it can be integrated with projects that use the JavaScript language.
Why should you try testing with Jest and what are the best practices of the biggest companies that need to test their code?
Facebook ReactJS tests are done with Jest but they aren't the only ones using it. Many other companies love it and some of them are high-profile names. Facebook, Instagram, and Revolut use Jest to test their code, which makes some people deem it the best ReactJS testing framework.
Airbnb uses it successfully as well but they have another ReactJS Testing Utility to pride themselves on. Airbnb has developed its own testing utility (before delivering it to a third party) and, from what we know, the company is still using it for testing today. Airbnb is working with
Enzyme, a testing utility that can be employed easily with three useful functions:
⦁ render -> This is used when you want to handle HTML. It outputs the rendered HTML of the component. You have no access to React lifecycle methods.
⦁ shallow -> This renders the component without the child components inside it. You have access to React lifecycle methods.
⦁ mount -> This is used to interact with the component and the child components. You have access to React lifecycle methods.
3. Installation and configuration
Jest is already set up when a new ReactJS project is created. In order to create a React project, run this command: npx create-react-app [project name].
After the project installation is finished, navigate to the project folder. The following need to be installed into the project:
⦁ Enzyme
⦁ enzyme-adapted-react-16 -> The role of this adapter is to help the enzyme work with your React version. To check which version is compatible with your React version, you can check on the official website.
⦁ enzyme-to-json -> This helps to serialize snapshots with Jest, and it will be used in Section 5.
The command to install all these libraries is npm install enzyme @wojtekmaj/enzyme-adapter-react-17 enzyme-to-json --save-dev
In order to start the project, run the npm start command.
The next step is to configure Enzyme to use the adapter. In the setupTests.js file, add the following lines:
import "@testing-library/jest-dom";

import { configure } from "enzyme";
import Adapter from "@wojtekmaj/enzyme-adapter-react-17";

configure({ adapter: new Adapter() });
Figure 1 – Configuration of Enzyme to use the adapter
4. Code Testing
Before starting to write unit tests in an application, it is a good practice to think about some code test cases. Having an idea of what needs to be tested can help you group them into describe blocks. The tests are written inside the block using the following methods: test() and it(). Both methods can be used but method it() is aliased by test().
The tests should be written in such a way that they are easy to understand. In the describe block, the action is to "do something", so the it() method can be used multiple times.
The tests presented in the following subchapters are written in order to test the functionality of a form. All the tests were written into the App.test.js file, but in a real project, it is recommended to create them in the folder of the component that is going to be tested. The files where the tests are written can be identified by the extension [filename].test.js
To check if all test functions are passing, run the npm test command. The tests run in watch mode so every time a change is made, they automatically run in parallel.
4.1 Components rendering
The first group of tests checks if the components are rendering. As previously mentioned, the tests are grouped in a describe block, giving them a suggestive name.
It can be tested whether an entire component or just a specific part of it is rendered. The first three tests check if the React components rendered without crashing.
The next test checks if the title is rendered in the App component. It is expected for the wrapper to contain the h1 element including the text. As a validation, the toBe() method is used.
There are multiple ways to validate whether specific elements are rendered. The most common methods are toBe() and toEqual(). The difference between these methods is that the first one is built to deal with primitive values like numbers and strings, while the second one deals with objects and arrays.
To check if all the form inputs were rendered, the inputs should be located by the name property using the find() method. For each input with a specific name, the toHaveLength() method used and one item for each specific input is expected to be found.
The last test from this block checks if the text is formatted correctly. The text is extracted using the find() method from Enzyme to locate the node. The text() method returns the rendered text.
describe("The components are rendered", () => {
  it("renders App component without crashing", () => {
    shallow(<App />);
  });

  it("renders Form component without crashing", () => {
    shallow(<Form />);
  });

  it("renders FormList component without crashing", () => {
    shallow(<FormList />);
  });

  it("renders title without crashing", () => {
    const wrapper = shallow(<App />);

    const header = <h1>Become a volunteer</h1>;
    expect(wrapper.contains(header)).toBe(true);
  });

  it("renders form inputs", () => {
    const wrapper = shallow(<Form />);

    expect(wrapper.find('input[name="volunteerName"]')).toHaveLength(1);
    expect(wrapper.find('input[name="hours"]')).toHaveLength(1);
    expect(wrapper.find('select[name="jobTitle"]')).toHaveLength(1);
  });

  it("renders submit button without crashing", () => {
    const wrapper = shallow(<Form />);

    const label = wrapper.find("#submit-button").text();
    expect(label).toBe("Submit");
  });
});
Figure 2 – Checking components rendering.
4.2 Passing props
The next describe group checks if components accept props. In order to receive data from an application, the Axios library is used to initiate API calls. JSON Server is used as a fake API for the mock data, which is kept in the db.js file. At the beginning of the testing file, the list of forms is imported from the db.js file.
For the first test, the FormList component is mounted and the forms are sent as a property. By using the toEqual() method, you can check if the wrapper received the forms’ props.
The second test goes through each form and using the toHaveProperty() method checks if it received all the properties (id, volunteerName, hours, jobTitle).
import { forms } from "../db.json";

describe("FormList is passing props", () => {
  it("accepts props", () => {
    const wrapper = mount(<FormList forms={forms} />);
    expect(wrapper.props().forms).toEqual(forms);
  });

  it(`should have all properties`, () => {
    const wrapper = mount(<FormList forms={forms} />);
    const renderedForms = wrapper.props().forms;
    for (let i = 0; i < renderedForms.length; i += 1) {
      expect(renderedForms[i]).toHaveProperty("id");
      expect(renderedForms[i]).toHaveProperty("volunteerName");
      expect(renderedForms[i]).toHaveProperty("hours");
      expect(renderedForms[i]).toHaveProperty("jobTitle");
    }
  });
});
Figure 3 – Checking if the component accepted props.
4.3 Events
On a form, actions can be done using event handlers. Figure 4 shows some examples of how to test the events such as changing the input’s value, submitting the form, and resetting the form. The change event is simulated for all the form inputs.
Following the DRY principle, the logic of simulating the change action of an input was extracted into the simulateOnChangeInput() function. For each input, it’s expected that the new values will be sent to the change method.
After the inputs have been filled with the given values, the click event on the reset button is simulated. The new values that are expected to be received from the inputs are the default ones.
const simulateOnChangeInput = (wrapper, inputSelector, newValue) => {
  const input = wrapper.find(inputSelector);
  input.simulate("change", {
    target: { value: newValue },
  });

  return wrapper.find(inputSelector);
};

describe("The events are working", () => {
  it("fill the form with values and then reset the form", () => {
    const wrapper = shallow(<Form />);

    const updatedNameInput = simulateOnChangeInput(
      wrapper,
      "#volunteerName-input",
      "Endzela Gaye"
    );
    const updatedHourInput = simulateOnChangeInput(
      wrapper,
      "#hours-input",
      "2"
    );
    const updatedJobTitleInput = simulateOnChangeInput(
      wrapper,
      "select",
      "Food supply"
    );

    expect(updatedNameInput.props().value).toBe("Endzela Gaye");
expect(updatedHourInput.props().value).toBe("2");
    expect(updatedJobTitleInput.props().value).toBe("Food supply");

    wrapper.find("#reset-button").simulate("click");

    expect(wrapper.find("#volunteerName-input").props().value).toBe("");
    expect(wrapper.find("#hours-input").props().value).toBe("");
    expect(wrapper.find("#job-input").props().value).toBe("Raising funds");
  });
});
Figure 4 – Filling the form with values and then resetting it
4.4 Mock functions
A mock function is a fake method that will give you some predefined results. It will not run the actual method code; instead, it will load up the call. Transforming it into a mock allows us to “spy” on the function calls.
The mock method will call the method that we want to spy on, and check if the behavior of it corresponds to what we are expecting.
To create a fake method, jest.fn() is used:
describe("The events are working", () => {
  it("The form is submitted when the click event is fired by simulated click on the submit button", () => {
    const mockCallBack = jest.fn();

    const wrapper = shallow(<Form onSubmit={mockCallBack()} />);

    wrapper.find("#submit-button").simulate("click");
    expect(mockCallBack).toHaveBeenCalledTimes(1);
  });
});
Figure 5 – Submitting the form
In the example above, the form is wrapped and the onSubmit() method is passed to it. After that, the click event is simulated on the submit button and it is expected that the mock method is called once. To check how many times a method has been called, the toHaveBeenCalledTimes() method from Jest is used.
5. Snapshot Testing
The role of snapshot testing is to check if the elements are in the right position in the user interface. To make sure that elements will not be changed accidentally, a snapshot can be done that retains the rendered component at a certain time.
To convert the Enzyme wrapper to a format compatible with the Jest snapshot, the toJson() helper is used, which is provided by the enzyme-to-json library.
describe("Snapshot", () => {
  it("matches App the snapshot", () => {
    const wrapper = mount(<App />);
    expect(toJson(wrapper)).toMatchSnapshot();
  });
});
Figure 6– Checking if the snapshots are matching
When the tests are run for the first time, a folder named __snapshots__ is created where the snapshot is saved:
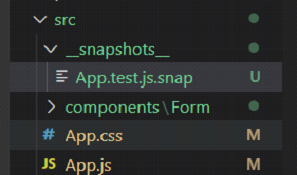
Figure 7 – __snapshots__ file
Every time the tests are run, Jest compares the output of the component with the previous Jest snapshot and it will display an error message if there are any differences between them. (Figure 8)

Figure 8 – Differences between the snapshot and the rendered component
A message like this will appear: “1 snapshot failed from 1 test suite. Inspect your code changes or press `u` to update them.”
6. Ensure that your tests are written well!
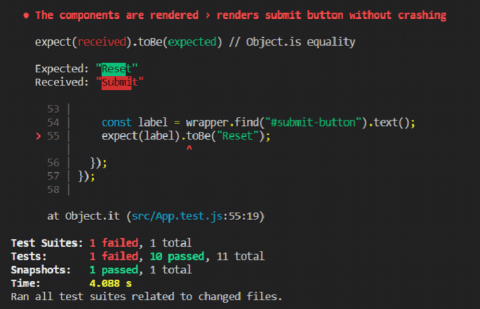
After you’ve checked that your tests pass, a good practice is to then break them and check if they still pass.
Figure 9 - Breaking a test
If the text that is expected to be received from the submit button is "Reset", an error will be displayed in the console where the name of the test that crashed is given together with the expected and received values.
7. Conclusion
I hope that you found this article helpful and that it’s given you a broad understanding of React JS unit testing. The libraries presented are very easy to use and come to the aid of developers to make the testing process as easy as writing an application and if Facebook tests with Jest and Airbnb test with Enzyme, that should be enough reason for you to also give it a try.
Did you like this article and did you find it helpful? Leave us a message!
You can read more from the same author here:
How to create your first schema in GraphQL | ASSIST Software Romania (assist-software.net)
Redux Basics for Beginners | ASSIST Software Romania (assist-software.net)