
How to implement Dynamic Multi-tenancy with MongoDb and Spring Boot
In recent years, especially with the power of cloud computing, the demand for software that follows the multi-tenant software architecture (also called software multi-tenancy) has been increasing. But we must also emphasize how important is the term tenancy has become for eCommerce, as well. Why is this the case? And what is multi-tenant software architecture? As a client, do you know how multi-tenancy can benefit you or what are the downfalls?
But how about as a software solution provider? Together we will focus not only on explaining the tenancy but also figure out what would be beneficial for you if you were to choose a single-tenant or multi-tenant architecture. Furthermore, you will find out the ways in which dynamic multi-tenancy with MongoDB and Spring Boot can be implemented.
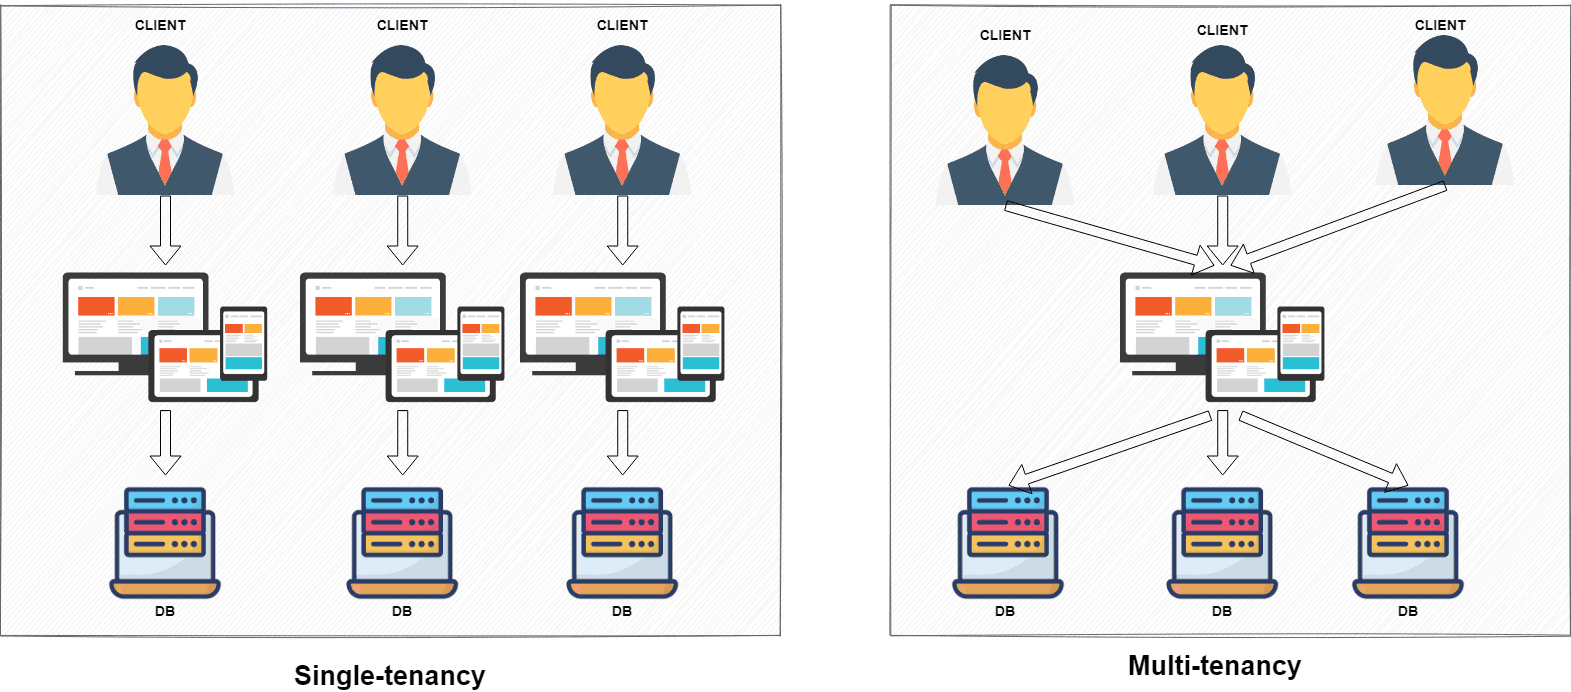
To start off, imagine that you build a piece of software and want to sell it to different customers. A customer from Paris wants the background color of the UI to be blue, but another customer from Barcelona likes the green color. A customer is paying a lot of money and should have all the features enabled, but another one is trying the free version. How can you please everyone with just a single application? In a single-tenant approach, this is a nightmare, but with multi-tenancy, you can set for each tenant (customer) a dedicated instance of configuration. In essence, multi-tenancy is a software architecture that allows the customers to be physically together but logically separated.
Besides the customization, there are many other benefits of multi-tenancy including lower costs and scalability.
Now that we know why you should use multi-tenant software architecture, let’s explore how we can start using it. At the database level, in development, there are 3 architectural patterns that can be identified for separating the data.
For this approach, all the tenants share the same database and the separation is done by a special column that will retain the tenant id. This column will show which tenant should have access to a specific row. In a NoSQL database, this pattern can also be applied, but for each document, you need to have a field-and-value pair that will contain the tenant id.
Pros:
- Saves space
- Can host the most tenants
- Adds complexity to the tables/ documents
- Can’t easily scale
- Hard to maintain
For this approach, all the tenants share the same database but have their own schema. In a NoSQL approach, this can be applied by having different collections per tenant. One big difference between SQL and NoSQL, in this case, is that you cannot apply security restrictions based on collections.
Pros: (all the advantages are somewhere in between shared schema and database per tenant)
- Lower hardware costs
Cons:
- Restoring data is more complicated.
- Strong coupling of the components
Each tenant has its own database that is completely isolated from other tenants.
Pros:
- Most secure option
- Easy for database backup and recovery
- Easy to implement
Cons:
- Most expensive approach
In its publication about multi-tenancy, the IEEE (the world’s largest technical professional organization for the advancement of technology) mentioned a few things that we need to take into consideration when we choose an architectural pattern for our project.
Cost
Cost is a vital factor we need to consider in choosing an architectural pattern. We will have infrastructure costs, especially in the cloud, management costs, and last but not least, development costs.
Growth
An important step in choosing one of the 3 patterns is to visualize how the database will look like in the future and what the target number of tenants is. The number of users per tenant is also important. For small tenants, a shared database with a shared schema is ideal, but that can be changed when there are a lot of concurrent users that contribute to the performance of the database system.
Security and regulations
One of the biggest challenges in multi-tenancy is the data security isolation among tenants. You don’t want to be in a situation where sensitive data is exposed. If tenants have high-security expectations, we need to choose a pattern that allows a high level of isolation between tenants. Some EU countries and the UK have strict rules regarding data separation, so the only approach allowed is the database per tenant pattern.
After all these theoretical concepts, it is time to work on a real example.
In the following project, we will implement the multi-tenancy architecture using the Spring Boot framework with MongoDB following the database per tenant pattern.
We chose this pattern because especially in the EU, data separation is regulated by the law, and most of the time, this is the only approach permitted.
Prerequisites
Java 8+
Spring Boot 2+
Gradle 6+
Mongo 4.2
For development, I will use the IntelliJ IDEA Ultimate 2020.2.2
Let’s start by initializing the project. In the IntelliJ IDEA Ultimate, this can be easily done by using the Spring Initializr that is integrated. If you are using the Community Edition, the initialization can be done using the web application, which can generate a Spring Boot project structure for you.
After generating the project, we will work with the following dependencies. These can be added from the Spring Initializr or imported later.
- spring-boot-starter-web - pulls all the dependencies related to web development
- spring-boot-starter-data-mongodb - provides integration with the MongoDB document database
- lombok - reduces boilerplate code
dependencies {
   implementation 'org.springframework.boot:spring-boot-starter-data-mongodb'
   implementation 'org.springframework.boot:spring-boot-starter-web'

   compileOnly 'org.projectlombok:lombok'
   annotationProcessor 'org.projectlombok:lombok'
   testImplementation 'org.springframework.boot:spring-boot-starter-test'
}
The idea behind the project is a web application that will help different musical schools to manage their formations and singers. In our case, the tenant will be the school.
We will create a REST API for adding a new musical formation like a choir. To do this, we will create a class called Choir, a service called ChoirService, which will handle Mongo operations, and a controller where we define the API routes. These classes are very simple just because we want to concentrate on multi-tenancy, not MongoDb.
@Getter
@Setter
@NoArgsConstructor
@Document(collection = "choirs")
public class Choir {

  @Id
  private String id;
  private String name;
  private List<Singer> singers;

}
@AllArgsConstructor
@NoArgsConstructor
@Setter
@Getter
public class Singer {

  private String name;
  private VoiceType voiceType;

}
The VoiceType is just an enum with different voice types.
public enum VoiceType {

  SOPRANO,
  ALTO,
  CONTRALTO,
  MEZZO_SOPRANO,
  COUNTERTENOR,
  TENOR,
  BARITONE,
  BASS
}
ChoirService will contain two methods. One will save a new entity and the other one will return a list of entities. We can already observe that the mongo template is initialized lazily. We will come back to this later.
@Service
public class ChoirService {

  private final MongoTemplate mongoTemplate;

  public ChoirService(@Lazy MongoTemplate mongoTemplate) {
    this.mongoTemplate = mongoTemplate;
  }

  public void saveChoir(Choir choir) {
    mongoTemplate.save(choir);
  }

The controller will also have two methods. One will create a new choir entity and one will return a list of existing entities.
@RestController
@RequestMapping("/api/v1/choirs")
public class ChoirController {

  private final ChoirService choirService;

  public ChoirController(final ChoirService choirService) {
    this.choirService = choirService;
  }

  @PostMapping
  public void save(@RequestBody Choir choir) {
    choirService.saveChoir(choir);
  }

  @GetMapping
  public List<Choir> getAll() {
    return choirService.getAllChoirs();
  }
}
  public List<Choir> getAllChoirs() {
    return mongoTemplate.findAll(Choir.class);
  }
}
The controller will also have two methods. One will create a new choir entity and one will return a list of existing entities.
@RestController
@RequestMapping("/api/v1/choirs")
public class ChoirController {

  private final ChoirService choirService;

  public ChoirController(final ChoirService choirService) {
    this.choirService = choirService;
  }

  @PostMapping
  public void save(@RequestBody Choir choir) {
    choirService.saveChoir(choir);
  }

  @GetMapping
  public List<Choir> getAll() {
    return choirService.getAllChoirs();
  }
}Now that the core classes are in place, we need to see how we will implement the multi-tenancy and how we will integrate the infrastructure for the mongo database. One common approach found everywhere on the internet is to have all the information regarding the databases saved in the application.properties file and provide a data source for each database. In a real project with hundreds of databases, this approach is not maintainable. Taking into consideration that we want our instance to be stateless, the simplest solution is to verify who made each request and connect the tenant to the correct database. In this case, before hitting the API, we need to know the tenant id.
The most common approach is to pass the tenant id in the request header. In our case, the tenant id will be saved in an HTTP header: X-Tenant.
As soon as we have access to the tenant id, we can create the database connection string based on our rule or query the connection string from a remote place (key vault, another service, etc). This information should be globally accessible and for this, we just used a thread-local.
The next class is a storage for our connection string.
public class ConnectionStorage {

   private static final ThreadLocal<String> storage = new ThreadLocal<>();

public static String getConnection() {
 return storage.get();
}

public static void setConnection(final String connectionString) {
 storage.set(connectionString);
}

public static void clear() {
 storage.remove();
}

}
To create the connection string, we added a filter on request to get the tenant id. There are different filters that can be used here. We will use the OncePerRequestFilter abstract class provided by spring web.
If the tenant is not provided in the header, we will return the unauthorized HTTP code.
In our case, the database name will be the tenantId and we can easily rebuild the connection string to the local MongoDB database. In a real project, the connection string should be queried from some secure place like a key vault. After we build our connection string to connect to a specific database, we save the connection string in ConnectionStorage.
public class TenantFilter extends OncePerRequestFilter {

  private static final String TENANT_HEADER = "X-Tenant";
  private static final String CONNECTION_STRING = "mongodb://localhost:27017/TENANT?readPreference=primary";
  private static final String TENANT_REPLACEMENT = "TENANT";

  @Override
  protected void doFilterInternal(HttpServletRequest request, HttpServletResponse response, FilterChain filterChain) throws ServletException, IOException {

    String tenantHeader = request.getHeader(TENANT_HEADER);
    if (tenantHeader == null || tenantHeader.trim().isEmpty()) {
      response.setStatus(HttpServletResponse.SC_UNAUTHORIZED);
    } else {

      String dbConnectionString = CONNECTION_STRING.replace(TENANT_REPLACEMENT, tenantHeader);
      ConnectionStorage.setConnection(dbConnectionString);
      filterChain.doFilter(request,response);
      ConnectionStorage.clear();
    }
  }
}
This filter should be saved in the spring context. In this filter, we also specify that we will apply the filter on all routes that start with “/api/v1/choirs”.
@Configuration
public class WebConfiguration {

  @Bean
  public FilterRegistrationBean<TenantFilter> tenantFilter() {
    FilterRegistrationBean<TenantFilter> registrationBean = new FilterRegistrationBean<>();
    registrationBean.setFilter(new TenantFilter());
    registrationBean.addUrlPatterns("/api/v1/choirs/*");
    return registrationBean;
  }
}
Now let’s configure the database. By default, Spring Boot provides auto-configuration for mongo which will create the beans necessary to open and maintain a connection to the database at the start time. But this is a bad move for us. We won’t know where we want to connect until the first request arrives, so providing a default database is not a good approach. Because of this, we need to exclude the auto-configuration for mongo.
@SpringBootApplication(exclude = {
    MongoAutoConfiguration.class,
    MongoDataAutoConfiguration.class
})
public class MultiTenancyApplication {

  public static void main(String[] args) {
    SpringApplication.run(MultiTenancyApplication.class, args);
  }

}
Because we excluded the mongoTemplate bean provided by Spring, we must create our own bean for this class responsible for mongo operation. This bean is initialized lazily which means that it is initialized the first time it is used, in our case at the first request.
@Configuration
public class MongoConfiguration {

  @Bean
  @Lazy
  public MongoTemplate mongoTemplate() {
    ConnectionString connectionString = new ConnectionString(ConnectionStorage.getConnection());
    return new MongoTemplate(new DatabaseConfiguration(connectionString));
  }
}
The DatabaseConfiguration is our implementation for the database factory provided by Spring Data and is used for switching between databases at runtime.
public class DatabaseConfiguration extends SimpleMongoClientDatabaseFactory {

  public DatabaseConfiguration(ConnectionString connectionString) {
    super(connectionString);
  }

  @Override
  protected MongoDatabase doGetMongoDatabase(String dbName) {

    ConnectionString connectionString = new ConnectionString(ConnectionStorage.getConnection());
    return super.doGetMongoDatabase(Objects.requireNonNull(connectionString.getDatabase()));
  }
}We will add information to 2 tenants: tenant1 and tenant2
For tenant 1:
curl --location --request POST 'http://localhost:8080/api/v1/choirs' \
--header 'X-Tenant: tenant1' \
--header 'Content-Type: application/json' \
--data-raw '{
   "name": "Choir1",
   "singers" : [
       {
           "name": "Singer1",
           "voiceType": "TENOR"
       }

   ]
}'
For tenant 2:
curl --location --request POST 'http://localhost:8080/api/v1/choirs' \
--header 'X-Tenant: tenant2' \
--header 'Content-Type: application/json' \
--data-raw '{
"name": "Choir2",
"singers" : [
{
"name": "Singer1",
"voiceType": "TENOR"
},
{
"name": "Singer2",
"voiceType": "BASS"
},
{
"name": "Singer3",
"voiceType": "SOPRANO"
},
{
"name": "Singer4",
"voiceType": "ALTO"
}
]
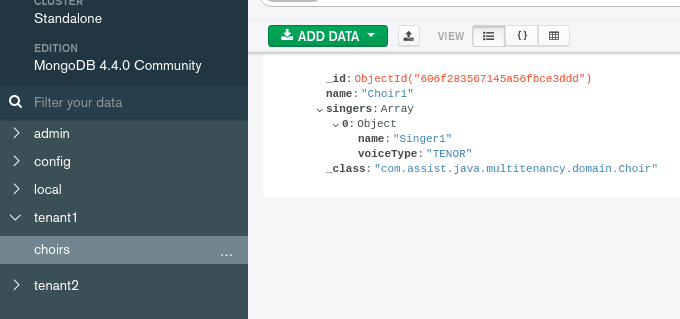
}'We can see on the left panel that 2 databases have been created.
For tenant 1:
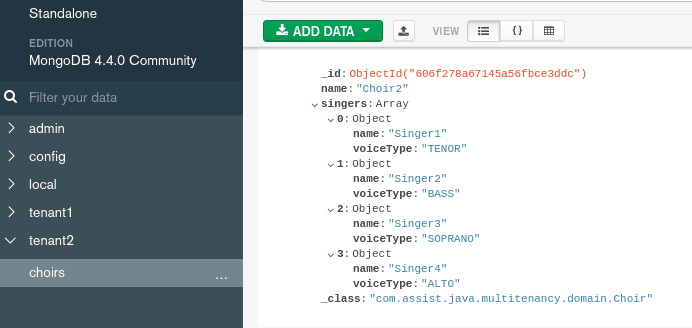
For tenant 2:
Now that you have a clue on how multi-tenancy works with MongoDB and Spring Boot, you can further assess how you wish to optimize your work process. To recap and be as clear as possible regarding the tenancy subject, you must keep in mind that a multi-tenancy is a software architecture in which a single instance serves multiple customers. Moreover, this architecture comes with an array of advantages that include but are not limited to saving you money, giving you flexibility, and providing a lot more efficiency than a single-tenant approach. So, no matter the reason why you are interested in multi-tenancy, be it eCommerce or not, you now know how to tackle it.
Full source code can be found here on GitHub.


