
How to authorize your .NET Web APIs using Keycloak
1. Mastering API Access Control with Keycloak
2. Setting Up Keycloak for Fine-Grained Authorization
3. How to Implement Fine-Grained Access Control with Keycloak
4. Retrieve User's Allowed Resources and Scopes in Keycloak
5. Check permissions from access token
6. Yet Another Reverse Proxy (YARP) and Authorization Policies
7. Recommendation
8. Conclusion
1. Mastering API Access Control with Keycloak
This article builds upon the insightful work of my colleague Sebastian Fulga; you can read his original piece here.
When it comes to securing Web APIs, authentication is only half the story. Authorization — knowing who can do what is just as critical, yet often receives less attention. In this follow-up, I’ll walk you through implementing fine-grained authorization using Keycloak, empowering you to manage access precisely. Whether you're just starting with authorization or already working with Keycloak, these steps are clear, practical, and designed with developers in mind.
Keycloak is an open-source single sign-on (SSO) solution licensed under Apache-2.0. Its implementation is publicly available on GitHub. Keycloak offers robust features including strong authentication, user management, identity provider integration, user federation, session control, event logging, and more. It’s highly configurable and has detailed official documentation on its website.

2. Setting Up Keycloak for Fine-Grained Authorization
If you’ve already installed and configured Keycloak using the Docker file mentioned in Sebastian Fulga’s original article, you can begin working with your Keycloak server.
In this guide, we'll use the default master realm for simplicity. However, you’re free to create a new realm if preferred; this won’t impact the core behavior, but it will result in URL paths different from those shown here.
Once deployed, Keycloak should be accessible at: http://localhost:7011/
You can log in using the admin credentials defined in your Docker Compose file.
Important Version Note:
At the time of writing, the current Keycloak version is 26.2.5. Future versions may introduce interface changes or new features, so always refer to the official Keycloak documentation and release notes to stay updated. It's best practice to use the latest stable version to take advantage of ongoing improvements from the development team.
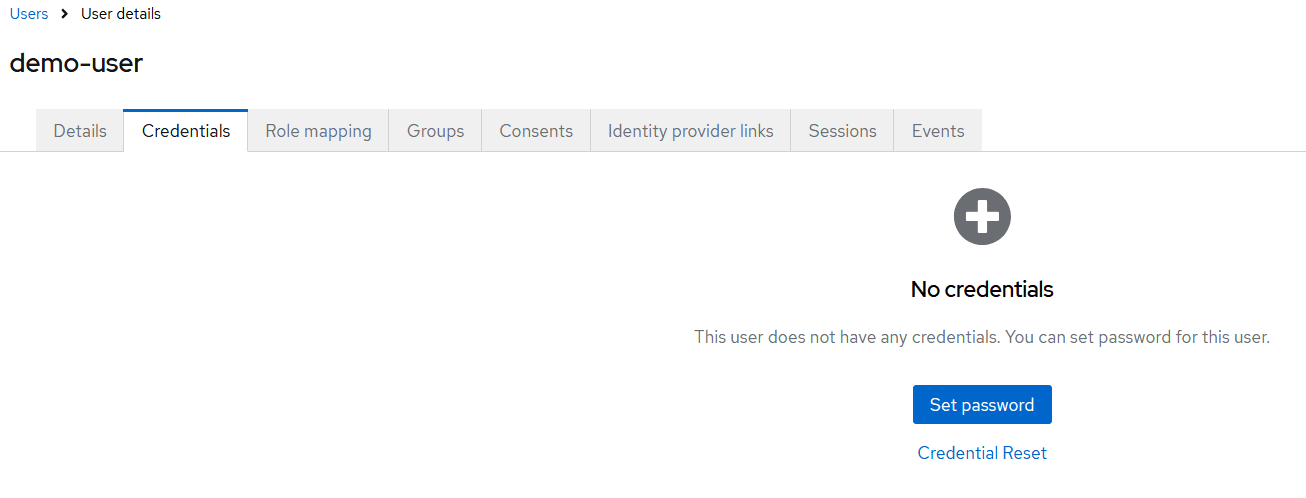
2.1. Create New User

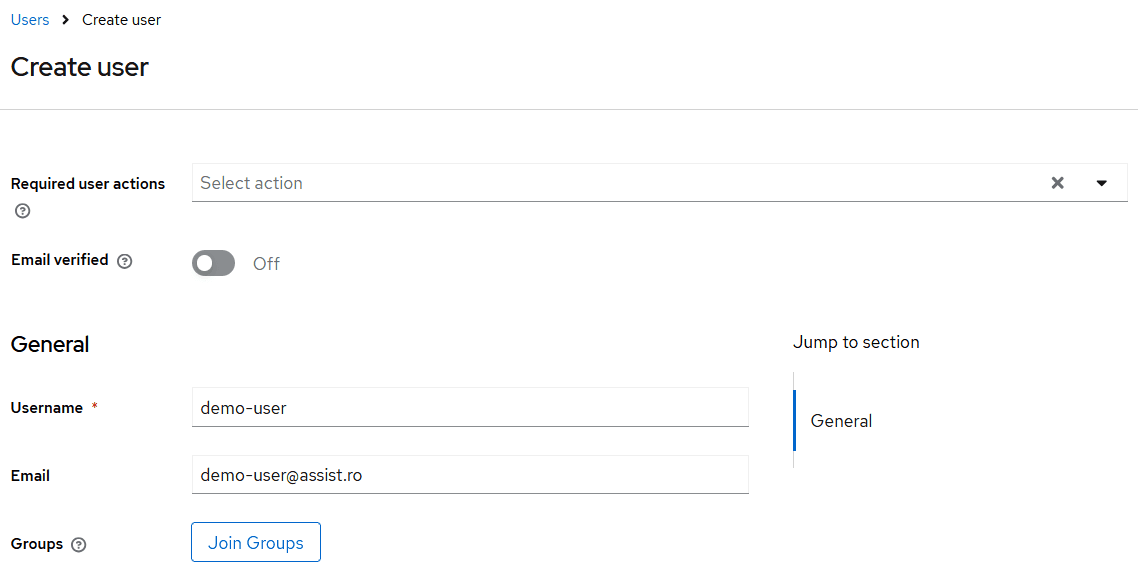
After creating a new user in Keycloak, the next step is to set up user credentials. To do this, navigate to the "Credentials" tab within the user's detail page in the Keycloak admin console.
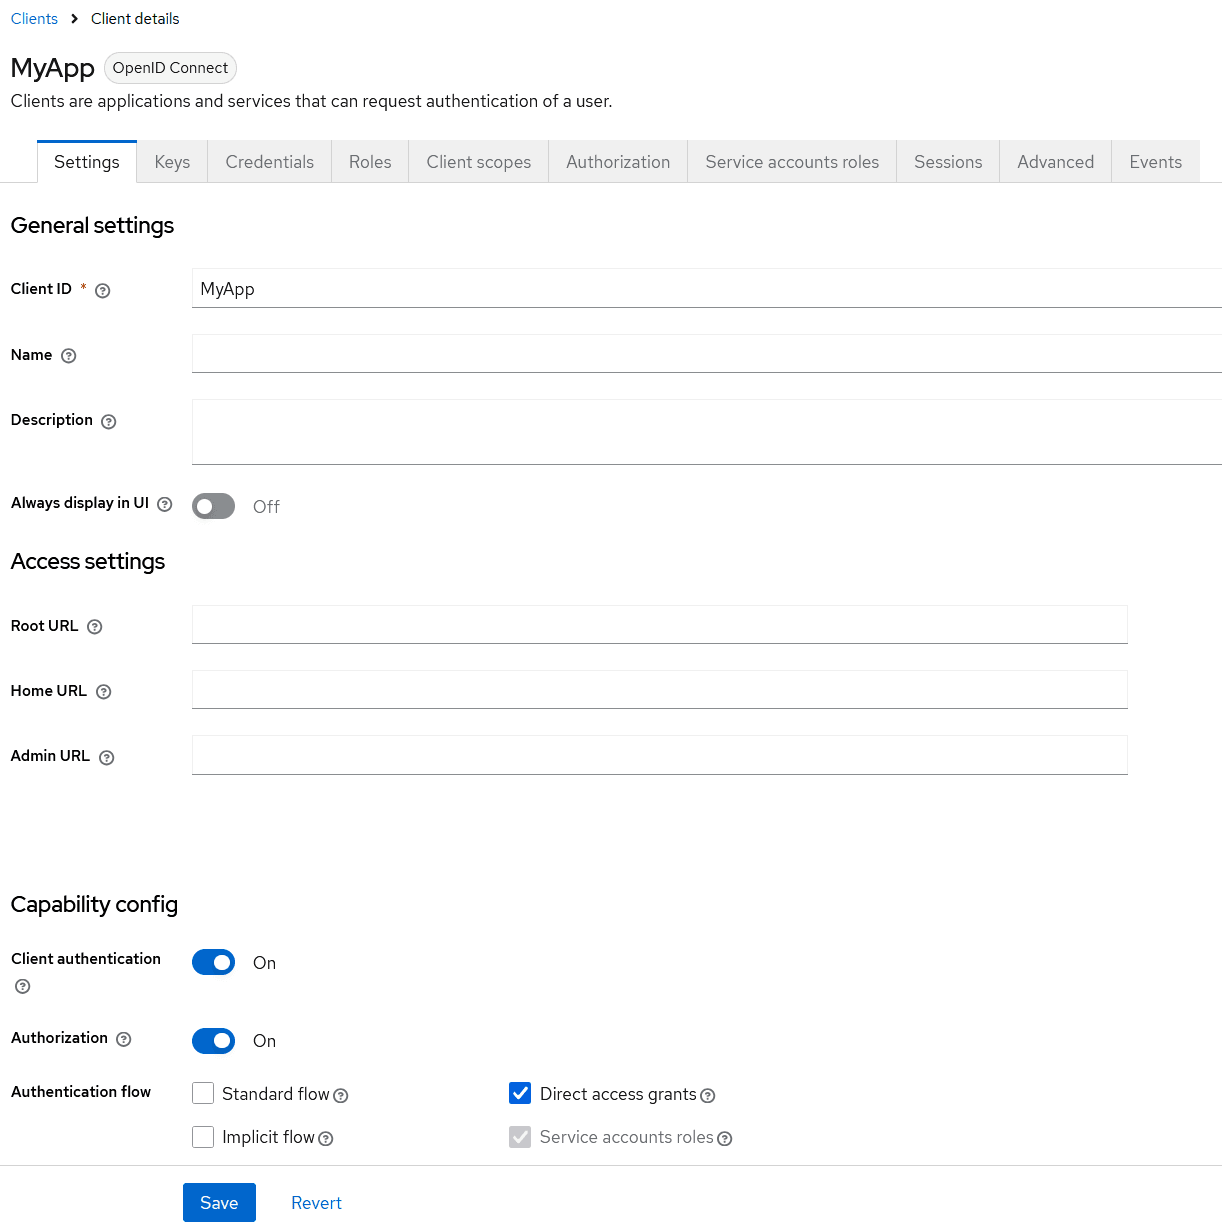
2.2. Creating a New Client and Enabling Authorization in Keycloak
Now that you’ve created a user, the next step is to create a new client in Keycloak and enable the Authorization feature. Creating a client is very similar to creating a user.
To get started, navigate to the “Clients” menu in the Keycloak admin console and click the “Create Client” button.
This client represents the application or backend service that will authenticate via the Keycloak API. In our example, we’ve named the client MyApp, but you can choose any name that fits your project.
Here are the essential settings to configure for the client:
- Client Authentication: ON
- Authorization: ON
- Direct Access Grant: Enabled
These settings ensure your client can handle secure authentication and fine-grained authorization using Keycloak.
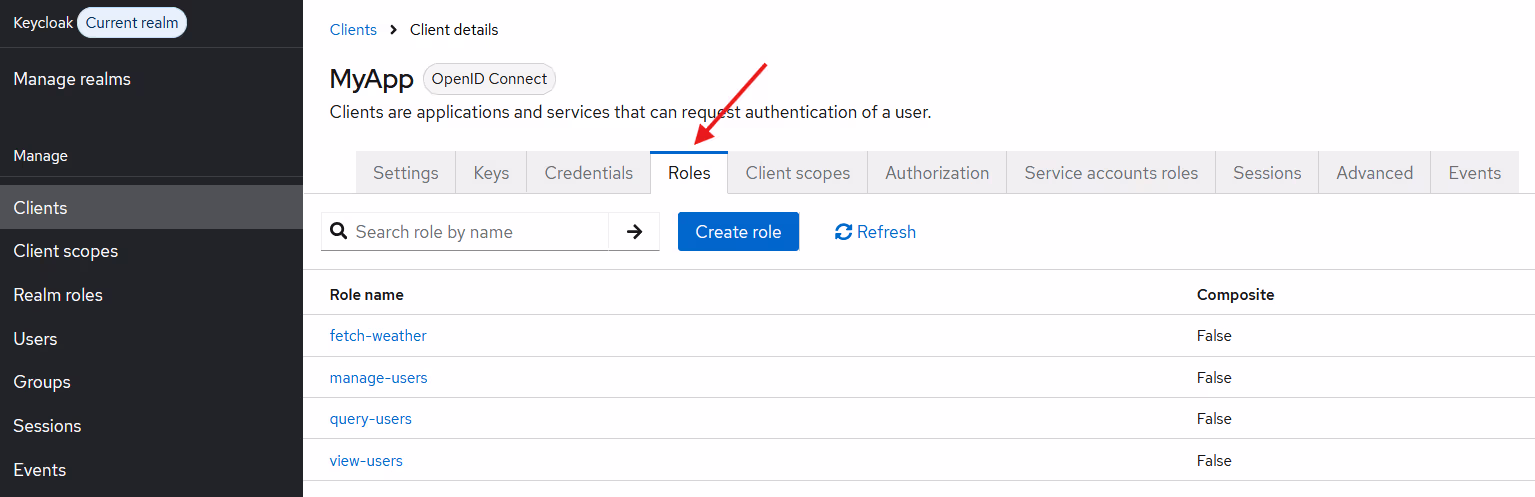
2.3. Creating User Roles for Your Keycloak Client
For our MyApp client, we need to define user roles. Keycloak has two role types: realm roles and client roles.
- Realm roles can be assigned across the entire realm and all clients.
- Client roles are limited to the specific client where they are created.
In this tutorial, we’ll use client roles. To create them, go to the Roles tab under your client’s details page.
We’ll apply the Role-Based Access Control (RBAC) approach to show Keycloak’s flexibility in handling fine-grained permissions.
Create the following roles, which will later be used to control access to backend APIs:
2.4. Configure client Authorization
To enable fine-grained access control, navigate to the Authorization tab under the MyApp client page, just as you did for roles.
Keycloak may auto-generate default resources, policies, and permissions. These can be safely deleted to keep your configuration clean. While setting up the Authorization module may take some time, this guide will walk you through each step.
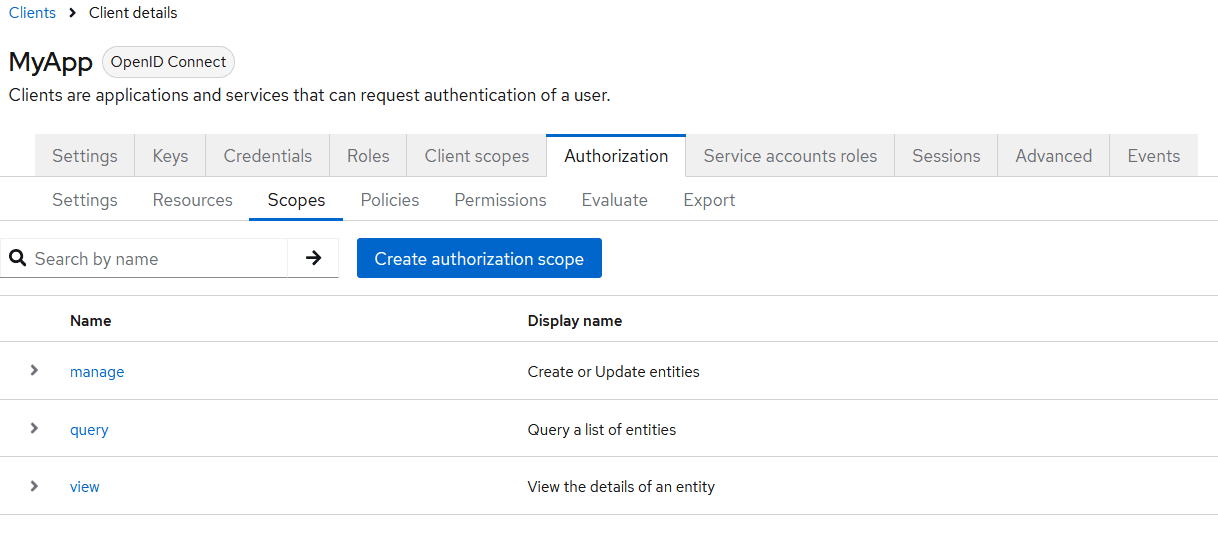
Configure Scopes
Scopes define a user's actions and are essential for fine-grained authorization in Keycloak. In this example, we’ll use standard scopes like:
- manage
- query
- view
You can also define custom scopes to match your application's needs.
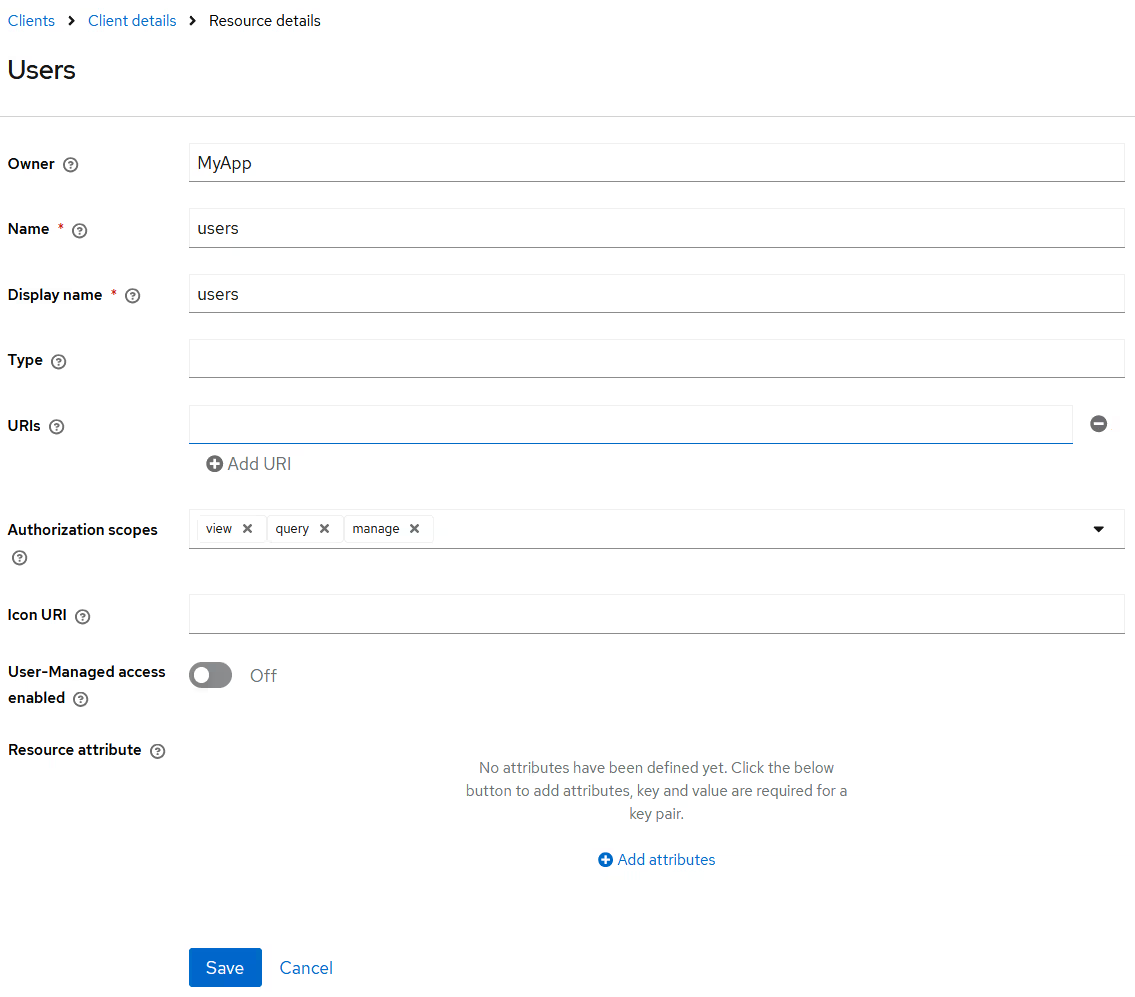
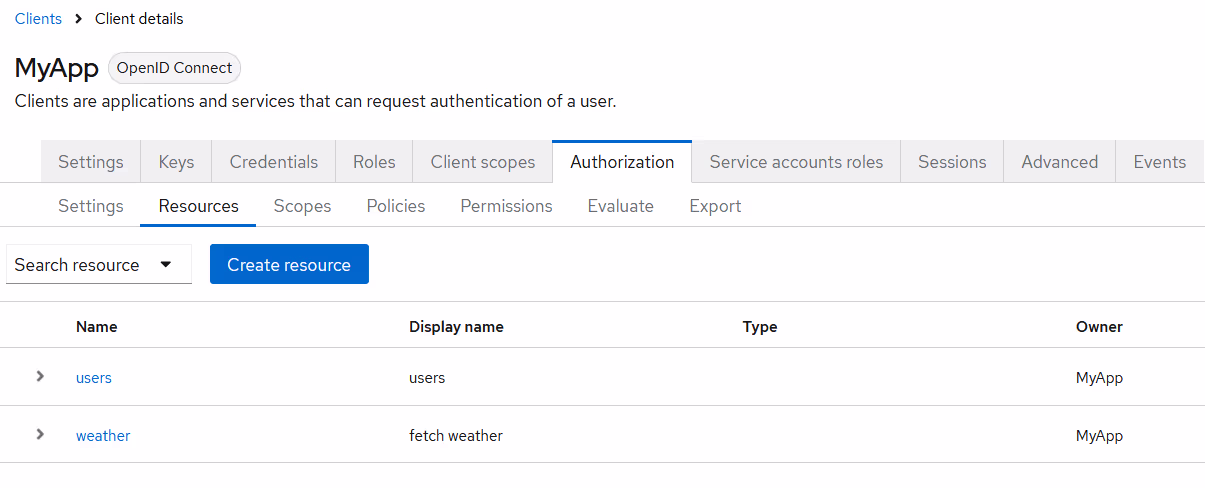
Configure Resources
Resources represent APIs or features you want to protect. These can range from single endpoints to entire application modules.
In this setup, we’ll create two resources:
- users – linked to the query, view, and manage scopes
- fetch-weather – without any scope, to demonstrate resource-based permissions
Note: Resources in Keycloak can have one, many, or no scopes.
Configure Policies
Policies in Keycloak define the rules that must be satisfied to grant access to a resource. They are evaluated during the authorization process to determine whether a user can access a specific resource.
Policies can be based on various conditions, such as:
- User roles
- Client applications
- User groups
- Attributes or context (e.g., time, regex patterns)
This guide will create role-based policies for each client role (user, admin, manager) defined earlier.
These policies will form the foundation for assigning permissions to protected resources.
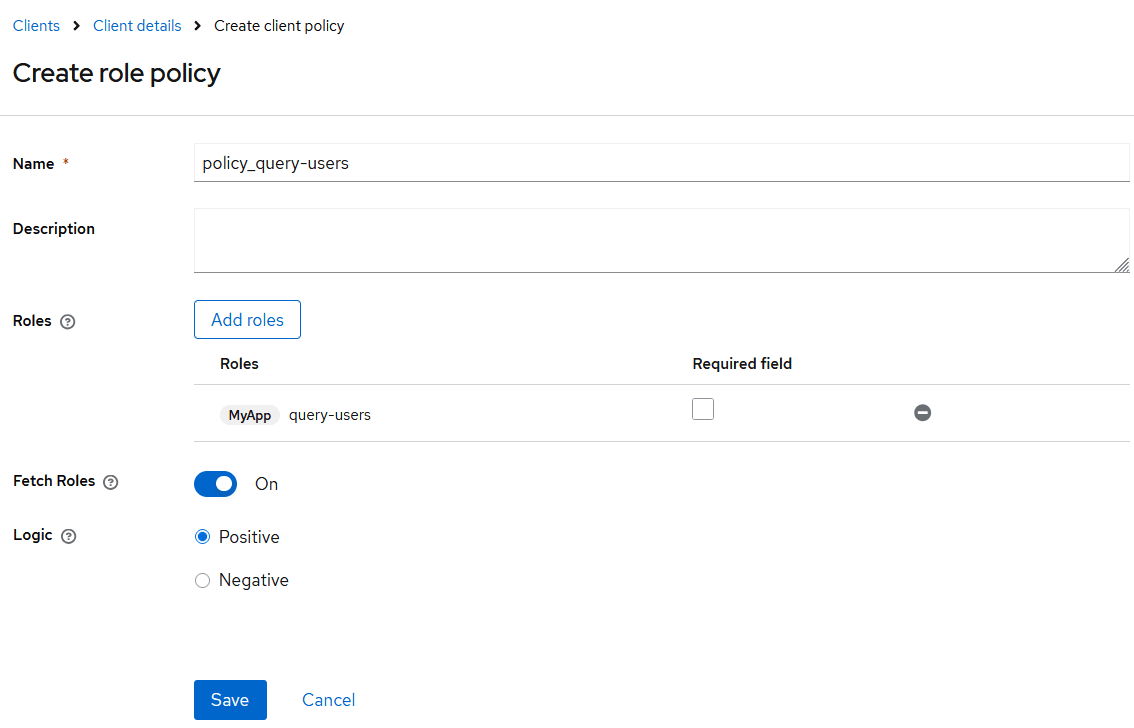
There are a few key aspects to understand when configuring role-based policies in Keycloak:
- Multiple Roles: A single policy can include various roles. The "Required" checkbox determines whether a role must be present for access. In our case, since each policy includes just one role, it will be required by default. For multi-role policies, be sure to define which roles are mandatory.
- Fetch Roles: This option is disabled by default. When enabled, Keycloak fetches roles in real time from the database rather than relying solely on the roles present in the access token. This can be powerful for dynamic role evaluation. If left disabled, users will retain the roles from their current token until a new token is issued.
- Logic Setting: The "Logic" configuration controls how decisions are applied:
- Positive: The policy behaves as defined, permits access, and denies blocks it.
- Negative: The result is inverted, the permit becomes denied, and vice versa.
By the end of this section, you should have a complete list of role-based policies, each linked to one of the roles created earlier.
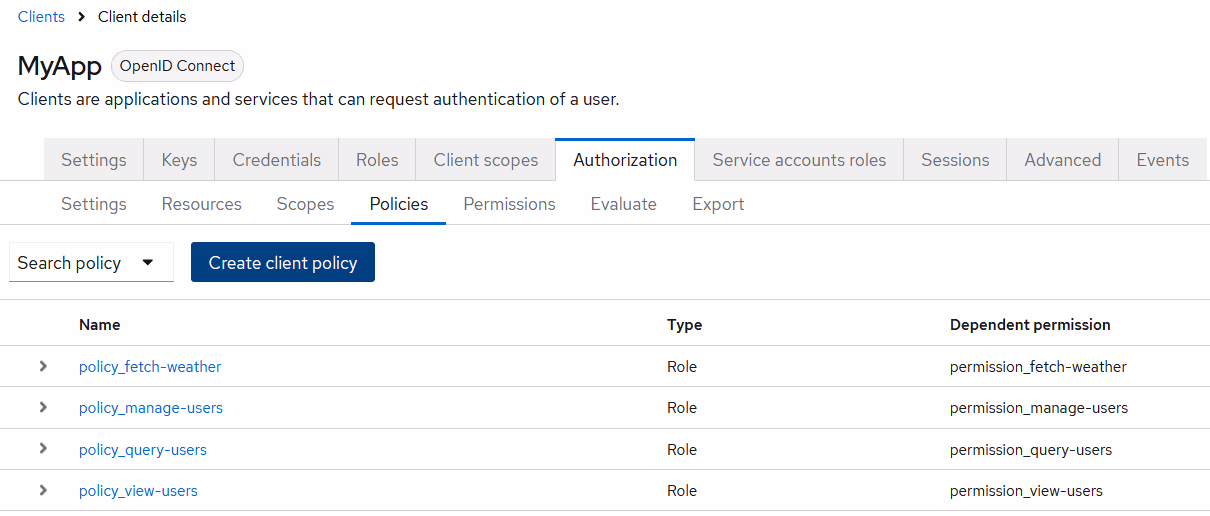
Configure Permissions
The final step in setting up Keycloak fine-grained authorization is to configure permissions. This step must come last, depending on previously defined resources, scopes, and policies.
Permissions control a user's or client's actions on specific resources or scopes. They are a key part of Keycloak's authorization module, enabling precise access control by linking resources to the policies that govern access decisions.
Keycloak supports two types of permissions:
- Scope-based permissions – applied to specific actions or scopes
- Resource-based permissions – applied directly to a resource
For this demo, we’ll use both types:
Scope-Based Permissions:
- permission_query-users
- permission_view-users
- permission_manage-users
Resource-Based Permission:
- permission_fetch-weather
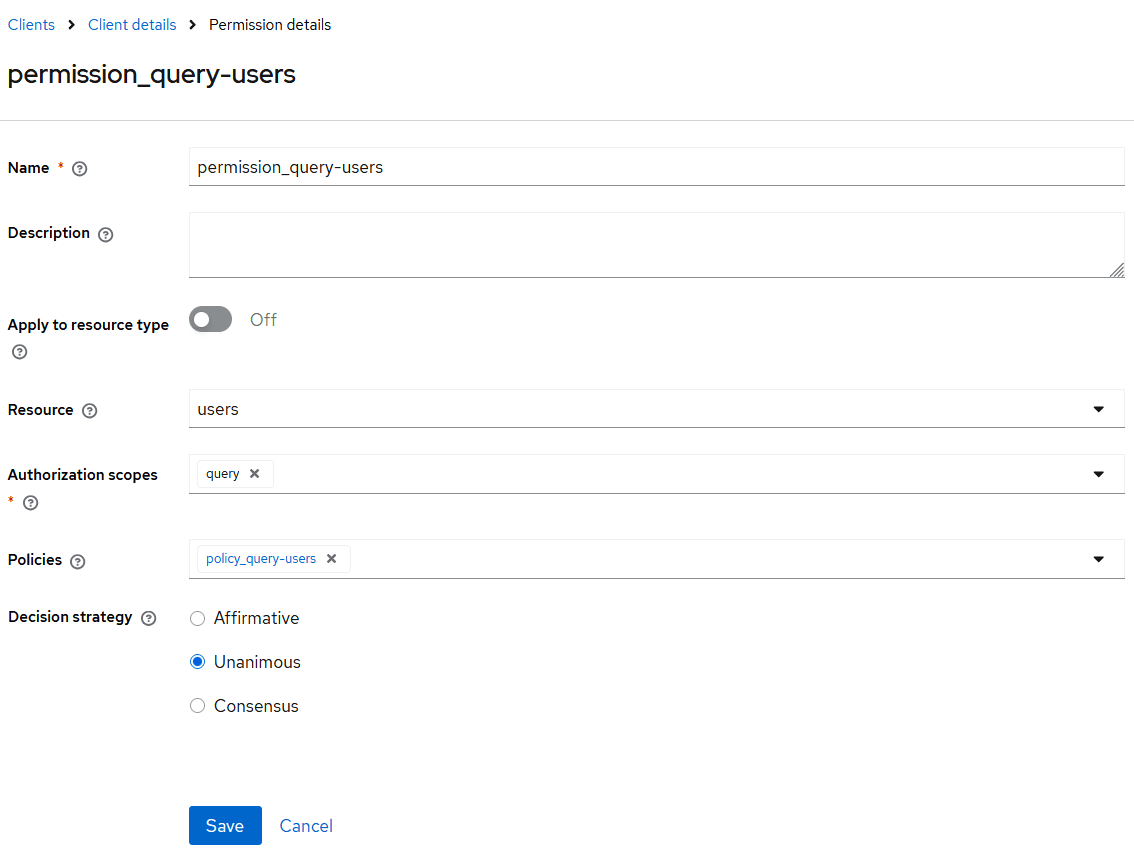
There are a few key points worth noting:
- Permissions can simultaneously support one or more 'Authorization scopes'.
- Similarly, multiple 'Policies' can be backed by Permissions simultaneously.
The 'Decision strategy' dictates how the policies associated with a given permission are evaluated and how a final decision is reached. Here are the options:
- 'Affirmative' implies that at least one policy must be positive.
- 'Unanimous' means that all policies must be favorable.
- 'Consensus' means that the number of positive outcomes must outweigh the number of negative ones.
In the end, we will have the following permissions:

We observe that we have one permission of the type 'Resource-Based'. This permission is much like the others, except that the scope is not a prerequisite.
Now that everything is in place, we can delve into the code to investigate how we handle authorization. However, before we do that, roles must be assigned to our user; otherwise, we'll lack access to our APIs.
Navigate to the Users tab in Keycloak, and then proceed to our user to assign all the roles from our MyApp client, just as illustrated:

3. How to Implement Fine-Grained Access Control with Keycloak
Let's start with the project structure, although this is not very important since you can create your own file structure. Since this is just a demo project, we will keep it simple.
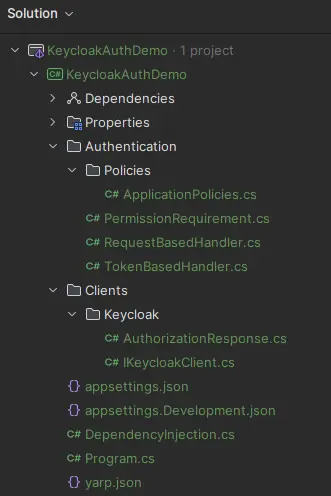
Dependencies required from NuGet gallery:
- Microsoft.AspNetCore.Authentication.JwtBearer
Appsettings.json:

To validate JSON Web Tokens (JWT) in your ASP.NET Core application, you typically configure a JwtSettings section in appsettings.json. When using Keycloak, you don't need to set a secret key manually. Instead, Keycloak simplifies JWT signature verification by exposing a MetadataAddress endpoint.
This metadata endpoint (/.well-known/openid-configuration) provides Keycloak’s OpenID Connect configuration. It includes essential information such as:
- The issuer (iss)
- Supported scopes and response types
- Authorization and token endpoints
- Public keys for JWT signature validation
- Logout endpoints and supported algorithms
With this built-in support, Keycloak enables secure and standardized token validation with minimal manual setup.
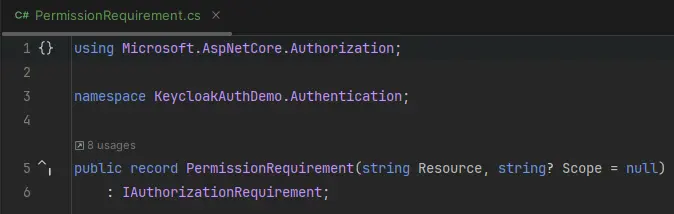
Next, you’ll define a custom authorization requirement by creating a new class: PermissionRequirement.cs. This record should implement Microsoft's IAuthorizationRequirement interface.AspNetCore.Authorization namespace.
This class forms the foundation for a custom authorization policy, allowing you to enforce fine-grained access control based on your application’s logic, such as user roles, scopes, or specific permissions.
Then we need to create a new file named ApplicationPolicies.cs that will contain two classes:
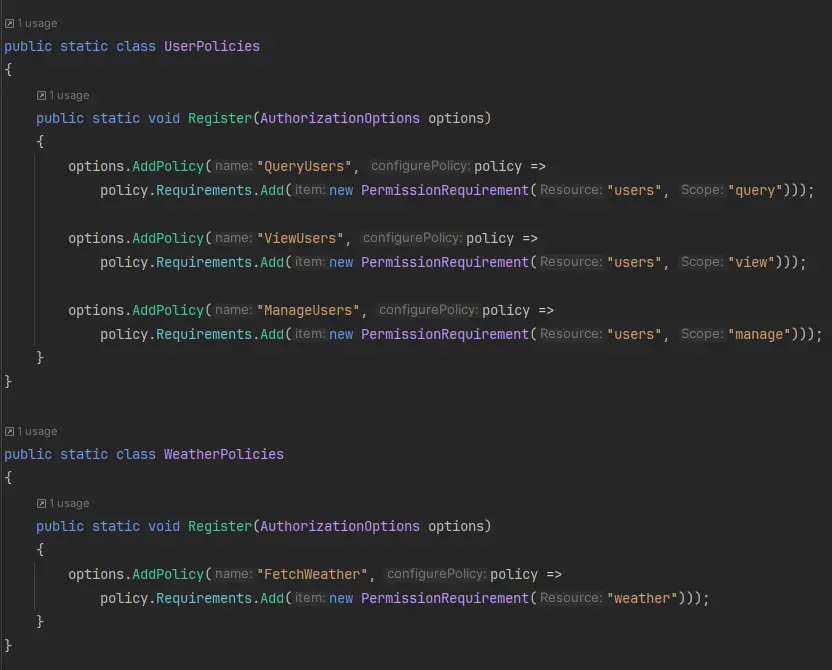
In our code, we have defined a static class known as DependencyInjection. The purpose of this class is to house our helper methods for dependency injection. These helper methods are designed as extension methods and these are being invoked in the Program.cs file.

In this section, we're setting up Authentication and Authorization for our service. We're also adding http clients. As an extra step, we're setting up a reverse proxy, which we'll discuss in more detail later.
We need to specify the previously defined necessary policies within the AddAuthorization method.
For simplicity, we stick with minimal APIs, which are the examples in the Program.cs file:

All API requests in this demo are GET requests, designed to return simple messages that confirm Keycloak authorization is functioning correctly.
Protected Endpoints and Required Policies:
- /api/users → Requires the QueryUsers policy
- /api/users/{id} → Requires the ViewUsers policy
- /api/users/manage → Requires the ManageUsers policy
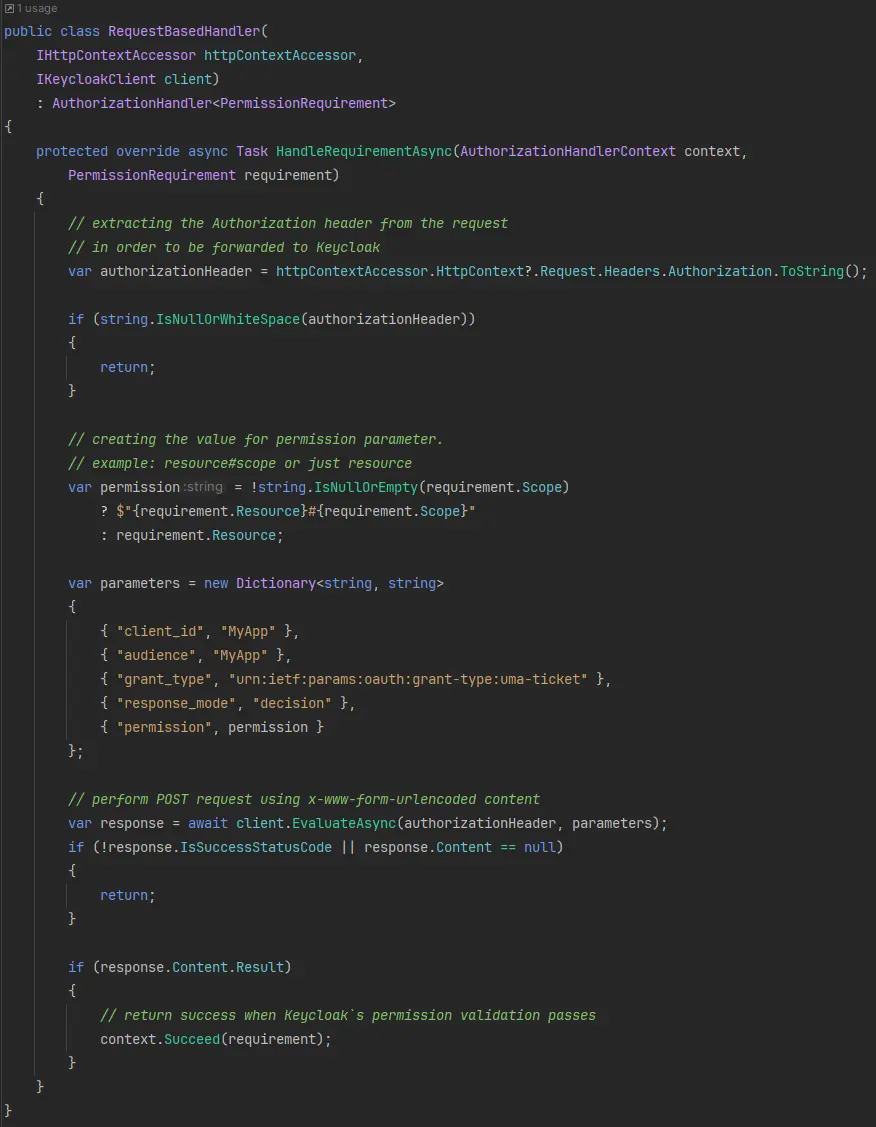
We’ve implemented a custom authorization handler called RequestBasedHandler to enforce these policies. This handler sends a request to Keycloak on each API call to:
- Verify the user's authentication
- Validate the applied authorization policy
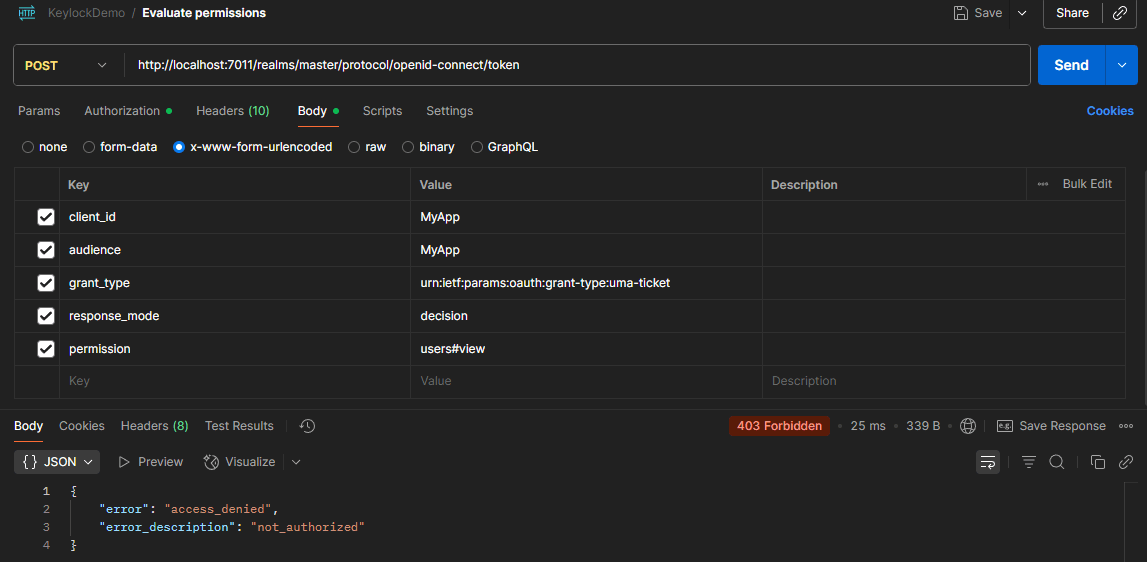
In our setup, the client (we’re using Postman) sends API requests with the Keycloak-issued access token, retrieved from: http://localhost:7011/realms/master/protocol/openid-connect/token.
This ensures each API request is checked in real time against the latest Keycloak roles and permissions.
RequestBasedHandler:
Let's now authenticate and get a new access token from Keycloak:
Explanation:
- API (location): 'http://localhost:7011/realms/master/protocol/openid-connect/token'
- Content type: x-www-form-urlencoded
- Client_id: the name of our client (MyApp)
- Client_secret: You can see it under your ‘Credentials’ tab of our client.
- Username and password of our user
The result of this API call will look like this:
Now that we have the access token, we can call our backend service to fetch user information. If our user accesses this API, the result will be a 204 NoContent status code; otherwise, a 401 Unauthorized status code will be returned.
You can now examine the functionality by deleting roles from your Keycloak user and verifying if you still possess access to the APIs. In our example, we'll eliminate the 'query-users' user role from our Keycloak user profile. Following this alteration, we should receive a status code 401, as demonstrated below:

Now, let's explain the events that occurred and review the Evaluation tab within Keycloak. You should examine this after defining your permissions, ensuring that your stipulated policies and permissions function as projected.
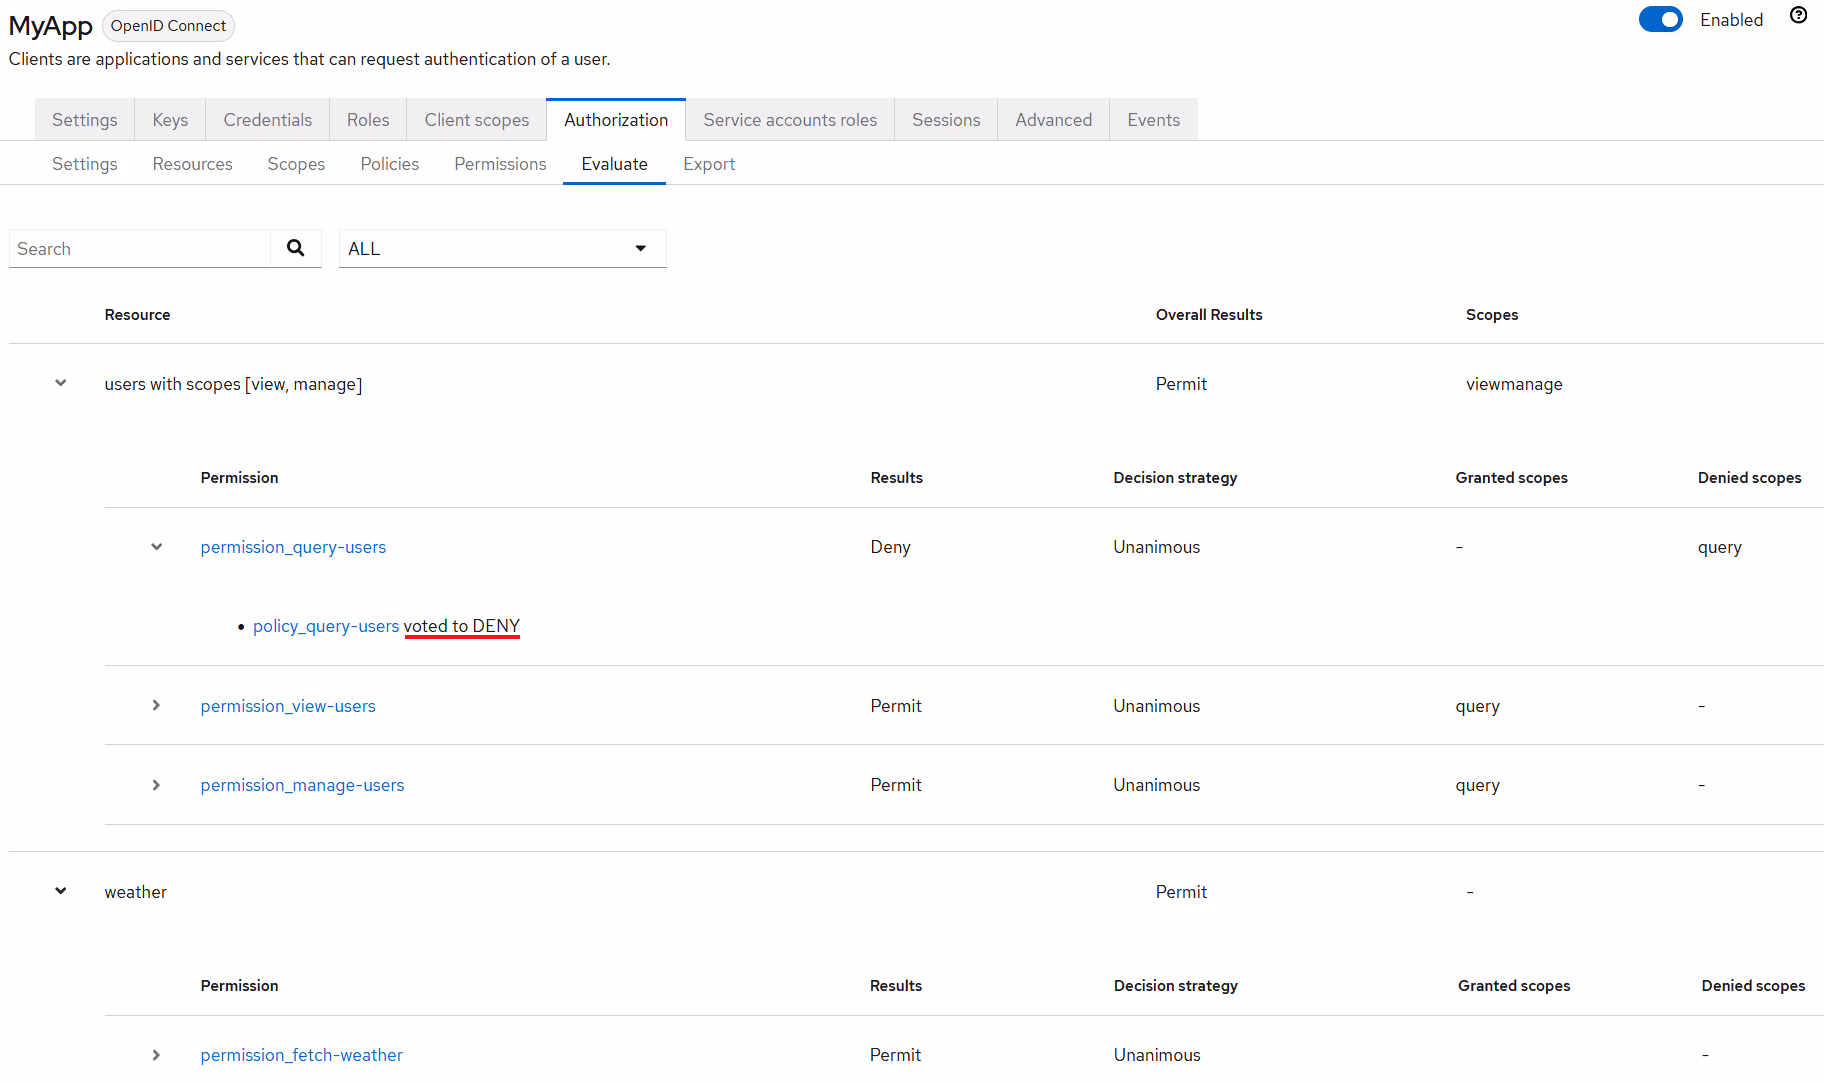
In this section, we can observe all permissions set for our client (MyApp). We have assessed the user's permissions, and it's evident that 'permission_query-users' was unsuccessful. The failure was because the 'policy_query-users' denied our access, as this specific policy looks for the 'query-users' user role. In addition, we also observe that other permissions are being granted, as their corresponding policies are valid. When we execute the HTTP call from Postman, bypassing the RequestBasedHandler, we can see Keycloak's response.
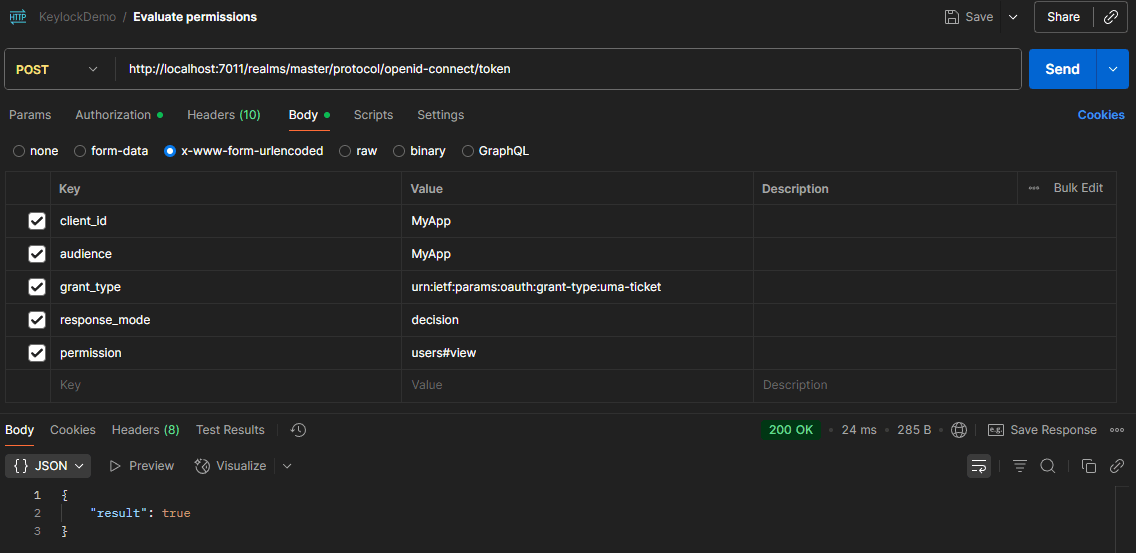
This is the response when we query whether our user has permission to access a particular resource, contingent on its scope:
However, if we attempt to assess a different resource and scope combination, such as 'users' resource with 'view' or 'manage' scope, we will obtain a positive status code response, such as 200 Ok with the following message:
4. Retrieve User's Allowed Resources and Scopes in Keycloak
To retrieve all the resources and scopes a user is authorized to access in Keycloak, you can make the following API call:
This request returns a JSON object containing the list of all authorized resources and associated scopes for the authenticated user. This is useful for debugging, auditing, or dynamically adapting frontend behavior based on user permissions.
In this case, we removed the ‘query-users’ role, and the ‘query’ scope is no longer present.
5. Check permissions from access token
To verify that the Keycloak access token includes the correct resources and scopes, you must perform a specific API call after obtaining the token.
By performing this API call, Keycloak will grant us a new access token that will contain a new claim named ‘authorization’:
TokenBasedHandler:
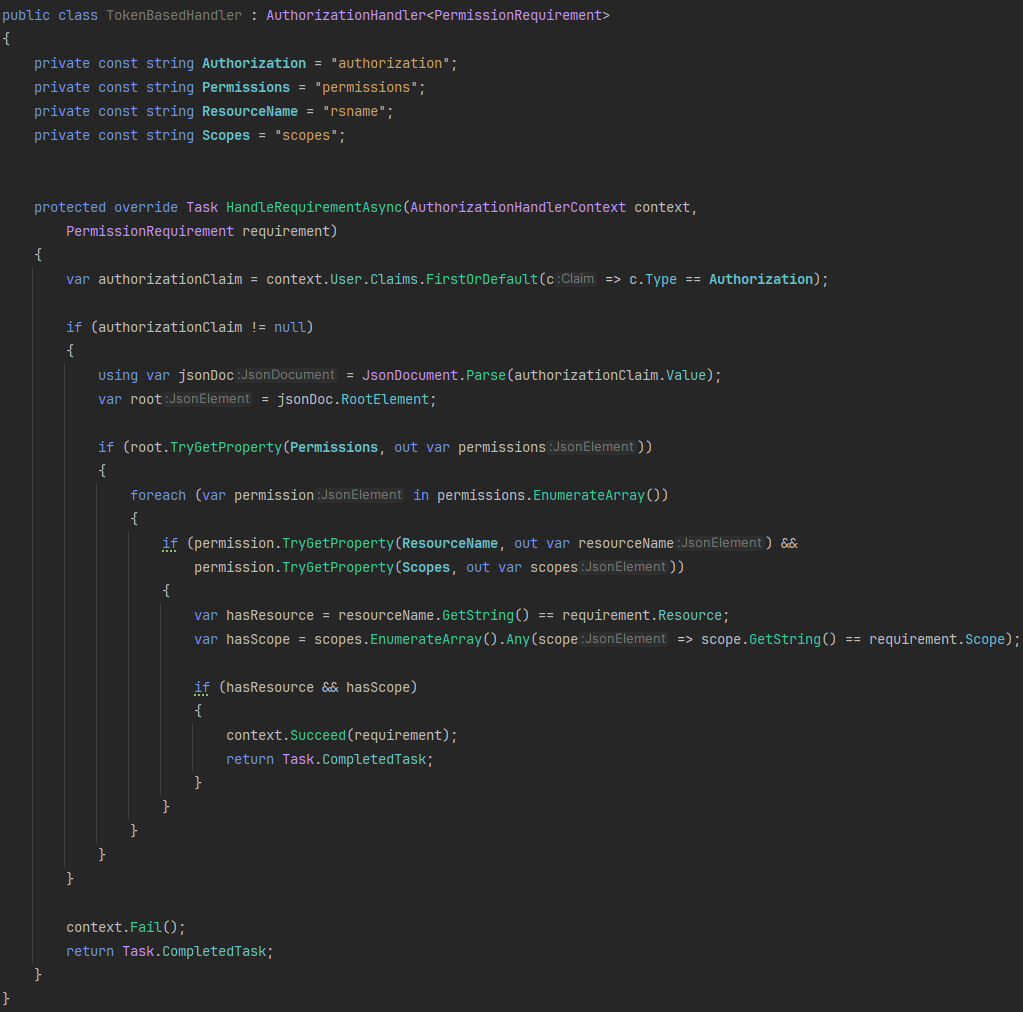
When comparing TokenBasedHandler and RequestBasedHandler, the key differences lie in API call frequency and permission update timing.
- TokenBasedHandler retrieves permissions directly from the access token issued by Keycloak. This approach reduces API calls to the Keycloak server, making it more efficient for performance. However, any role or permission changes made in Keycloak will not take effect until the token is refreshed, since the access token stores static permission data.
- RequestBasedHandler, on the other hand, performs real-time authorization checks by querying Keycloak on every API request. This ensures that any updates to roles or policies are applied immediately, offering dynamic and up-to-date access control, at the cost of increased API traffic.
Choosing between the two depends on whether your priority is performance optimization or real-time accuracy in authorization enforcement.
6. Yet Another Reverse Proxy (YARP) and Authorization Policies
Earlier, we created the fetch-weather role along with its corresponding resource, policy, and permission, but haven’t yet demonstrated its use. In this step, we’ll leverage the fetch-weather role to access a weather backend service through YARP (Yet Another Reverse Proxy), avoiding direct calls to the actual API.
Our YARP configuration will include the required authorization policies, using the RequestBasedHandler to validate user access via Keycloak in real time. This approach highlights the flexibility of authorization policies in .NET, showing that you’re not limited to scopes—you can define custom resources per API endpoint for precise access control.
Yarp.json
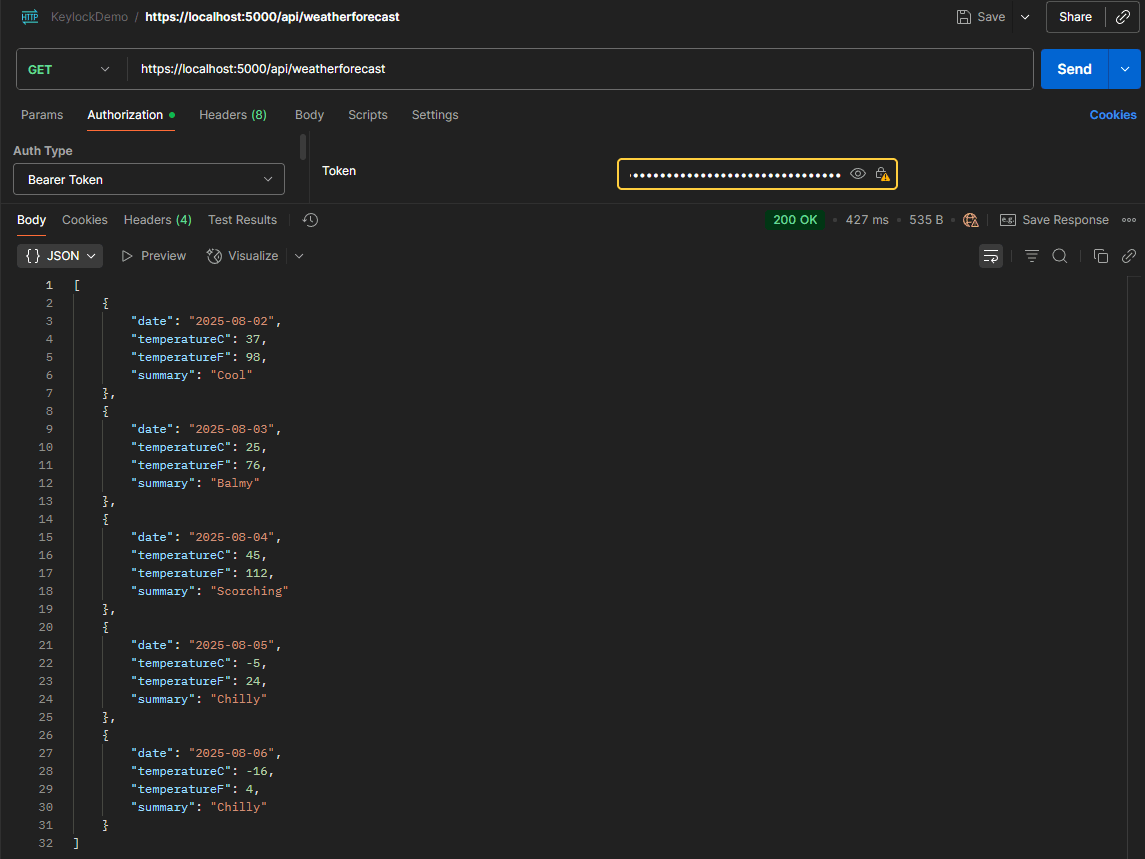
In this YARP setup, the address under the primary destination within the weather cluster points to the weather service's base URL. The route for the /api/weatherforecast/ endpoint is defined with the FetchWeather authorization policy.
When calling https://localhost:5000/api/weatherforecast/ using a Keycloak-issued access token, the request succeeds because the user holds the required fetch-weather role. This confirms that Keycloak authorization is working as expected through YARP.
7. Recommendation
Securing Keycloak in Production Environments
When aiming to achieve the highest level of security for your applications, it's essential to consider layered protection strategies. While Keycloak is a powerful and trusted solution for authentication and authorization, additional precautions can help mitigate exposure to potential network threats.
One key recommendation is to avoid exposing Keycloak directly to the public internet. Instead, it should be accessible only through a secure backend service acting as a gateway. This architectural pattern adds a protective layer, helping shield Keycloak from direct attacks by malicious actors.
This approach does not suggest that Keycloak is insecure; quite the opposite. Keycloak provides robust security, including support for OpenID Connect, OAuth2, role-based access control (RBAC), and token management. However, following defensive programming principles and minimizing attack surfaces adds resiliency to your system and protects against unexpected vulnerabilities.
Combining this strategy with other security best practices, such as token validation, role enforcement, HTTPS enforcement, and logging, creates a stronger and more secure application infrastructure. In security, proactive defense is always better than reactive recovery.
8. Conclusion
We successfully configured Keycloak locally in this walkthrough as a powerful identity and access management solution. We explored its fine-grained authorization features, including resources, roles, policies, and permissions, enabling granular access control for your APIs and services.
Using Role-Based Access Control (RBAC) in Keycloak, we demonstrated how to control user access to various protected endpoints. We also compared two practical authorization approaches:
- Token-based validation, where permissions are read directly from the access token.
- Request-based validation, where permissions are checked in real time with Keycloak.
To extend our scenario, we built an additional application that fetches weather data, using YARP (Yet Another Reverse Proxy). This allowed us to securely implement authorization policies while proxying requests, illustrating how to apply Keycloak authorization beyond a single service.
We focused on API security throughout the process, showing how to prevent unauthorized access while keeping integration smooth and developer-friendly. This hands-on guide offers a practical foundation for building secure, scalable, and flexible authorization systems with Keycloak in .NET environments.
Whether you're new to identity management or expanding your understanding of access control in distributed systems, this guide aims to provide actionable insights you can apply in your development workflow.
Happy coding, and remember - safety doesn't happen by accident!


