How to Use Vue Instance Lifecycle Hooks

Lifecycle methods serve as a viewpoint into how our built components work behind the scenes. You often need to know when your component is created, added to the DOM, updated or destroyed. They provide you methods that enable you trigger different actions at different junctures of a component's lifecycle. They also auto-bind to your component so that you can use the component's state and methods.
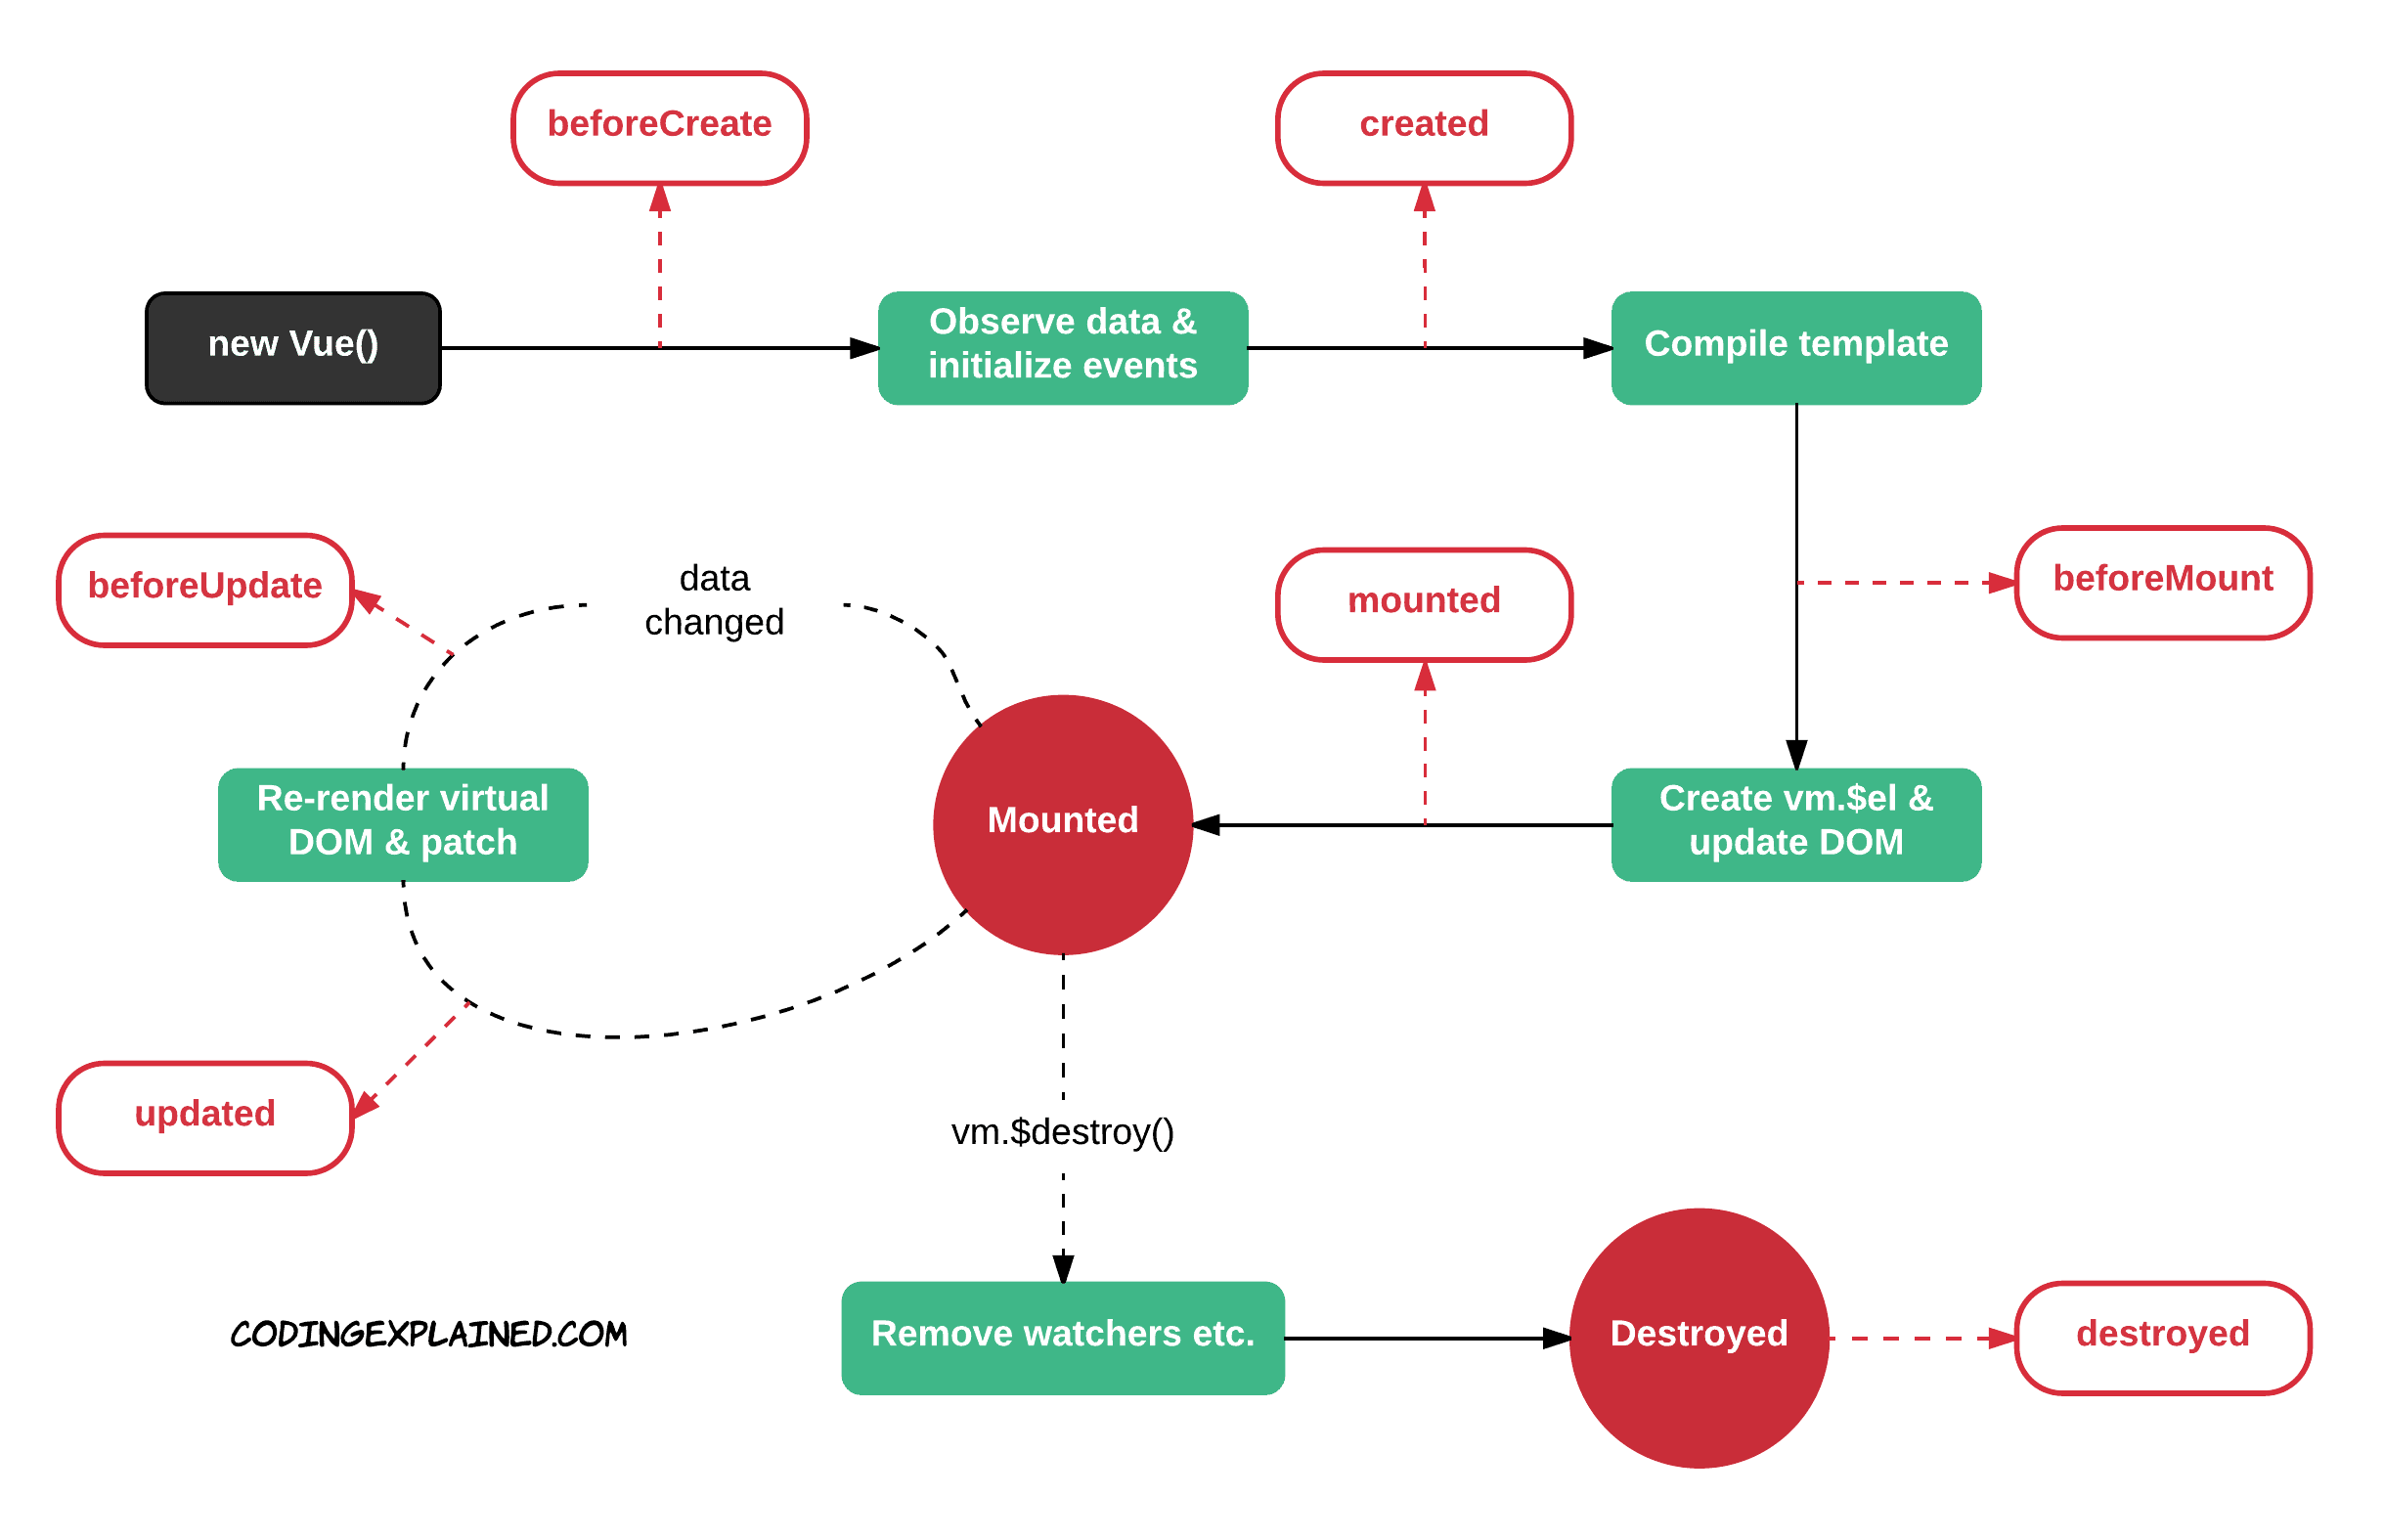
Lifecycle Diagram

Actions of lifecycle methods can be broken down into four categories:
-
Creation (Initialization)
-
Mounting (DOM Insertion)
-
Updating (Diff & Re-render)
-
Destruction (Teardown)
1.1. beforeCreate and created
Creation hooks are the very first hooks that run in your component. They allow you to perform actions before your component has even been added to the DOM. Unlike any of the other hooks, creation hooks are also run during server-side rendering.
a. beforeCreate
The beforeCreate hook runs at the very initialization of your component. Here, data is still not reactive and events that occur during the component's lifecycle have not been set up yet
new Vue({
    data: {
     x: 'Assist Software Vue Lifecycle hooks'
    },
    beforeCreate: function () {
      // `this` points to the view model instance
      console.log('x is: ' + this.x)
    }
  })
     // x is: undefined
b. created
created(): The created() hook is invoked when Vue has set up events and data observation. Here, events are active and access to reactive data is enabled though templates have not yet been mounted or rendered. Check out the code block below:
new Vue({
    data: {
     x: 'Assist Software Vue Lifecycle hooks'
    },
    created: function () {
      // `this` points to the view model instance
      console.log('x is: ' + this.x)
    }
  })
     // x is: Assist Software Vue Lifecycle hooks
Mounting hooks are often the most-used hooks, for better or worse. They allow you to access your component immediately before and after the first render. They do not, however, run during server-side rendering.
Should be used if the DOM of your component needs to be modified immediately before or after it is initially rendered.
Do not use if: You need to fetch some data for your component on initialization. Use created (or created + activated for keep-alive components) for this instead, especially if you need that data during server-side rendering.
a. beforeMount
beforeMount(): The beforeMount() method is invoked after our template has been compiled and our virtual DOM updated by Vue. After this, the $el property is added to the Vue instance, the native DOM is updated and the mounted() method is invoked.
 new Vue({
    beforeMount: function () {
      // `this` points to the view model instance
      console.log(`this.$el doesn't exist yet, but it will soon!`)
   }
 })
b. mounted
In the mounted() hook, you will have full access to the reactive component, templates, and rendered DOM (via. this.$el). Mounted is the most-often used lifecycle hook. The most frequently used patterns are fetching data for your component (use created for this instead,) and modifying the DOM, often to integrate non-Vue libraries.
Updating methods are useful for debugging. They are called whenever a reactive property used by your component changes or re-renders. The component's DOM would have been updated when this hook is called so you can use updating methods to perform DOM dependent operations. It's advised you don't use updating methods to change state, computed properties or watchers are best fit for that instead.
a. beforeUpdate
beforeUpdate(): hook runs after data changes on your component and the update cycle begins, right before the DOM is patched and re-rendered. It allows you to get the new state of any reactive data on your component before it actually gets rendered.
b. updated
updated(): The hook runs after data changes on your component and the DOM re-renders. If you need to access the DOM after a property change, here is probably the safest place to do it.
Destruction hooks are used in the final moments of a component's lifecycle. They allow you perform actions such as cleanup when your component is destroyed and are executed when your component is torn down and removed from the DOM.
a. beforeDestroy
beforeDestroy(): is fired right before teardown. Your component will still be fully present and functional. If you need to cleanup events, beforeDestroy() is the best time to do that.
b. destroyed
destroyed(): This hook is called after your component has been already destroyed, its directives have been unbound and its event listeners have been removed. The destroyed() can be used to do any last minute cleanup or informing a remote server that the component was destroyed. Check out the example below:
There are two other hooks, activated and deactivated. These are for keep-alive components, a topic that is outside the scope of this article. Suffice it to say that they allow you to detect when a component that is wrapped in a <keep-alive></keep-alive> tag is toggled on or off. You might use them to fetch data for your component or handle state changes, effectively behaving as created and beforeDestroy without the need to do a full component rebuild.
That's it. That's all Vue.js lifecycle methods are and nothing more. Now you should be able to visualize the journey of a Vue instance whenever it is initialized and as well customize your own code using these various hooks or methods should the need arise. You can look up also at A Beginner`s Intro to Vue.js 2.0 and documentation for other methods and properties to use alongside lifecycle methods when creating your components.
More to learn here:
https://alligator.io/vuejs/
https://scotch.io/search?q=vuejs
https://github.com/vuejs/vue


