
How to use Redux in an Angular application
Date published: June 19, 2019
9 min read
1. Introduction
Redux is a reactive state management library developed by Facebook and used in the React library. This library is based on the Flux pattern. The main difference between Flux and Redux is how they handle actions; in the case of Flux, we usually have multiple stores and a dispatcher, whereas Redux has a single store, which means a dispatcher is not needed.
To use Redux in the Angular framework, we can use the NgRx library. This is a reactive state management library. With NgRx, we can get all events (data) from the Angular app and put them all in the same place (Store). When we want to use the stored data, we need to get it (dispatch) from the store using the RxJS library. RxJS (Reactive Extensions for JavaScript) is a library based on the Observable pattern that is used in Angular to process asynchronous operations.
So far, so good, but why should we use Redux in an Angular application instead of a shared service for example? We can use a service to share data between components (make sure to unsubscribe the observable every time, otherwise you risk needlessly running the observable in the background, which consumes resources) or we can use the Input/Output data flow (make sure the components have a parent/child relationship).
We can also use ViewChild for nested components. But in the case of a large project, these solutions will increase the project complexity. If we have a large number of components, we risk losing control over the data flow within a component (where did this data come from and what is its intended destination?)
This is the reason why we use Redux in Angular: the store and the unidirectional data flow reduce the complexity of the application. The flow is more clear and easy to understand for new team members.
2. Project setup
In this article, we will try to demonstrate how easy it is to use Redux and the NgRx library by creating a simple Todo application. But before starting the development, we need to ensure that we have installed angular-cli on our computer. To check this, open a command prompt or a terminal and type ng --version. If you don’t see something like this (see figure 1), please refer to the tutorial available here to install angular-cli on your machine. Now that everything is set up, we’re ready to start on our Todo app.
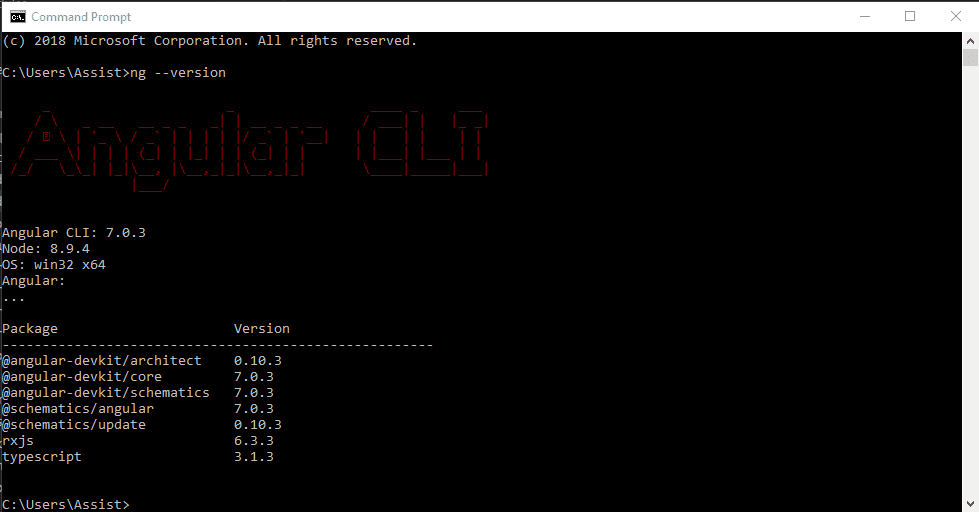
Figure 1. Check if Angular CLI is installed.
The first step is to generate a new Angular CLI application using the following command in the terminal: ng new ngrx-todo
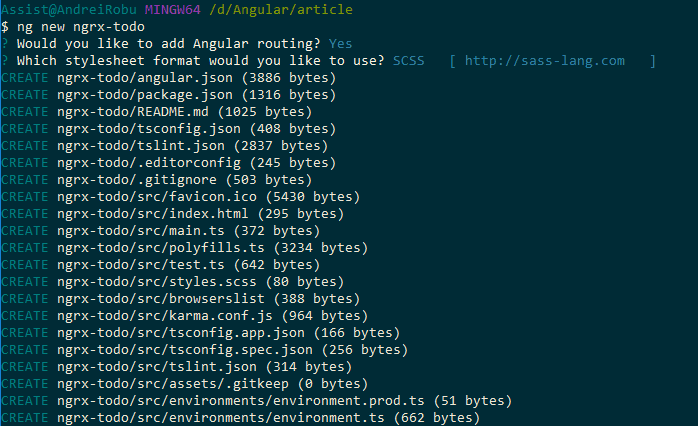
Figure 2. Generate a new project.
As soon as the Angular app is created, we can check if everything is working the way it should be by typing ng serve inside the terminal and by testing the bootstrap app on a browser by going to http://localhost:4200.
Some dependencies will need to be installed:
npm install @ng-bootstrap/ng-bootstrap bootstrap @ngrx/core @ngrx/effects @ngrx/store ngrx-store-logger ngx-pagination
To save the ToDo app’s data, we will use a REST API because we want to be able to do some CRUD operations with it. To accomplish this, we’ll use JSON Server; this will save the ToDo’s in a JSON file so that we can access this file using HttpClient from Angular.
3. Implementation
After the project setup is done, we can start to implement our ToDo app. The first step is to create a new module for our app (we need to do this because we’ll consider the app.module as the core module of the entire application). To do this, we run ng g module todos in the terminal and after that, we import this module in the app.module.ts file as can be seen below:
import { BrowserModule } from '@angular/platform-browser';
import { NgModule } from '@angular/core';

import { AppRoutingModule } from './app-routing.module';
import { TodosModule } from './modules/todos/todos.module';

import { AppComponent } from './app.component';

@NgModule({
  declarations: [
    AppComponent
  ],
  imports: [
    BrowserModule,
    AppRoutingModule,
    TodosModule
  ],
  providers: [],
  bootstrap: [AppComponent]
})
export class AppModule { }
Figure 3. app.module.ts file.
Here is the folder structure of the TodosModule that we will use for the components and the common files (services, headers, models, etc.):
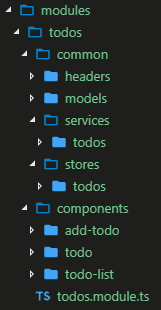
Figure 4. Project file structure.
After we have the application structure, we can start to code. The first step is to import the modules that we need to use in our todos.module.ts :
imports: [
    CommonModule,
    HttpClientModule,
    NgbModule,
    FormsModule,
    ReactiveFormsModule,
    NgxPaginationModule,
    StoreModule.forRoot({})
  ],
  providers: [TodosService]
Figure 5. todos.module.ts file, imports array.
By adding the StoreModule, this means that our module has a Store now.
In NgRx, the Store is like an internal database that reflects the state of our application. All of the StoreModule's data will be contained in the Store. Now we can write our todos action.
An action is a class that implements the NgRx action interface. Action classes have two properties:
- type: This is a read-only string that describes what the action stands for. For example GET_TODO.
- payload: The type of this property depends on what type of data this action needs to send to the reducer. In the previous example, the payload will be a string containing a todo. Not all actions need to have a payload.
For example, to get the todo list, we need the following actions:
import { Action } from '@ngrx/store';
import { Todo } from '../../models/todo';


export enum TodosActionType {
  GET_TODOS = 'GET_TODOS',
  GET_TODOS_SUCCESS = 'GET_TODOS_SUCCESS',
  GET_TODOS_FAILED = 'GET_TODOS_FAILED'
}

export class GetTodos implements Action {
  readonly type = TodosActionType.GET_TODOS;
}

export class GetTodosSuccess implements Action {
  readonly type = TodosActionType.GET_TODOS_SUCCESS;
  constructor(public payload: Array<Todo>) { }
}

export class GetTodosFailed implements Action {
  readonly type = TodosActionType.GET_TODOS_FAILED;
  constructor(public payload: string) { }
}

export type TodosActions = GetTodos |
  GetTodosSuccess |
  GetTodosFailed;
Figure 6. Todo actions.
In order to get the todo list from the REST API, we will have an action for each type of call. These actions will be used in the reducers.
A reducer is a function that knows what to do with a given action. The reducer will take the previous state of the app from the store and return the new state. Also, a reducer is a pure function. In JavaScript, a pure function means its return value is the same for the same arguments and has no side effects (outer scope is not altered). To get the todo list, use the reducers as shown below:
import { TodosActions, TodosActionType } from './todos.actions';
import { Todo } from '../../models/todo';

export const initialState = {};

export function todosReducer(state = initialState, action: TodosActions) {

  switch (action.type) {

    case TodosActionType.GET_TODOS: {
      return { ...state };
    }

    case TodosActionType.GET_TODOS_SUCCESS: {
      let msgText = '';
      let bgClass = '';

      if (action.payload.length < 1) {
        msgText = 'No data found';
        bgClass = 'bg-danger';
      } else {
        msgText = 'Loading data';
        bgClass = 'bg-info';
      }

      return {
        ...state,
        todoList: action.payload,
        message: msgText,
        infoClass: bgClass
      };
    }

    case TodosActionType.GET_TODOS_FAILED: {
      return { ...state };
    }
}
Figure 7. Todo reduces.
With the GET_TODOS_SUCCESS action, we can see that the reducer returns an object that contains the todo list, a message, and a CSS class. This object will be used to display the todo list in our application. Also, the actions can be used in Effects.
An Effect uses streams to provide new sources of actions to reduce states based on external interactions such as REST API requests or web socket messages. In fact, Effects are a kind of middleware we use to receive a new state of the store data. For example, to get the list of todos, we need to have the following service:
import { Injectable } from '@angular/core';
import { HttpClient } from '@angular/common/http';
import { catchError } from 'rxjs/operators';
import { throwError } from 'rxjs';
import { Todo } from './../../models/todo';
import { headers } from '../../headers/headers';

@Injectable({
  providedIn: 'root'
})
export class TodosService {

  baseUrl: string;

  constructor(private http: HttpClient) {
    this.baseUrl = 'http://localhost:3000';
  }

  getAPITodos() {
    return this.http.get(`${this.baseUrl}/todos`, { headers })
      .pipe(catchError((error: any) => throwError(error.message)));
  }
}
Figure 8. Todo service.
This is a simple way to get data from the API. The getAPITodos method returns an observable.
And the effects of this service will be the following:
import { Injectable } from '@angular/core';
import { Actions, Effect, ofType } from '@ngrx/effects';

import { TodosService } from './../../services/todos/todos.service';

import {
  TodosActionType,
  GetTodosSuccess, GetTodosFailed,
  AddTodoSuccess, AddTodoFailed,
  UpdateTodoSuccess, UpdateTodoFailed,
  DeleteTodoSuccess,
  DeleteTodoFailed
} from './todos.actions';
import { switchMap, catchError, map } from 'rxjs/operators';
import { of } from 'rxjs';

import { Todo } from '../../models/todo';

@Injectable()
export class TodosEffects {

  constructor(
    private actions$: Actions,
    private todosService: TodosService
  ) { }

  @Effect()
  getTodos$ = this.actions$.pipe(
    ofType(TodosActionType.GET_TODOS),
    switchMap(() =>
      this.todosService.getAPITodos().pipe(
        map((todos: Array<Todo>) => new GetTodosSuccess(todos)),
        catchError(error => of(new GetTodosFailed(error)))
      )
    )
  );
}
Figure 9. Todo effects.
We can see here that the Effect will return GetTodosSuccess if we receive the data from the API or it will return GetTodosFailed if it fails.
To access the data, we just need to dispatch an action to the store in todo-list.component.ts as follows:
import { Component, OnInit } from '@angular/core';
import { Todo } from './../../common/models/todo';
import { Store } from '@ngrx/store';
import * as Todos from '../../common/store/todos/todos.actions';

@Component({
  selector: 'app-todo-list',
  templateUrl: './todo-list.component.html',
  styleUrls: ['./todo-list.component.scss']
})
export class TodoListComponent implements OnInit {

  todos: Array<Todo>;
  message: string;
  bgClass: string;
  p = 1;

  constructor(private store: Store<any>) { }

  ngOnInit() {
    this.store.dispatch(new Todos.GetTodos());
    this.store.select('todos').subscribe(response => {

      this.todos = response.todoList;
      this.message = response.message;
      this.bgClass = response.infoClass;

      setTimeout(() => {
        this.message = '';
      }, 2000);

    }, error => {
      console.log(error);
    });
  }
}
Figure 10. todo-list.component.ts file.
The template of the todo-list.component.ts component is the following:
<div class="container-fluid" *ngIf="todos">
  <div class="row">

    <div class="col-12">

      <div class="card mt-5">
        <div class="card-header">
          <h1 class="display-6 d-inline">Todo App</h1>

          <app-add-todo></app-add-todo>

        </div>
        <div class="card-body">
          <table class="table">
            <tbody>
              <tr *ngFor="let todo of todos | paginate: { itemsPerPage: 10, currentPage: p }">
                <td>
                  <code>{{todo | json}}</code>
                </td>
              </tr>
            </tbody>
          </table>

          <pagination-controls (pageChange)="p = $event"></pagination-controls>
        </div>
      </div>

    </div>

  </div>
</div>
Figure 11. Template file for todo-list component.
The result of the GET operation will look like this:

Figure 12. GET operation result.
As can be seen in figure 13, you need to select the todo list and subscribe it to your store in order to get the list of items. You also need to add new elements into the imports array from todos.module.ts. Then you need to add the store for your module (feature), reducers and effects:
imports: [
    CommonModule,
    HttpClientModule,
    NgbModule,
    FormsModule,
    ReactiveFormsModule,
    NgxPaginationModule,
    StoreModule.forRoot({}),
    StoreModule.forFeature('todos', todosReducer, { metaReducers }),
    EffectsModule.forRoot([]),
    EffectsModule.forFeature([TodosEffects])
  ],
Figure 13. todos.module.ts updated imports array.
After these steps, we can finish the application just for the GET operation from the CRUD operations. And the diagram for the GET operation using the NgRx library will be the following:
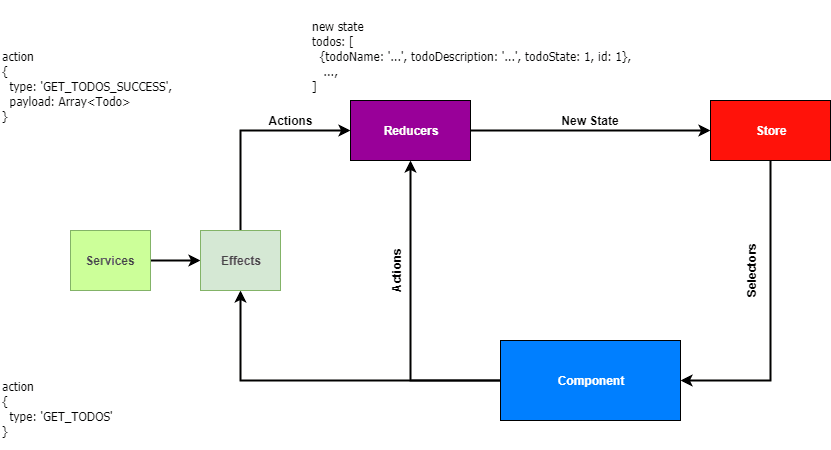
Figure 14. NgRx workflow diagram for GET todo list.
The other CRUD operations (create, update and delete) for this article can be found in the source code on github and after you have completed your application, it should look like this:
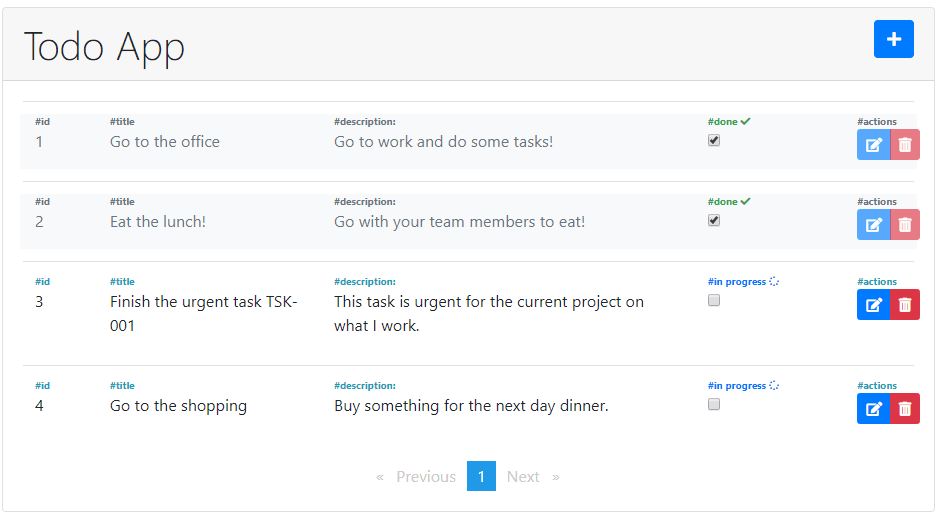
Figure 15. Complete todo application.
4. Conclusions
We can see how easy it is to add the NgRx library into an Angular project. Here are some of my conclusions before we end:
- The NgRx library is awesome if we want to use it in larger applications (as seen in the application we presented in this article, we needed to do some configurations, but if you have more than 20-30 components, this library will be helpful).
- A large application that uses the NgRx library will be easy to understand for a new team member.
- It is easy to follow the data flow and to debug the application.
- By using Redux in an Angular application, the NgRx library becomes more robust and flexible.


