Easy Gateway Payment Integration with Stripe | ASSIST Software Romania
get in touch
>

LIKE

SHARE

Facebook Share Tweet LinkedIn Share

FOLLOW

LinkedIn Follow Xing Follow

Software Development Engineer II at ASSIST

Programming with online payment systems is like juggling chainsaws - one mistake and your customers' money goes flying!

Read time: 17 minutes

Title Easy Gateway Payment Integration Stripe

1. Introduction

When I first decided to write this blog post, I kept thinking about how to explain, in great detail, how this service provider works. But the more I thought about it, the more I was searching for definitions and explanations on the internet, and eventually I realized that if I were to include all that information here, it would end up becoming a monolith of a post. No one would be interested in reading it.

So I decided to remove all the “boilerplate” text and keep it concise and easy to follow.


2. What is Stripe?

Today, mobile devices are not only miniature malls with all you can buy listings but also wallets. As a consumer, you can make purchases in seconds, and it’s all thanks to the evolution andStripe Logo innovation of the payment industry. 

Buying and selling goods on the internet most often involves an intermediary called a payment gateway. PayPal is a payment gateway example, but it’s not the one some of the major companies use. 

Stripe is the payment gateway used by Twitter, Facebook and Amazon and is regarded as a top solution in the industry. Not to mention that developers review the Stripe API as easy-to-use. Stripe lets companies accept credit and debit cards as a form of payment inside their applications.

An account on the Stripe website is required in order to obtain a PUBLISHABLE_KEY and a SECRET_KEY. All the payments will be logged on the dashboard, which will be available as soon as you create your account. For our intended purpose, we will need a Backend application and an Android application.


3. Setting up a Node.js Stripe server

Without further ado, let’s see how to integrate stripe payment gateway in Node.js. This will handle all the requests made from the mobile application and will pass them to the Stripe dashboard. In other words, the Backend will act as a middleware between the Android application and the Stripe dashboard.

First you will need to create a server.js file as you can see in Code Snippet 1. This is the central point of the application. Here you will specify on what port the server will be running and from here, you will be able to start the server.

To start the server, you can run one of the following commands inside a terminal:

  • npm start
  • node server.js

const http = require('http');
const service = require('./service');
const dotenv = require('dotenv');
dotenv.config();
const port = 8080;

const server = http.createServer(service);

server.listen(port, () => {
    console.log('Server is up and running on port number ' + port);
});

Code Snippet 1 - Server.js
 

The service.js file from Code Snippet 2 will contain all the endpoint definitions that are necessary to enable the communication between the mobile application and the Stripe dashboard.

The /greet endpoint can be used to see if the server is up and running. The only purpose of this endpoint is to print a message.

const bodyparser = require('body-parser')
const express = require('express');
const stripeServer = require('./stripeServer');
const app = express();

// Body-parser middleware
app.use(bodyparser.urlencoded({extended:false}))
app.use(bodyparser.json())

app.get('/greet', stripeServer.greetUser);
app.get('/config', stripeServer.config);
app.post('/create-payment-intent', stripeServer.createPaymentIntent)
module.exports = app;

Code Snippet 2 - Service.js


The result for the greet endpoint can be seen in Image 1.

Image 1 - Greet Endpoint


The /config endpoint has a more practical use. This one will send to the mobile application the PUBLISHABLE_KEY for the Stripe account that was set. For safety reasons, the key is not stored on the mobile device but instead it is sent from the server.

The response for the /config endpoint can be seen in Image 2.

Stripe Publishable Key

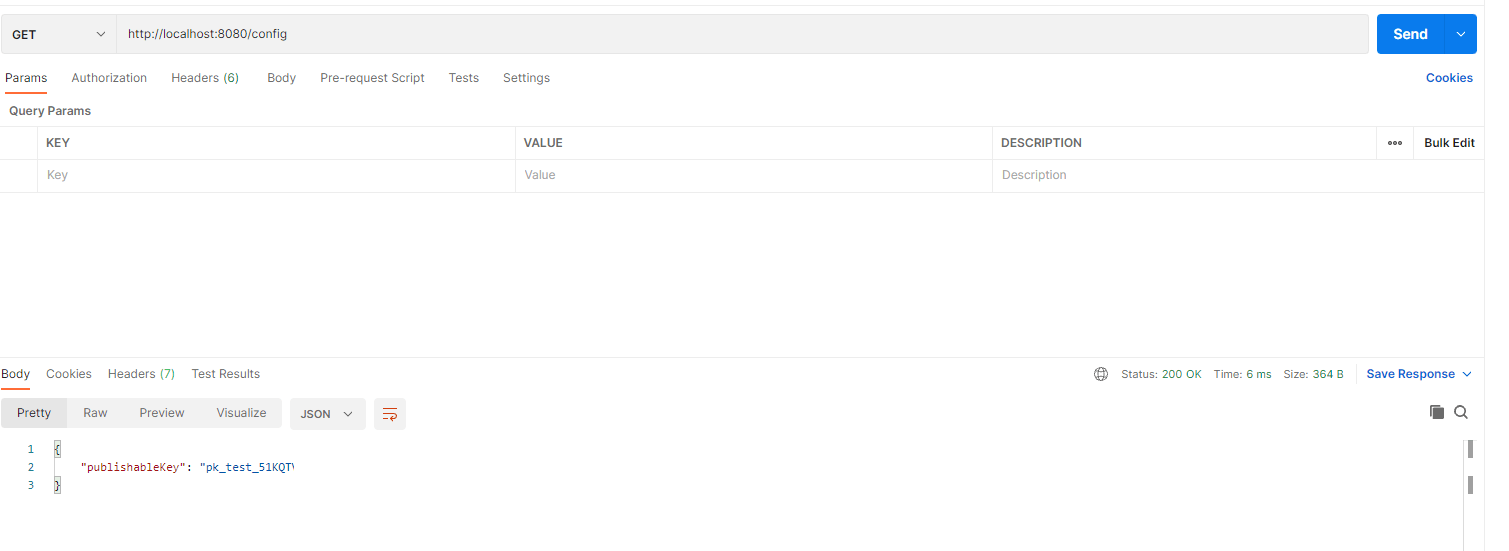
Image 2 - Config Endpoint


The /createa-payment-intent endpoint is responsible for creating the payment intent from the user using the currency, payment amount and payment method. By creating this payment intent, the payment is registered on the Stripe dashboard with the status Incomplete. This is because at this time, the payment is not fully finalized because the user has not provided their credit/debit card information. At this early stage, the payment has a unique Id that will be later used to finalize the payment process.

As a response for executing this endpoint, we will receive the payment intent secret key. This is a unique identifier for each individual payment, and it will later be saved on the Stripe dashboard. To see this response, check out Image 3 below.
 

Payment Intent Stripe

Image 3 - Create payment intent


The next file is stripeServer.js. We can consider this the brains of the entire application. Each method from this file is responsible for the corresponding endpoint. Here we define what data is expected from the mobile application and what data we send in return.

The code for this file can be seen below in Code Snippet 3.

'use stric'
const constants = require('./constants/constants');
const express = require("express");
const app = express();
const { resolve } = require("path");
const dotenv = require('dotenv');
dotenv.config();
const SECRET_KEY = “SECRET_KEY”
const PUBLISHABLE_KEY = “PUBLISHABLE_KEY”
    // This is your real test secret API key.
const stripe = require(constants.stripe)(SECRET_KEY);
app.use(express.static("."));
app.use(express.json());

module.exports = {
    greetUser: function(req, res) {
        return res.status(200).json({ 'message': constants.greet_message });
    },

    config: function(req, res) {
        return res.status(200).json({ 'publishableKey': PUBLISHABLE_KEY });
    },

    createPaymentIntent: async function(req, res) {

        // Create a PaymentIntent with the order amount and currency

        try {
            const { amount, currency, paymentMethodType } = req.body;

            const paymentIntent = await stripe.paymentIntents.create({
                amount: amount,
                currency: currency,
                payment_method_types: [paymentMethodType]
            });

            return res.status(200).json({ clientSecret: paymentIntent.client_secret });
        } catch (e) {
            return res.status(400).json({ error: { message: e.message } });
        }
    }
}

Code Snippet 3 - StripeServer.js


Last but not least, we have the constants.js file. Here we store all the necessary constants that are used all throughout the application. This file is mostly used to remove redundancies with strings or other values that do not need to change. The code for this file can be seen below in Code Snippet 4.

const stripe = "stripe";
const greet_message = "It is working fine";

module.exports = {
    stripe: stripe,
    greet_message: greet_message
};

Code Snippet 4 - Constant.js


4. Setting up Stripe Android Application

For the Android application, we will create a simple project composed of two activities with their corresponding XML files and an additional class file that handles the payment intent creation.

In Code Snippet 5, we can see the above-mentioned class that handles the creation of the payment intent. This method requires some parameters like the transaction amount, the currency, the payment method and a completion callback that is triggered when the server approves the payment and the Stripe dashboard marks it as completed as shown in Image 4.

Sum money Stripe Payment

Image 4 - Completed Transaction

class ApiClient {
  private val httpClient = OkHttpClient()

  fun createPaymentIntent(
      amount: Double,
      paymentMethodType: String,
      currency: String,
      completion: (paymentIntentClientSecret: String?, error: String?) -> Unit
  ) {
      val mediaType = "application/json; charset=utf-8".toMediaType()
      val requestJson = """
          {
          "amount": $amount,
          "currency": "$currency",
          "paymentMethodType": "$paymentMethodType"
          }
      """.trimIndent()
      val body = requestJson.toRequestBody(mediaType)
      val request = Request.Builder().url("$backendUrl/create-payment-intent").post(body).build()
      httpClient.newCall(request).enqueue(object : Callback {
          override fun onFailure(call: Call, e: IOException) {
              completion(null, "$e")
          }

          override fun onResponse(call: Call, response: Response) {
              if (response.isSuccessful) {
                  val responseData = response.body?.string()
                  val responseJson = responseData?.let { JSONObject(it) } ?: JSONObject()
                  var paymentIntentClientSecret: String = responseJson.getString("clientSecret")
                  completion(paymentIntentClientSecret, null)
              } else {
                  completion(null, "$response")
              }
          }
      })
  }
}

Code Snippet 5 - Api Client


Next on the chopping block is the MainActivity. Here we fetch the publishable key from the server and we create a method that will take the transaction amount from the user. If you want to see the Main Activity code, you can direct your attention to Code Snippet 6 and if you want to see the XML file, you can refer to Code Snippet 9. If you’re expecting some super futuristic design, you will be disappointed because this activity only has one button and one edit text field as shown in Image 7. The user can enter the transaction amount in the edit text and after pressing the ‘PAY WITH CREDIT CARD’ button, they will be redirected to a screen where they will be required to enter their credit card information. Don’t worry; there is no need to enter real credit card information here during the development/testing stages, but more on this at the appropriate time.

Because the Stripe platform works with the smallest monetary unit in each currency, if we want for example to use USD for the transaction, we will need to multiply the user input (which is in cents) by 100 to get the amount in dollars. This applies for any other currencies, and this can be seen in Code Snippet 6.

After a successful transaction, the application will come back to this screen and show an alert dialog with a JSON Object that contains all the information about the freshly completed transaction. This dialog can be seen in Image 5.
 

private val httpClient = OkHttpClient()
private lateinit var publishableKey: String

override fun onCreate(savedInstanceState: Bundle?) {
  super.onCreate(savedInstanceState)
  setContentView(R.layout.activity_launcher)

  fetchPublishableKey()
  initComponents()
}

private fun initComponents() {
  paymentMethodCard.setOnClickListener {
      if (!transactionAmount.text.toString().isEmpty()) {
          val intent = Intent(this, CardActivity::class.java)
          intent.putExtra(
              "transactionAmount",
              transactionAmount.text.toString().toDouble() * 100
          )
          startActivity(intent)
      } else {
          Toast.makeText(this, "Insert payment amount", Toast.LENGTH_LONG).show()
      }
  }
}

private fun displayAlert(title: String, message: String) {
  runOnUiThread {
      val builder = AlertDialog.Builder(this)
          .setTitle(title)
          .setMessage(message)

      builder.setPositiveButton("Ok", null)
      builder.create().show()
  }
}

//Fetch publishable key from server and initialize the Stripe SDK
private fun fetchPublishableKey() {
  val request = Request.Builder().url("$backendUrl/config").build()

  httpClient.newCall(request).enqueue(object : Callback {
      override fun onFailure(call: Call, e: IOException) {
          displayAlert("Request failed", "Error: $e")
      }

      override fun onResponse(call: Call, response: Response) {
          if (response.isSuccessful) {
              val responseData = response.body?.string()
              val responseJson = responseData?.let { JSONObject(it) } ?: JSONObject()
              publishableKey = responseJson.getString("publishableKey")

              PaymentConfiguration.init(applicationContext, publishableKey)
          } else {
              displayAlert("Request failed", "Error: $response")
          }
      }
  })
}

Code Snippet 6 - MainActivity


Stripe Payment

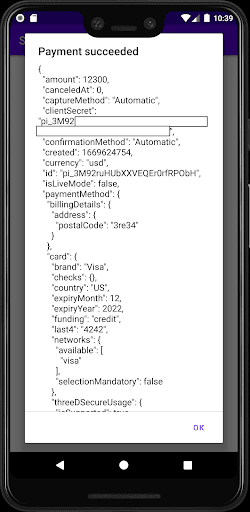
Image 5 - Completed Transaction Dialog
 

Last but not least, we have the CardActivity visible in Code Snippet 7. The XML file for this screen contains a predefined widget requiring the credit card information and a simple button to initiate the payment. The XML code can be seen in Code Snippet 8 and the final result can be seen in Image 6. The card widget is a component of the Stripe library that must be implemented in the Gradle file. Simply add the latest version like so: implementation 'com.stripe:stripe-android:19.1.1'. As I mentioned earlier, there is no need to enter real credit card information because Stripe provides some testing cards in order to ease the development and testing process. These cards can be found in their documentation under the Testing section or by using this link: https://stripe.com/docs/testing.

The widget used is the default one for easy integration. But the Stripe documentation describes a method to create your own custom widgets based on the theme of your application.

If you are using your own computer to host the server presented in the beginning of this article and if you are using the Android emulator to test your app, I recommend that you use the local IP address presented in Code Snippet 7. This is stored in the backendUrl variable. Just make sure that this is a global variable inside the CardActivity class. If you are hosting your server on another machine or on Heroku, then you will use the IP address provided by that platform.

The default credit card widget provides some validations such as that the credit card number must have the correct number of digits and the expiration date should be in the future based on the current date.
 

//val backendUrl = "http://10.0.2.2:4242" //For local testing with an emulator

class CardActivity : AppCompatActivity() {

  private lateinit var paymentIntentClientSecret: String
  private lateinit var stripe: Stripe

  override fun onCreate(savedInstanceState: Bundle?) {
      super.onCreate(savedInstanceState)
      setContentView(R.layout.activity_card)

      stripe = Stripe(this, PaymentConfiguration.getInstance(applicationContext).publishableKey)

      var amount = intent.getDoubleExtra("transactionAmount", 0.0)

      startCheckout(amount)
  }

  override fun onActivityResult(requestCode: Int, resultCode: Int, data: Intent?) {
      super.onActivityResult(requestCode, resultCode, data)

      //Handle the result of stripe.confirmPayment
      stripe.onPaymentResult(requestCode, data, object : ApiResultCallback<PaymentIntentResult> {
          override fun onSuccess(result: PaymentIntentResult) {
              val paymentIntent = result.intent
              if (paymentIntent.status == StripeIntent.Status.Succeeded) {
                  val gson = GsonBuilder().setPrettyPrinting().create()
                  displayAlert("Payment succeeded", gson.toJson(paymentIntent))
              } else if (paymentIntent.status == StripeIntent.Status.RequiresPaymentMethod) {
                  displayAlert(
                      "Payment failed",
                      paymentIntent.lastPaymentError?.message.orEmpty()
                  )
              }
          }

          override fun onError(e: Exception) {
              displayAlert("Error", e.toString())
          }
      })
  }

  private fun startCheckout(amountPay: Double) {
      ApiClient().createPaymentIntent(
          amountPay,
          "card",
          "usd",
          completion = { paymentIntentClientSecret, error ->
              run {

                  paymentIntentClientSecret?.let {
                      this.paymentIntentClientSecret = it
                  }
                  error?.let {
                      displayAlert("Failed to load PaymentIntent", "Error: $error")
                  }
              }
          })

      // Confirm the PaymentIntent with the card widget
      payButton.setOnClickListener {
          cardInputWidget.paymentMethodCreateParams?.let { params ->
              val confirmParams = ConfirmPaymentIntentParams.createWithPaymentMethodCreateParams(
                  params,
                  paymentIntentClientSecret
              )
              stripe.confirmPayment(this, confirmParams)
          }
      }
  }

  private fun displayAlert(title: String, message: String) {
      runOnUiThread {
          val builder = AlertDialog.Builder(this)
              .setTitle(title)
              .setMessage(message)

          builder.setPositiveButton("Ok") { _, _ ->
              val intent = Intent(applicationContext, LauncherActivity::class.java)
              startActivity(intent)
          }
          builder.create().show()

      }
  }

Code Snippet 7 - CardActivity


<?xml version="1.0" encoding="utf-8"?>
<androidx.constraintlayout.widget.ConstraintLayout xmlns:android="http://schemas.android.com/apk/res/android"
  xmlns:app="http://schemas.android.com/apk/res-auto"
  xmlns:tools="http://schemas.android.com/tools"
  android:layout_width="match_parent"
  android:layout_height="match_parent"
  android:layout_marginLeft="30dp"
  android:layout_marginRight="30dp"
  tools:context=".CardActivity">

  <com.stripe.android.view.CardInputWidget
      android:id="@+id/cardInputWidget"
      android:layout_width="match_parent"
      android:layout_height="wrap_content"
      app:layout_constraintBottom_toTopOf="@id/payButton"
      app:layout_constraintEnd_toEndOf="parent"
      app:layout_constraintStart_toStartOf="parent"
      app:layout_constraintTop_toTopOf="parent"
      app:layout_constraintVertical_chainStyle="packed" />

  <Button
      android:id="@+id/payButton"
      android:layout_width="match_parent"
      android:layout_height="wrap_content"
      android:backgroundTint="@android:color/holo_green_light"
      android:text="@string/pay"
      app:layout_constraintBottom_toBottomOf="parent"
      app:layout_constraintEnd_toEndOf="parent"
      app:layout_constraintStart_toStartOf="parent"
      app:layout_constraintTop_toBottomOf="@id/cardInputWidget"
      app:layout_constraintVertical_chainStyle="packed" />

</androidx.constraintlayout.widget.ConstraintLayout>

Code Snippet 8 - CardActivity.xml

Demo Stripe App Card

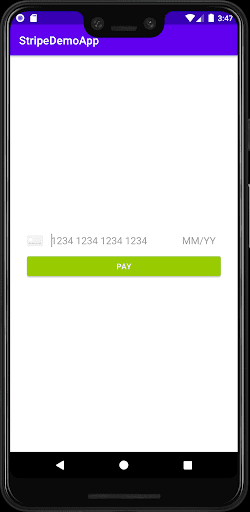
Image 6 - Card Activity Screen

<?xml version="1.0" encoding="utf-8"?>
<androidx.constraintlayout.widget.ConstraintLayout xmlns:android="http://schemas.android.com/apk/res/android"
  xmlns:app="http://schemas.android.com/apk/res-auto"
  xmlns:tools="http://schemas.android.com/tools"
  android:layout_width="match_parent"
  android:layout_height="match_parent"
  tools:context=".LauncherActivity">

  <EditText
      android:id="@+id/transactionAmount"
      android:layout_width="wrap_content"
      android:layout_height="wrap_content"
      android:hint="@string/transaction_amount"
      app:layout_constraintBottom_toTopOf="@id/paymentMethodCard"
      app:layout_constraintEnd_toEndOf="parent"
      app:layout_constraintStart_toStartOf="parent"
      app:layout_constraintTop_toTopOf="parent"
      app:layout_constraintVertical_chainStyle="packed" />

  <Button
      android:id="@+id/paymentMethodCard"
      android:layout_width="0dp"
      android:layout_height="wrap_content"
      android:layout_marginStart="10dp"
      android:layout_marginEnd="10dp"
      android:text="@string/pay_with_credit_card"
      app:layout_constraintBottom_toBottomOf="parent"
      app:layout_constraintEnd_toEndOf="parent"
      app:layout_constraintStart_toStartOf="parent"
      app:layout_constraintTop_toBottomOf="@id/transactionAmount"
      app:layout_constraintVertical_chainStyle="packed" />

</androidx.constraintlayout.widget.ConstraintLayout>

Code Snippet 9 - MainActivity.xml


Main Activity Screen

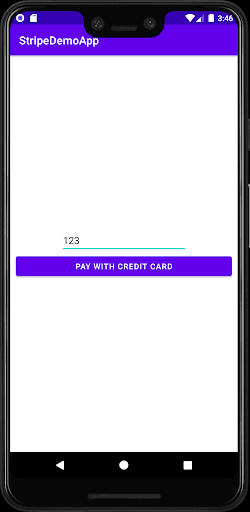
Image 7 - Main Activity Screen


5. Conclusions

This article aimed to help you create a basic application to learn how to integrate the Stripe SDK inside your Android application. Also, as I stated in the beginning of the article, you will need to create a server application to act as a middleware between the Android application and the Stripe platform. This post will get you up and going on that part too even if you don’t know any server side languages. Just watch a tutorial on how to create a basic Node.js server and create the required files presented in the first part of this blog post and you will be on your merry way.

As for the Android application, I opted for a simple project without complex UI files, in order to focus on the integration and functionality of the Stripe SDK.

So, could you use one of the payment gateway alternatives instead of Stripe? Sure. But why would you do that? Let me know in the comments!

In the end, there is nothing more to say on my part than be careful where you enter your personal information and especially your credit card details.


Do you want to get in touch with us? 

If you are interested in our software development services, you would like to join our team, or you simply want to find out more about us, we’d love to hear from you! Drop us a line and a member of the ASSIST team will get back to you as soon as possible. We are sure we can ASSIST you.

GET IN TOUCH