
Software Development Engineer II at ASSIST
Leave a digital legacy that shapes the future.
Read time: 20 minutes
1. Introduction
This article is meant for developers or solution architects who want to integrate an Identity Server in their application.
Keycloak is an open-source Identity Server and Access Management Solution that provides user federation, strong authentication, user management, fine-grained authorization, and more.
Nowadays, a lot of Web APIs need the best security solutions and architecture to survive in this industry. The main reasons why developers may want to use a dedicated Identity Server are because it has built-in secure services, and the integration can be done with minimum effort.
Also, there is no need to deal with managing the users or the authentication and authorization processes. Since an Identity Server has built-in standard protocols, like OpenID Connect, OAuth2, and SAML2.0, developers will have a more secure API.
Image 1: Keycloak logo - https://www.keycloak.org
2. Main advantages of using Keycloak
- Single-sign on
- Standard protocols
- Centralized management for admins and users
- Built-in admin portal
- Integration with a lot of SQL databases (MySQL, Microsoft SQL, MariaDB, PostgreSQL)
- Customizable themes
- High performance
- Password policies
- Identity Brokering and Social Login (authenticate with external identity providers like Facebook, GitHub, Google, Instagram, Twitter, PayPal and more)
- Maintainable and efficient
3. Best Practices when using Keycloak
- Use a Docker Compose file.
- You should be using Kubernetes nodes to protect your Identity Server and have a fallback mechanism.
- Use PostgreSQL.
- Always use the integrated middleware from .NET SDK. (for example: JwtBearer or OpenIdConnect Middlewares)
NOTE: On industry projects, in a Production Environment, we usually see Microsoft SQL and MySQL as well. These are the so-called “community databases”, which also have all the needed support in Keycloak.
4. Implementation
First, let’s look at the high-level diagram (see Image 2). Here we see that the Frontend requests the Keycloak token by the API Endpoint. That endpoint gets implemented in the Keycloak Identity Server, which is our web application with its own Web API. Then the Frontend saves the token into the HTTP Headers and after that, at every request, the Backend, which receives the token, will validate it by using its own authorization middleware. After that, the Backend will return either 200 OK, which means Authorized, or 401 Unauthorized.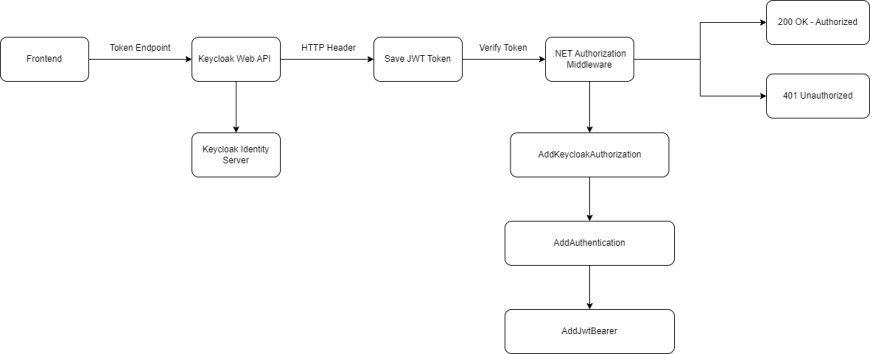
Image 2: Keycloak Authentication Flow – High-level diagram
4.1. Design and Project Architecture for the Identity Server
Here we can see the initial solution for our Identity Server.
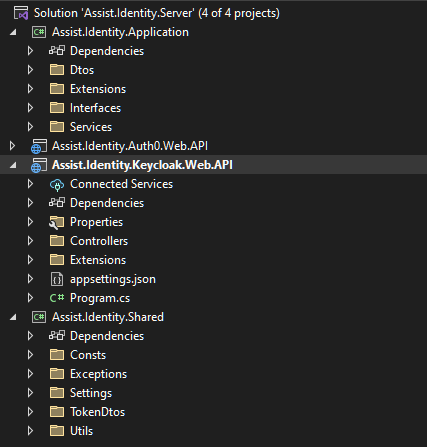
Image 3: Project structure - Identity Server with Keycloak
If we expand all the folders in every assembly, we will see the following:
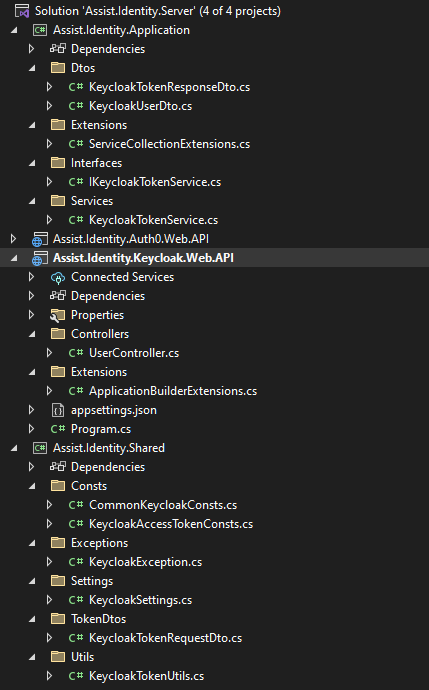
Image 4: Expanded Project structure - Identity Server with Keycloak
I preferred to use the recommended Clean Architecture design pattern, so I created an application layer, which has the Request DTOs, some extension methods for our service registration into our IoC container, and some services related to the Keycloak API endpoints.
You will notice that I have also created a shared layer which has the needed constants, a custom exception related to Keycloak, the KeycloakSettings which we will be using through the IOptions pattern to register our configuration variables, and a Utils static class which will convert our initial request to a request DTO needed for the Keycloak token endpoint.
4.2. The Docker Compose file
As mentioned in the Keycloak best practices section, we will need a Docker Compose file because most of the requirements for an industry level project call for such a file.
Generally, it is best to use a single Docker Compose file that creates all the needed instances. It is not recommended to use a separate Dockerfile for each instance or resource. Instead use a Docker Compose file that will contain all your needed instances and eventually, you can reference the Dockerfile for each separate resource in the Docker Compose file.
Here is the .yml file that we will use to run Keycloak in Development Mode.
|
|
Here you can notice that the preferred database is PostgreSQL. As described in the Best Practices section, we can also use “community databases” like Microsoft SQL, MySQL and so on.
Be careful to always check the preferred database documentation to construct your own Docker Compose file, because every connection string is different.
The image used is obviously the latest one from Keycloak and the entrypoint is using Development Mode. We also used the HTTP scheme instead of HTTPS (the hostname scheme is set to false), and the port is set to 7011.
To run the Administration Console with the admin credentials, we need to set the KEYCLOAK_ADMIN and KEYCLOAK_ADMIN_PASSWORD environment variables.
After running the docker compose up command in our CLI, we will have our Identity Server on our local machine.

Image 5: Keycloak Admin Portal
NOTE: If you want to use Keycloak in Production Mode, you will need to use the Start command.
The Production Mode is targeted for deployments of Keycloak into Production environments and follows a "secure by default" principle. This means that instead of kc.sh start-dev, we will use the kc.sh start command.
The following defaults will be set:
- HTTP is disabled as transport layer security (HTTPS) is essential.
- Hostname configuration is expected.
- HTTPS/TLS configuration is expected.
4.3. Web API Implementation
Now, since we have our Identity Server, we are able to use it in order to get the access token from Keycloak.
On a client-server architecture or on a microservices architecture, we can integrate the JWT middleware into our Web API. This is because we can propagate our JWT token through all the requests since we have a Frontend client.
However, if the application was an MVC one, we would need to think about a different strategy, because the request would need to be always kept on our MVC client-side.
Let’s start with the Program.cs file.
|
var builder = WebApplication.CreateBuilder(args);
builder.Services.AddServices(); var app = builder.Build(); if (app.Environment.IsDevelopment()) app.UseHttpsRedirection(); app.Run(); |
Here you can see that we added the services using the .NET IoC pattern and a couple of extension methods as shown above to make our code much cleaner.
After we added the services, we then configured the Keycloak configuration variables through the AddKeycloakSettings extension, and then we added the authorization using the specific extension for it as well. And of course, the usual Swagger Bearer Authentication button, which we all see on our current projects, was integrated into our Open API.
Next, I will present a couple of the extensions that I have used through this solution.
|
public static class ServiceCollectionExtensions
return services; |
After this, we added the Keycloak configuration variables (BaseUrl, ClientId and ClientSecret) to be able to call their APIs and get the access token.
To register the configuration variables, I decided to use the IOptions pattern. This means that our appsettings.json file has a Configuration JSON like this:
|
"Keycloak": { |
Here is the AddKeycloakSettings extension:
|
public static void AddKeycloakSettings(this WebApplicationBuilder builder) |
The KeycloakSettings class is the below one:
|
public class KeycloakSettings |
Next, we will move to the AddKeycloakAuthorization.
|
public static void AddKeycloakAuthorization(this WebApplicationBuilder builder)
builder.Services
options.TokenValidationParameters = new TokenValidationParameters |
Here we can see the options for the JWT middleware used to validate our Keycloak token.
The RequireHttpsMetadata option was set to false only because the running environment is Development. In Production, this option is by default set as true.
ValidateIssuer was set to true to mitigate forwarding attacks that could occur when our Identity Provider represents multiple tenants and signs tokens with the same keys.
ValidateAudience also mitigates forwarding attacks. The default value was set as true. We also set lifetime validation as true, and we validated the issuer signing key (because it is possible for tokens to contain the public key needed to check the signature). This applies to default signing key validation. The default was set as false.
After that we added the Swagger Authentication.
Now let’s move to our Controllers folder.
|
[ApiController]
public UserController(IKeycloakTokenService keycloakTokenService)
[HttpPost("token")] |
You will see that our KeycloakTokenService calls the GetTokenResponseAsync method which will create our Request DTO to call the Keycloak token endpoint.
|
public async Task<KeycloakTokenResponseDto?> GetTokenResponseAsync( var tokenRequestBody = KeycloakTokenUtils.GetTokenRequestBody(keycloakTokenRequestDto); var responseJson = await response.Content.ReadAsStringAsync().ConfigureAwait(false); |
The $"{keycloakSettings.BaseUrl}/token" is equivalent to
http://{keycloakHost}:{keycloakPort}/realms/{yourRealm}/protocol/openid-connect/token
The KeycloakTokenRequestDto class that I used is presented here:
|
public class KeycloakTokenRequestDto |
Now we can see the response DTO that was represented by the KeycloakTokenResponseDto class:
|
public class KeycloakTokenResponseDto |
To make an HTTP Post Request to Keycloak, we will need to use FormUrlEncodedContent. That means we will create a list of KeyValuePairs containing our x-www-form-urlencoded Key Value Pairs. If we open Postman, the request will look like this:

Image 6: Keycloak Token API Endpoint
Now since we are talking about the request format, let’s take a look at our KeycloakTokenUtils static class which parses our initial request into the request preferred for the Keycloak token endpoint. Since we need a FormUrlEncodedContent type, we will have to create a list of KeyValue Pairs.
|
public static class KeycloakTokenUtils |
And this is the KeycloakAccessTokenConsts static class.
|
public static class KeycloakAccessTokenConsts |
As you can see, the GrantType used has the type of “password”, and besides the credentials, we also need the client_id and the client_secret. Please look again at the Postman request, because this way you will have a better understanding of the request itself.
4.4. Let’s get to practice! Test the already created API
Here you can see the 2 endpoints: one for getting the access token from Keycloak and the other, a validation endpoint to see that we are authorized (so the API will return 200 HTTP Status OK instead of 401 HTTP Status Unauthorized).

Image 7: Swagger API Endpoints
Our request body will contain the following JSON:
|
{ |
Then we will get the following response:
|
{ |
Then after adding the Bearer Token into your Frontend header, the api/user/check/authorization endpoint will return the 200 OK HTTP status code. If you delete the token, the API will return the 401 Unauthorized HTTP status code.
5. Auth0 vs Keycloak: Pros and Cons
When we talk about Identity Servers, we will always think about Auth0 since it is the most popular Identity Server in our industry, so I considered it appropriate to make a Pros and Cons topic.
While both have a lot of features in common, it is important to mention that Auth0 has a better administration portal, so it has a better UX. Auth0 also has better integration for specific industries like financial services, healthcare, retail, public sectors, etc.
Also, it is much easier to customize your login themes than on Keycloak. Auth0 has much better UX regarding themes, while on Keycloak you must build your own theme based on Freemarker templates (which are like HTML templates).
Auth0 has anomaly detection which offers brute-force protection and breached password detection while Keycloak is poorly situated on these.
Regarding the pricing, Keycloak is open source while Auth0 is free only for the first 7,000 active users (no credit card required), then you will have to pay according to your plan.
So, keep in mind these main differences between these Identity Servers when you want to integrate one into your own application.
6. Conclusion
In this blog article, we have covered how to create your own Identity Server using Keycloak on your local machine and how to integrate it into your Web APIs using .NET.
We followed best practices when achieving these steps, and also made a comparison to other Identity Servers like Auth0. Even though they seem the same, we saw that Auth0 has much more interesting features and for a paid plan it is more popular than Keycloak.
On the other hand, having Keycloak for an industry project is a very safe option. This is because it is very customizable, and it can easily fit your needs for your application on the authorization side.
It is important to note that Keycloak is newer, but it is starting to get even more popular every year, so if you want a stable Identity Server that provides all the security needs for your application, you should go for it.
I hope you enjoyed this article, and that it will help you to develop your current and future projects!
Want to learn more on your .NET journey? Try a blog article that highlights best practices in the case of managed and unmanaged code.