
Visual Recognition Tutorial with IBM Watson and Python
In the era of digital cameras, with people sharing billions of photos and videos daily, it’s impossible to manage the content manually. Therefore the necessity of automatizing visual recognition has rapidly increased, proportionally with social networks. Image recognition can be used in numerous tasks, such as filtering out explicit content, labeling the content of images with meta-tags and performing image content search. Beyond social media, visual recognition can be used in various other domains: health, to trace visible symptoms on patients and contribute to the diagnostic, environment, to detect problematic areas, road traffic, to avoid accidents and build self-driving cars, and many others.
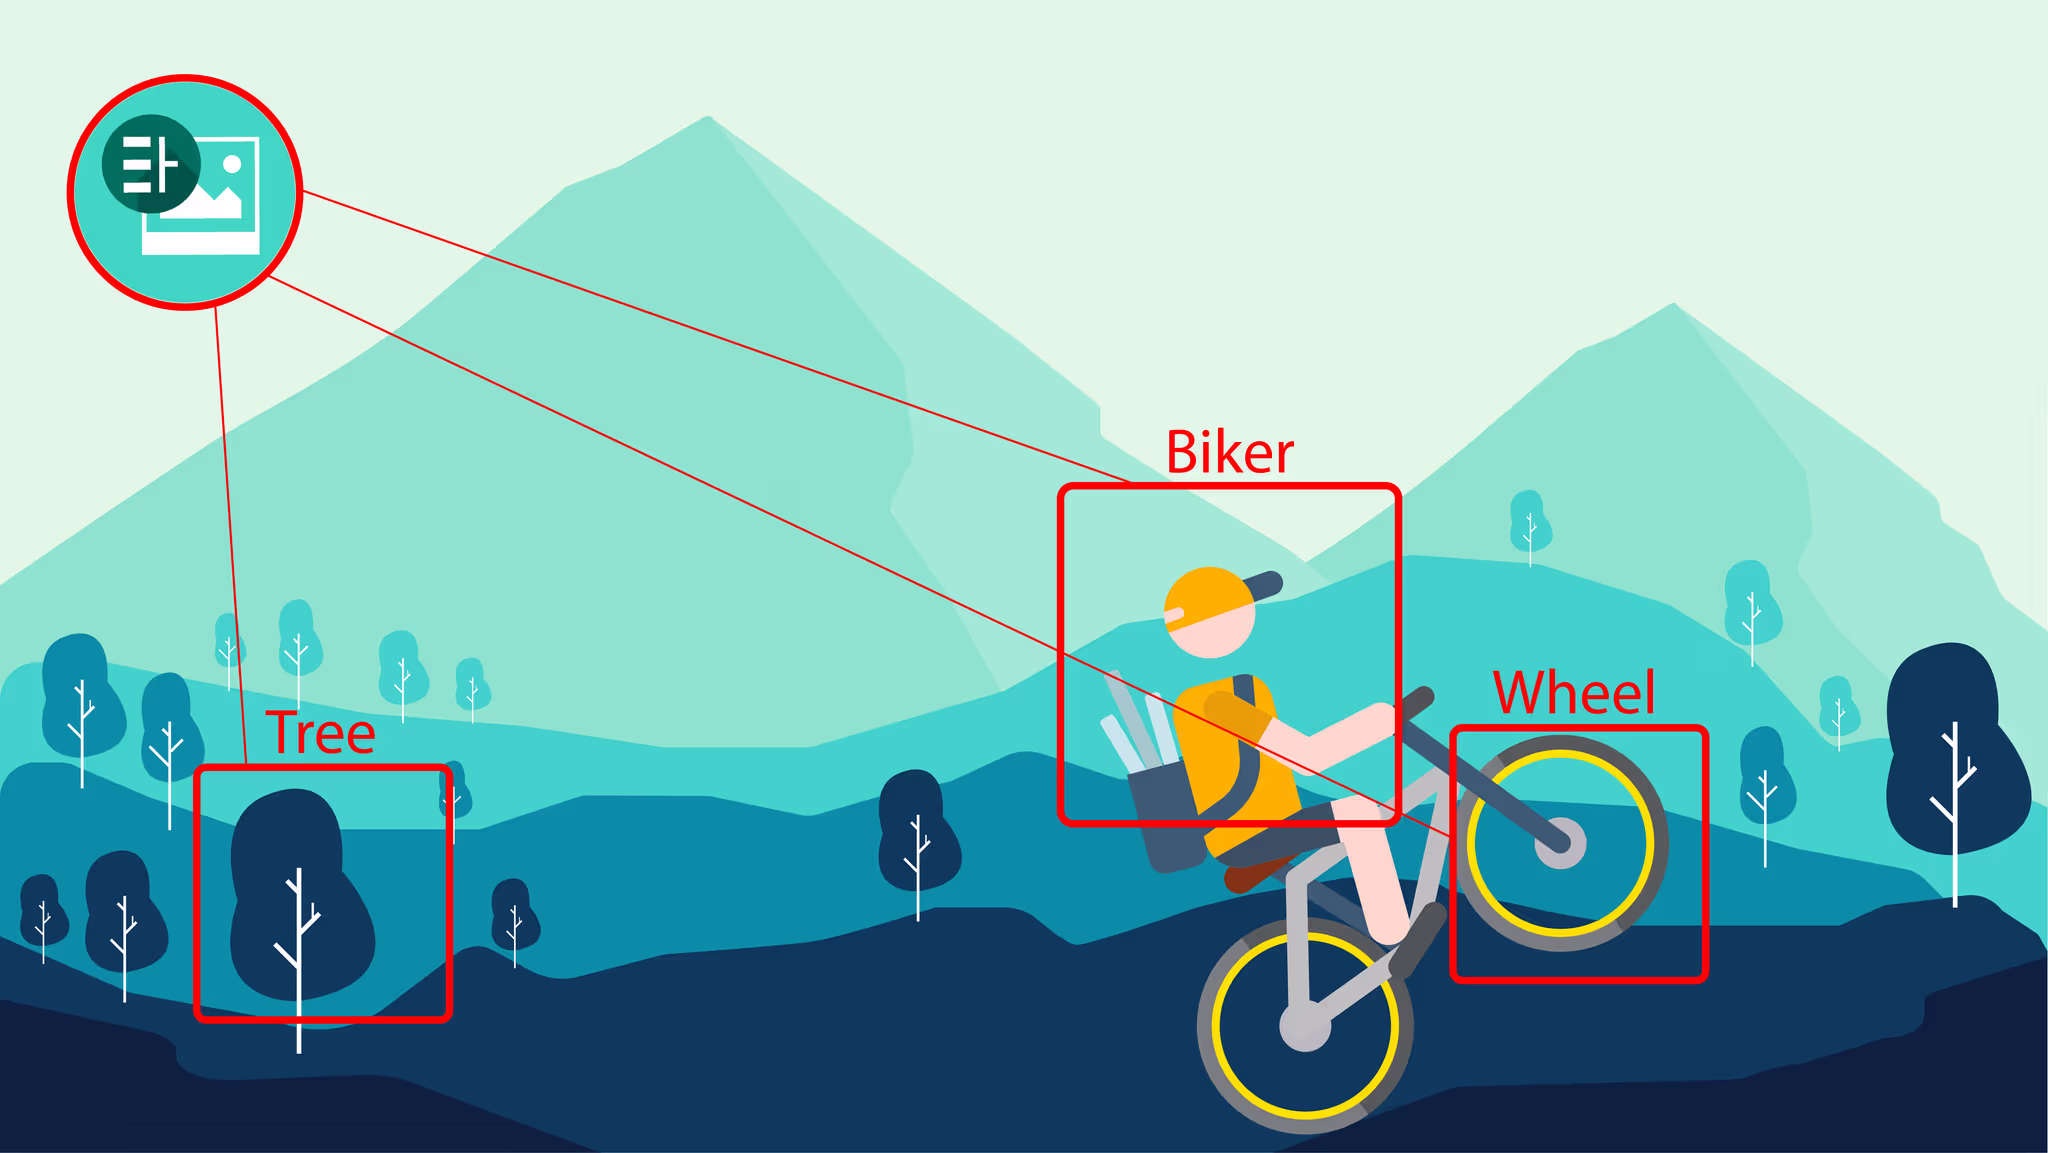
But while image recognition seems like a simple task for humans, a computer requires deep machine learning to perform this task. IBM Watson, a leader in cognitive computing, offers visual recognition service as API and uses deep learning algorithms to analyze images to give insights into visual content.
In this article, you will learn how to use Watson’s default classifiers for image recognition and create and manage custom classifiers which can analyze images according to the requirements of your application.
For this purpose you will first need:
- An IBM Bluemix account (you can sign up here)
- Python 2.7
- Virtualenv
- Pip
After creating the Bluemix account, you need to create a Visual Recognition service. To do this, you need to access Watson from the menu on the left side of the page. Then press the Browse all Watson services button to view the entire list of services. Select Visual Recognition from that list and you will be redirected to the service creation page. Once the service was created, you will be redirected to its dashboard, where you need to access the Service Credentials option on the left menu. After clicking the View Credentials button you will see the API key needed for performing operations through the API.
The next step is to set up your virtualenv and install Watson Developer Cloud using pip:
pip install --upgrade watson-developer-cloud
The watson-developer-cloud version used for this article is 1.4.1.
According to the official documentation, Watson’s Visual Recognition comes with a number of default classification models:
- General model - Default classification from thousands of classes
- Animals (including birds, reptiles, amphibians, etc.)
- Person and people-oriented information and activities
- Food (including cooked food and beverages)
- Plants (including trees, shrubs, aquatic plants, vegetables)
- Sports
- Nature (including many types of natural formations, geological structures)
- Transportation (land, water, air)
- And many more, including furnishings, fruits, musical instruments, tools, colors, gadgets, devices, instruments, weapons, buildings, structures and man-made objects, clothing and garments, and flowers, among others.
- Face model - Facial analysis with age and gender
- Explicit model - Whether an image is inappropriate for general use
- Food model - Specifically for images of food items
- Text model - Text extraction from natural scene images
In order to analyze an image or a set of images using the general model criteria, we will use the classify() method.
import json
from watson_developer_cloud import VisualRecognitionV3, \
    WatsonApiException
visual_recognition = VisualRecognitionV3(
    '2016-05-20', api_key='<API key>')
with open('/home/Workspace/RoadSigns/Classify.zip', 'rb') as images_zip:
    try:
        response = visual_recognition.classify(images_zip, threshold=0.0)
        print(json.dumps(response, indent=1))
    except WatsonApiException as ex:
        print "Status code: {}\nError message: {}\nError info: \n{}" \
            .format(ex.code, ex.message, json.dumps(ex.info, indent=1))
First, you need to instantiate VisualRecognitionV3 with the version parameter and the API key. The version parameter is a date in the ‘YYYY-MM-DD’ format and is used to select the API version for that date or the one previous to that date. As for the API key, the version used in this article uses authentication based on the api_key parameter, but Watson is currently being migrated to IAM authentication.
Regarding error handling, for every unsuccessful HTTP response code received, the Python SDK will raise a WatsonApiException containing the HTTP code, the reason message and a dictionary containing further information on the error. For this reason, we will wrap the classifying code in a try except block, followed by printing the information provided by the exception instance.
The classify() method accepts either a JPG/PNG image or a zip file containing at most 20 images. The limit for an image is 10 MB, while a zip file must have less than 100 MB. The filenames must be UTF-8 encoded if they contain non-ASCII characters. The threshold argument is used to filter out classes with scores under the specified number and its default value is 0.5. In order to receive all the possible results, we will set it as 0.0.
Here you can see the output for each image after the default classification:
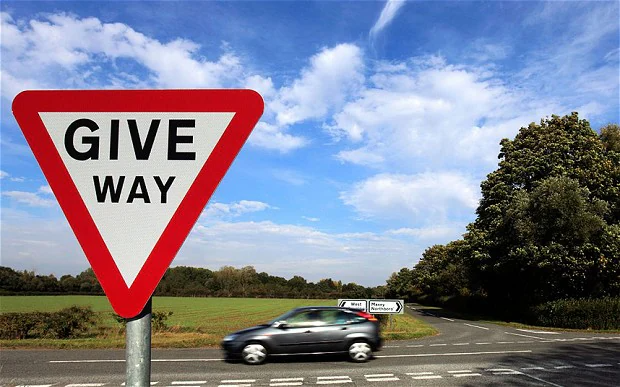
Source: https://secure.i.telegraph.co.uk |
{
  "image": "/home/Workspace/RoadSigns/Classify.zip/Classify/give_way.jpg",
  "classifiers": [
  {
   "classes": [
    {
     "score": 0.708,
     "class": "no-parking zone"
    },
    {
     "score": 0.66,
     "class": "divided highway",
     "type_hierarchy": "/road/divided highway"
    },
    {
     "score": 0.661,
     "class": "road"
    },
    {
     "score": 0.596,
     "class": "intersection",
     "type_hierarchy": "/junction/intersection"
    },
    {
     "score": 0.597,
     "class": "junction"
    },
    {
     "score": 0.5,
     "class": "street sign"
    },
    {
     "score": 0.712,
     "class": "gray color"
    },
    {
     "score": 0.521,
     "class": "maroon color"
    }
   ],
   "classifier_id": "default",
   "name": "default"
  }
 ]
}
|

 Source: https://t4.ftcdn.net |
{
  "image": "/home/Workspace/RoadSigns/Classify.zip/Classify/no_overtaking.jpg",
  "classifiers": [
  {
   "classes": [
    {
     "score": 0.91,
     "class": "signboard"
    },
    {
     "score": 0.538,
     "class": "no-parking zone"
    },
    {
     "score": 0.5,
     "class": "life buoy",
     "type_hierarchy": "/rescue equipment/life preserver/life buoy"
    },
    {
     "score": 0.54,
     "class": "life preserver"
    },
    {
     "score": 0.54,
     "class": "rescue equipment"
    },
    {
     "score": 0.665,
     "class": "dark red color"
    },
    {
     "score": 0.636,
     "class": "azure color"
    }
   ],
   "classifier_id": "default",
   "name": "default"
  }
 ]
} |
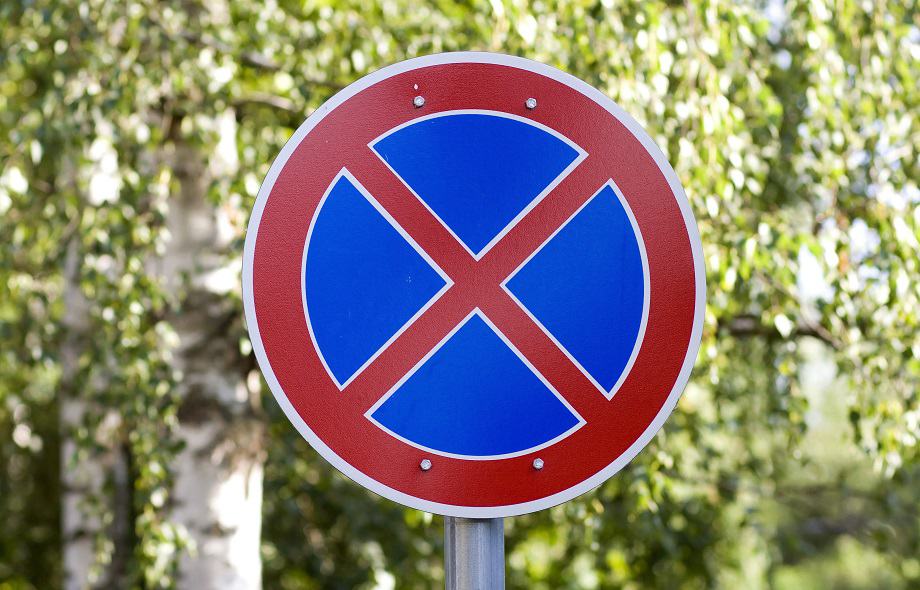 Source: https://s.toptests.co.uk |
{
  "image": "/home/Workspace/RoadSigns/Classify.zip/Classify/no_stopping.jpg",
  "classifiers": [
  {
  "classes": [
    {
    "score": 0.844,
    "class": "street sign"
    },
    {
    "score": 0.766,
    "class": "signboard"
    },
    {
    "score": 0.5,
    "class": "tetraskelion"
    },
    {
    "score": 0.963,
    "class": "reddish orange color"
    }
   ],
   "classifier_id": "default",
   "name": "default"
  }
 ]
}
|

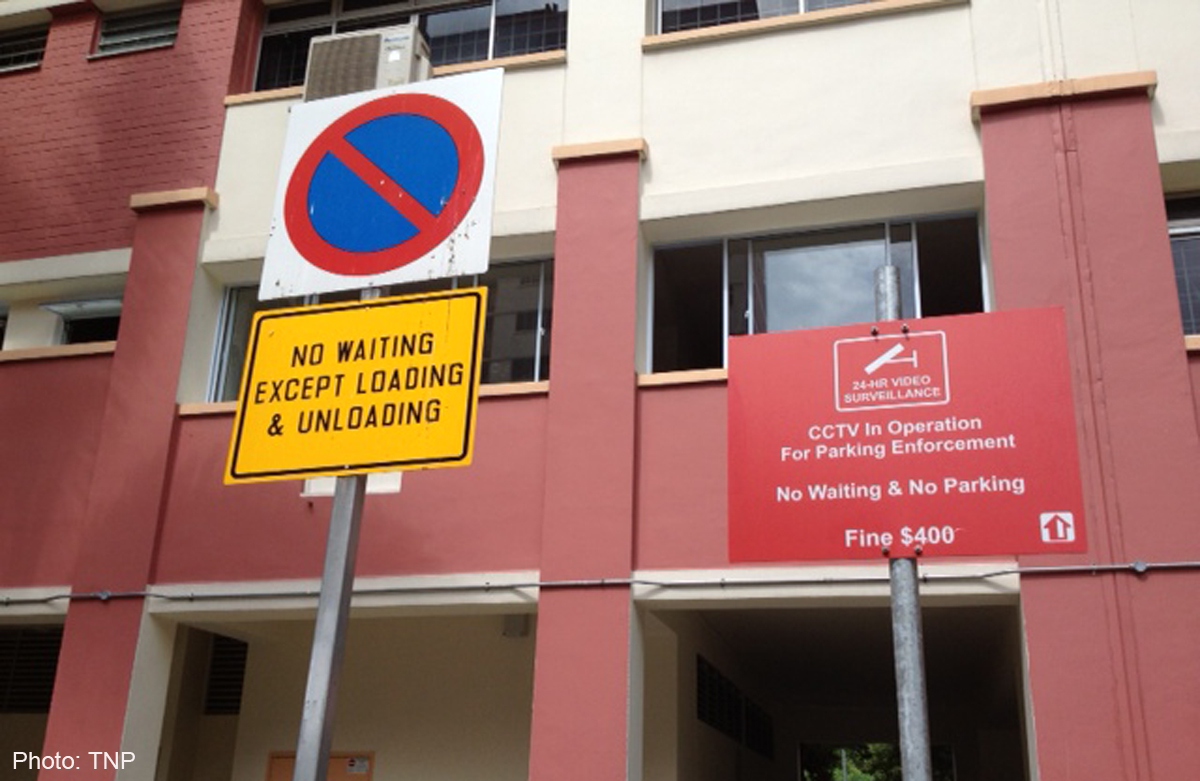
Source: http://www.asiaone.com |
{
"image": "/home/Workspace/RoadSigns/Classify.zip/Classify/no_waiting.jpg",
"classifiers": [
{
"classes": [
{
"score": 0.592,
"class": "movie theater",
"type_hierarchy": "/building/theatre/movie theater"
},
{
"score": 0.68,
"class": "theatre"
},
{
"score": 0.76,
"class": "building"
},
{
"score": 0.559,
"class": "Theater Building"
},
{
"score": 0.526,
"class": "headquarters",
"type_hierarchy": "/building/office/headquarters"
},
{
"score": 0.529,
"class": "office"
},
{
"score": 0.5,
"class": "signboard"
},
{
"score": 0.721,
"class": "reddish orange color"
},
{
"score": 0.713,
"class": "alizarine red color"
}
],
"classifier_id": "default",
"name": "default"
}
]
} |
As you may have noticed, the results are accurate but they omit the point of interest: recognizing the type of road sign. For this purpose, we will next create a custom classifier containing a class for each type of road sign.
In order to create a custom classifier we are going to use the create_classifier() method.
with open('/home/Workspace/RoadSigns/GiveWay.zip', 'rb') as giveway, \
     open('/home/Workspace/RoadSigns/NoOvertaking.zip', 'rb') as noovertaking,\
     open('/home/Workspace/RoadSigns/NoStopping.zip', 'rb') as nostopping,\
     open('/home/Workspace/RoadSigns/NoWaiting.zip', 'rb') as nowaiting:
    try:
        response = visual_recognition.create_classifier(
            'road_signs',
            giveway_positive_examples=giveway,
            noovertaking_positive_examples=noovertaking,
            nostopping_positive_examples=nostopping,
            nowaiting_positive_examples=nowaiting)
        print(json.dumps(response, indent=2))
    except WatsonApiException as ex:
        print "Status code: {}\nError message: {}\nError info: \n{}" \
            .format(ex.code, ex.message, json.dumps(ex.info, indent=1))
This method requires a string representing the classifier name and a zip with examples of images containing the defined object for each class. The argument name for positive examples will have the following pattern: <class name>_positive_examples. This method also accepts a compressed file containing negative examples, images that do not depict the visual subject of any of the classes of the new classifier. The zip files used for retraining must contain a minimum of 10 images with the minimum recommended resolution 32x32 pixels. The maximum limits for these files are 10.000 images or 100 MB and their names must be UTF-8 encoded if there are any non-ASCII characters.
As a response, we have the following json containing information like the classifier availability status, the created and updated datetimes, the classifier name and ID, which will be later used for classifying images and managing the classifier, and the created classes:
{
  "status": "training",
  "updated": "2018-07-04T23:26:47.806Z",
  "name": "road_signs",
  "created": "2018-07-04T23:26:47.806Z",
  "core_ml_enabled": true,
  "classes": [
	{
  	"class": "nowaiting"
	},
	{
  	"class": "giveway"
	},
	{
  	"class": "nostopping"
	},
	{
  	"class": "noovertaking"
	}
  ],
  "owner": "dff5b9c5-5747-4394-90bf-f637a2cce066",
  "classifier_id": "road_signs_294439632"
}
To get an update on this information, you can use the get_classifier() method, which requires as a parameter the classifier ID and returns the current information about it. This is useful in both classifying images and retraining the classifier to check the classifier status before performing an operation. If the status is still “retraining” the classifying process will not take into account the new retrain data and a new retrain request will fail, as the expected status for this is “ready”.
try:
    response = visual_recognition.get_classifier('road_signs_294439632')
    print (json.dumps(response, indent=1))
except WatsonApiException as ex:
    print "Status code: {}\nError message: {}\nError info: \n{}" \
        .format(ex.code, ex.message, json.dumps(ex.info, indent=1))
You can also use the list_classifiers() method to get an update on the status of all your classifiers.
try:
    response = visual_recognition.list_classifiers()
    print (json.dumps(response, indent=1))
except WatsonApiException as ex:
    print "Status code: {}\nError message: {}\nError info: \n{}" \
        .format(ex.code, ex.message, json.dumps(ex.info, indent=1))
{
 "classifiers": [
  {
   "status": "ready",
   "classifier_id": "road_signs_294439632",
   "name": "road_signs"
  }
 ]
}
If you wish to retrieve the complete information on every classifier, set the verbose argument for this method to True, as it will return the brief version by default.
The retraining can be done using the update_classifier() method, which is very similar to create_classifier(), except it expects an existing classifier ID instead of the name of a new one.
with open('/home/Workspace/RoadSigns/GiveWay.zip', 'rb') as giveway, \
     open('/home/Workspace/RoadSigns/NoOvertaking.zip', 'rb') as noovertaking,\
     open('/home/Workspace/RoadSigns/NoStopping.zip', 'rb') as nostopping,\
     open('/home/Workspace/RoadSigns/NoWaiting.zip', 'rb') as nowaiting:
    try:
        response = visual_recognition.update_classifier(
            classifier_id='road_signs_294439632',
            giveway_positive_examples=giveway,
            noovertaking_positive_examples=noovertaking,
            nostopping_positive_examples=nostopping,
            nowaiting_positive_examples=nowaiting)
        print(json.dumps(response, indent=2))
   except WatsonApiException as ex:
       print "Status code: {}\nError message: {}\nError info: \n{}" \
           .format(ex.code, ex.message, json.dumps(ex.info, indent=1))
An important aspect to take into account when retraining a classifier is that deep learning models learn through observation, therefore everything they know is based on the retrain data they receive. That’s why the size of the data set and its diversity are essential for a higher accuracy. Images with different lighting, angle, focus, color, shape, distance from subject, and presence of other objects are recommended for a better learning.
If we repeat the classification made previously using the general model, but this time using the classifier we just created, we will notice that the results are focused on the subject we need to identify - road signs in this case.
with open('/home/Workspace/RoadSigns/Classify.zip', 'rb') as images_zip:
    try:
        response = visual_recognition.classify(
            images_zip, threshold=0.0,
            classifier_ids='road_signs_294439632')
    except WatsonApiException as ex:
       print "Status code: {}\nError message: {}\nError info: \n{}" \
           .format(ex.code, ex.message, json.dumps(ex.info, indent=1))
print (json.dumps(response, indent=1))
 |
{
 "image": "/home/Workspace/RoadSigns/Classify.zip/Classify/give_way.jpg",
 "classifiers": [
  {
   "classes": [
    {
     "score": 0.905,
     "class": "giveway"
    }
   ],
   "classifier_id": "road_signs_294439632",
   "name": "road_signs"
  }
 ]
}
 Source: https://s.toptests.co.uk
|
{
  "image": "/home/Workspace/RoadSigns/Classify.zip/Classify/no_stopping.jpg",
  "classifiers": [
    {
      "classes": [
      {
        "score": 0.904,
        "class": "nostopping"
      }
      ],
      "classifier_id": "road_signs_294439632",
      "name": "road_signs"
    }
  ]
} |
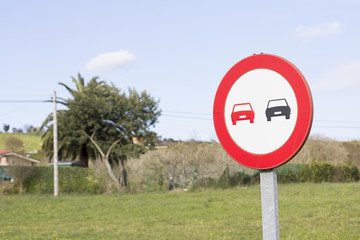
Source: https://t4.ftcdn.net |
{
  "image": "/home/Workspace/RoadSigns/Classify.zip/Classify/no_overtaking.jpg",
  "classifiers": [
    {
      "classes": [
      {
        "score": 0.903,
        "class": "noovertaking"
      }
      ],
      "classifier_id": "road_signs_294439632",
      "name": "road_signs"
    }
 ]
}
|
 Source: http://www.asiaone.com |
{
  "image": "/home/Workspace/RoadSigns/Classify.zip/Classify/no_waiting.jpg",
  "classifiers": [
    {
      "classes": [
        {
          "score": 0.902,
          "class": "nowaiting"
        }
      ],
      "classifier_id": "road_signs_294439632",
      "name": "road_signs"
    }
   ]
} |
If you no longer need a certain classifier, you can delete it using the delete_classifier() method.
try:
    visual_recognition.delete_classifier(
        'road_signs_294439632')
except WatsonApiException as ex:
    print "Status code: {}\nError message: {}\nError info: \n{}" \
        .format(ex.code, ex.message, json.dumps(ex.info, indent=1))
The Watson Visual Recognition service is a powerful business tool, as it facilitates the creation of smart apps that can extract information from visual data without the need to develop AI software. In this tutorial, you learned how to use it with the Watson Python SDK using both the default classifiers and newly created custom ones.
If you want to see a preview of this service’s abilities you can check the live demo or the API explorer. Also, if you want to learn more about the Python SDK, you can check the official documentation.


