
Clear and Easy: Building Neural Networks from Scratch

This blog post has two main objectives:
➤ To convey the idea that neural networks are not as difficult to understand as they first appear.
It is often believed that creating a neural network is a difficult task, requiring deep knowledge of differential calculus and complex mathematical formulas. Most tutorials try to explain advanced mathematical concepts, such as derivatives and other complex notions.
My goal is to show that you do not need to master these mathematical concepts to create a neural network. However, the question may arise: “How can you create a neural network without knowing about certain elements that compose it?” The answer is simple and will be detailed in the following chapters.
➤ To explain the process of creating a fully functional neural network in the C# programming language.
The code will consist of three classes that represent the structure of the neural network, four properties for the Neuron class, where we will store information, and two algorithms (the second one will be split into two functions) for prediction and training. The neural network will be made up only of these elements. But besides these, we will, of course, also need some additional features for handling the training data and saving the model.
You can git clone the code from this repository:
Most of the tutorials on the internet use the analogy of physical neurons in the human brain to explain neural networks. This approach, although useful for clarifying certain concepts, can also bring a lot of confusion for a beginner.
For example, using this analogy, the following false ideas are widely spread:
- The neurons of a neural network, just like the biological ones, are capable of making decisions. This is FALSE. Neurons within a neural network do NOT contain ANY algorithm and do NOT represent methods/functions.
- The neurons of a neural network, just like the biological ones, can be in one of two possible states: Active (fire)/Inactive (not fire). This is another FALSE statement. Neurons within a neural network do NOT decide whether they should (Active neuron) or should not (Inactive neuron) transmit information further. However, even if we were to accept this analogy as appropriate, there is a discrepancy in this context: the neurons of a neural network would ALWAYS transmit some value, but sometimes that value would not have a major impact on the subsequent calculations. However, as I mentioned, neurons do NOT transmit anything at all.
This misleading analogy is present in most tutorials that try to explain neural networks to beginners. That’s why the explanation I propose excludes the analogy between biological neurons and those in a neural network.
In what follows, I will not present the optimal solution, with the best performance in training the network or the best performance in the process of generating a prediction. I will present a much-simplified solution to make neural networks easy to understand for beginners. Only after you understand how a neural network works, you can optimize it to a simple data array to achieve high performance.
An abstract representation of a neural network is the classic schema with circles and arrows between them:
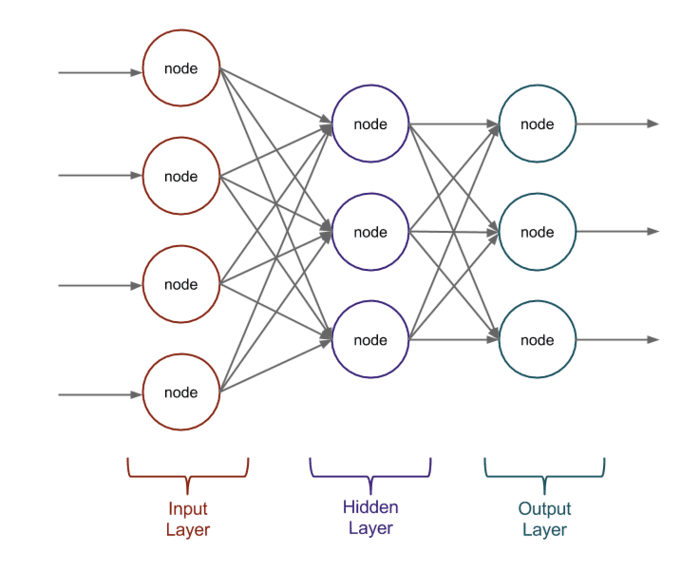
Image 1 - Neural Network graphic representation
First, we have to translate what we see in this image into code. We could start from the abstract level (neural network) and go down to the detailed level (neuron/node), but this approach is not obvious when you are not familiar with neural networks. That’s why I decided to adopt the clearest approach for a beginner.
First, let’s create a project using the Console Application template in the C# language.

Image 2 - Project Base Structure
We will then add the Neuron, Layer, and NeuralNetwork classes in the NetworkDefinition folder.
First of all, let’s identify the elements in image 1 that are most likely to attract the attention of a beginner. Most likely, they are the circles. These represent the neurons of the network. So, to represent a circle/neuron, we will create a class named Neuron.
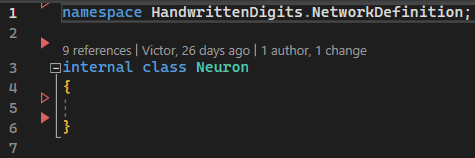
Image 3 - Neuron class
Another obvious structure is the three columns composed of several circles. These represent a layer that contains multiple neurons. To represent this, we will create a class that will contain a list of neurons. We will name the class Layer.
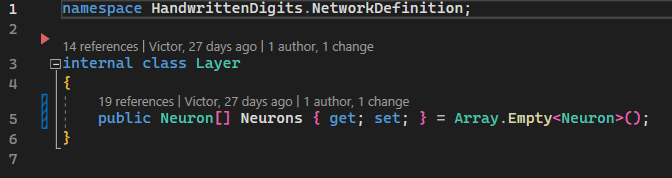
Image 4 - Layer class
And finally, because the structure in the image represents a neural network, we will create the NeuralNetwork class that will represent it. As you can see from image 1, the structure contains several columns - which, in our project, are represented by the Layer class. To express this in code, we will create a property of type list of Layer.
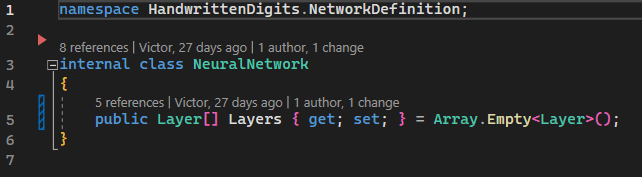
Image 5 - NeuralNetwork class
So far, we have created the class structure that represents a neural network.
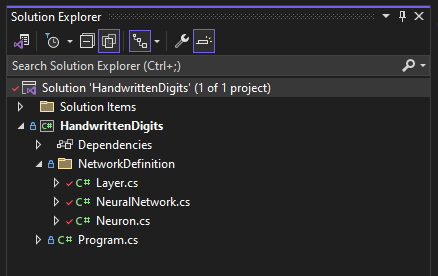
Image 6 - Neural Network structure definition
There is absolutely nothing complicated, right?!
Next, I will dedicate a chapter to explaining what a neuron is and what it is used for in this equation. I should use the analogy with the biological neuron… as it is practiced in almost all tutorials on the internet. But as mentioned earlier, this analogy can be very confusing for a beginner, so I will avoid it.
To understand the role of a neuron in a neural network, I will start with a suggestion: if you have already adopted the idea that a neuron (from a neural network) represents a function or an algorithm, or that the neuron can be in one of these two states: active/inactive, I invite you to give it up. As you will see in the following explanation, a neuron does not represent anything more than a simple data holder.
In our case, because I am using a beginner-friendly approach, I represented the neuron by a class. This approach is not optimal at all because it consumes a lot of resources and takes much longer to train the network.
In the optimized version of a neural network, both neurons and layers are represented by simple data arrays, such as an … array. In other words, to represent the structure of an optimized neural network, we will only need one class (the NeuralNetwork class) that would have only a few properties of the type data array.
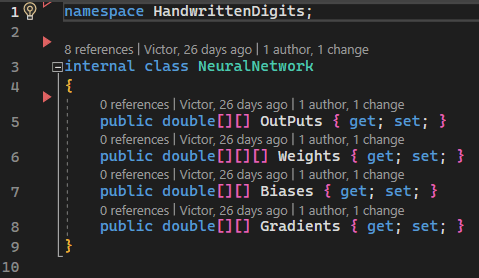
Image 7 - An Optimized Neural Network Structure
Even though this structure is much simpler than the one I proposed, it is not suitable for a beginner. Besides the fact that it becomes too abstract, the two algorithms become very complex and hard to implement/follow.
The main and unique role of a neuron is to store the data needed for the ForwardPropagation algorithm (one of the two algorithms - yes, a fully functional neural network can be simplified to just two algorithms) to calculate the output. To store this “necessary data”, we will create 3 properties in the Neuron class. Next, to understand the role of these 3 properties, I will explain in general why the ForwardPropagation algorithm needs them.
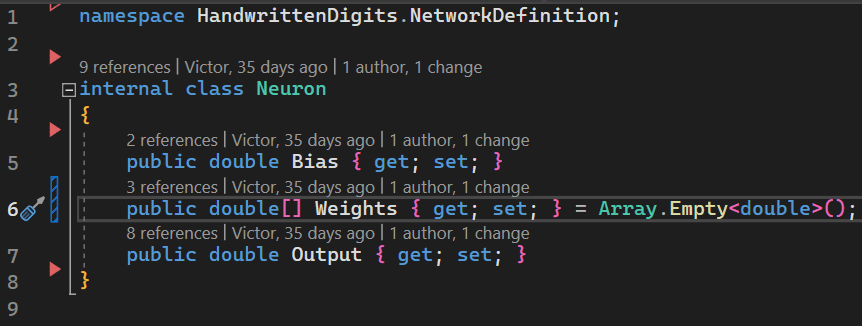
Image 8 - Neuron class
As I said above, a neural network has two algorithms, the first of which is ForwardPropagation, which calculates the output for each neuron in the network, starting from the first layer (InputLayer) and ending with the last layer (OutputLayer). The output is a double value with an interval [0 - 1] and is stored in the Output property of the Neuron class. Here’s how this algorithm works step by step:
- The algorithm receives as an argument the values for the Output properties of the neurons in the InputLayer, which represent the input data of the network (see image 1).
- The algorithm uses the output of the neurons in the InputLayer to calculate the output of the neurons in the next layer - HiddenLayer.
- The algorithm repeats the previous step to calculate the output of the neurons in the OutputLayer, using the output of the neurons in the HiddenLayer. The output of the neurons in the OutputLayer represents the neural network prediction, that is, the final result of the neural network.
- Thus, the ForwardPropagation algorithm propagates the output from one layer to another, until it reaches the final output of the network.
So, now that we have understood the flow of the ForwardPropagation algorithm, we have also understood the role of the Output property in the Neuron class.
To calculate the Output, the ForwardPropagation algorithm also needs the other 2 parameters: Weights and Bias.
- Weights
In image 1, Weights are represented by the arrows between neurons. In code, an arrow is actually a double value. These represent “how important the value in the Output property of the previous neuron is in calculating the Output of the current neuron”. In other words, when the value in Weight is relatively large, the product of Weight and Output of the previous neuron will be large even if the value in Output of the previous neuron is relatively small. In general, the Weight values are adjusted by the learning algorithm, which tries to find the best values to have the desired Output.
- Bias
For the beginning, all you need to know is that Bias is used as a parameter to manipulate the ForwardPropagation algorithm, so that we have in the Output property a value as close as possible to the desired one. It is also adjusted by the learning algorithm.
C# code
- Setup
Now, after a bit of theoretical knowledge, we will create the C# code needed for the ForwardPropagation algorithm.
First, we will create the NetworkAlgorithm folder in our project.
Then, inside this folder, we will create the Algorithm class.
We have intentionally separated the neural network structure from the algorithms that process the data to highlight their simplicity.
- Code Explanation
This is the function signature (plus the returned type) representing the ForwardPropagation algorithm:
double[] ForwardPropagation(double[] inputs, Layer[] layers)
Before we start writing the code for the ForwardPropagation function, let’s discuss the purpose of the following parameters: inputs and layers.
- inputs is a vector of doubles representing the input data of the neural network. These values will be assigned to the Output properties of each neuron in the first layer (InputLayer). For example, if we want to use the neural network to recognize handwritten digits, the inputs could be a vector of 784 elements, representing the pixels of a 28 x 28 pixel image, where each element has a value between 0 and 1, corresponding to the intensity of the grey color of each pixel.
- layers is a vector of Layers representing the neural network's layers. Each Layer is a class containing a Neuron vector representing the neurons in that layer. For example, if the neural network has an InputLayer with 784 neurons, a HiddenLayer with 16 neurons, and an OutputLayer with 10 neurons, the parameter of the function layers should be a vector of 3 elements, each containing a vector of type Neuron of size: [784] [16] [10]. Thus, with this parameter, we actually receive the data stored in the neurons of the neural network.
With these two parameters, the ForwardPropagation function receives all the information needed to calculate the output of the neural network.
After defining the signature of the ForwardPropagation function, we will move on to its implementation.
Next, we will set the output of the neurons in the first layer (InputLayer) with the values received as arguments in the "inputs" vector. So only for the first layer InputLayer we do not calculate the values for Output. But for the following layers, Output will have to be calculated.
public double[] ForwardPropagation(Layer[] layers, double[] inputs)
{
for (int i = 0; i < inputs.Length; i++)
layers[0].Neurons[i].Output = inputs[i];
Next comes the most difficult part of this algorithm. After setting the output of the neurons in the first layer, we will proceed to calculate the output for the rest of the layers using Weights, Bias.
The first for loop goes through all the layers starting from the second - the index "i" is initialized with the value 1. The first layer already has the Output properties set.
for (int i = 1; i < layers.Length; i++)
{
In order to calculate the value of the Output property of the current neuron, we need to access the current layer and we also need to access the previous layer because we need the values of the Output properties of the previous neurons. Thus, these two lines of code access the current layer and the previous layer.
Layer currentLayer = layers[i];
Layer previousLayer = layers[i - 1];
Next, we iterate through each neuron of the current layer to calculate its value from the Output property.
for (int j = 0; j < currentLayer.Neurons.Length; j++)
{
Neuron currentNeuron = currentLayer.Neurons[j];
We said above that Bias is used as a parameter to manipulate the ForwardPropagation algorithm so that the Output property is as close as possible to the desired value. The value of Bias is adjusted by the second BackPropagation algorithm. Specifically, if we want the Output property to store a value that has little impact on the next ForwardPropagation operation, BackPropagation will set the Bias property to a relatively small negative value - which tends to move away from zero. This will cause the output of the current neuron to have a negative value added. This will cause the output value to be reduced. Thus, the output of the current neuron will have a negligible influence on the next operation.
We initialize a variable in which we save the output of the current neuron.
double output = currentNeuron.Bias;
To understand the purpose of the next two lines of code, I will explain in detail how the output is calculated.
To calculate the value of the Output property of the current neuron, we need the values of the Output properties of each neuron in the previous layer, the Weight between the current neuron and each neuron in the previous layer and of course we also need the Bias that we already included in the previous line of code.
The operations are done in the following order. We iterate through all the neurons in the previous layer and take one by one:
We take the Output from the first neuron in the previous layer and multiply it by the Weight between it and the current neuron to get the first product.
We take the Output of the second neuron in the previous layer and multiply it by the Weight between it and the current neuron to get the second product.
Continue this cycle for all the neurons in the previous layer.
Finally, we add up all the products obtained by multiplying Output and Weight.
And of course, since the value in the Bias property has already been added to the Output variable, it is already taken into account.
The steps described above are implemented as follows:
for (int k = 0; k < previousLayer.Neurons.Length; k++)
output += previousLayer.Neurons[k].Output * currentNeuron.Weights[k];
This gives the value for Output. But this must be transformed to a value in the range [0 - 1]. For this, we use an activation function. The activation function is a mathematical function that transforms any number, however large or small, into a value from a clearly defined range such as [0 - 1] - the range in which our network operates. There are several types of activation functions, such as sigmoid, relu, tanh, etc. We will use the sigmoid function, which is defined in the Activate function. We have left below the implementation of the sigmoid function. The output of the current neuron is the result of applying the activation function to the raw output calculated in the previous step. This value is stored in the Output property of the current neuron. The following line of code accomplishes this step.
currentNeuron.Output = Activate(output);
Thus, we computed the Output of the current neuron using the bias, the outputs of the neurons in the previous layer, the weights, and the Sigmoid activation function. This output will be used as input for the neurons in the next layer in the ForwardPropagation algorithm.
Now we close the bodies of the two For cycles.
}
}
Finally, all we need to do is return the values from the Output properties of the neurons in the last OutputLayer layer.
Layer outputLayer = layers[layers.Length - 1];
return outputLayer.Neurons.Select(n => n.Output).ToArray();
And we close the body of the ForwardPropagation function.
}
This is the final result:
public double[] ForwardPropagation(Layer[] layers, double[] inputs)
{
for (int i = 0; i < inputs.Length; i++)
layers[0].Neurons[i].Output = inputs[i];
for (int i = 1; i < layers.Length; i++)
{
Layer currentLayer = layers[i];
Layer previousLayer = layers[i - 1];
for (int j = 0; j < currentLayer.Neurons.Length; j++)
{
Neuron currentNeuron = currentLayer.Neurons[j];
double output = currentNeuron.Bias;
for (int k = 0; k < previousLayer.Neurons.Length; k++)
output += previousLayer.Neurons[k].Output * currentNeuron.Weights[k];
currentNeuron.Output = Activate(output);
}
}
Layer outputLayer = layers[layers.Length - 1];
return outputLayer.Neurons.Select(n => n.Output).ToArray();
}
- Sigmoid Function
This is the sigmoid function implementation.
private double Activate(double weightedInput)
{
// Sigmoid
return 1.0 / (1.0 + Math.Exp(-weightedInput));
}
The second algorithm in a neural network is BackPropagation. Its purpose is to adjust the Weights and Bias for each neuron for all the layers except the first one - InputLayer. Why exclude the first layer?! Weights and Bias are used to calculate the Output of each neuron. However, as explained above, the first layer does not need to calculate the Output for its neurons because these values are received by a parameter of the ForwardPropagation function. That is, if we don't calculate Output, we don't need Weights and Bias in the first layer, and as a result, the BackPropagation algorithm ignores these properties of the InputLayer.
The BackPropagation algorithm consists of two steps:
- Calculating gradients for each neuron - The gradient is the value by which the values in Weights and Bias will be increased or decreased. In the technical literature, the gradient is described as being able to indicate both the size of the adjustment (it is the value itself) and the direction (the direction is represented by the sign of the value: plus or minus).
- Adjustment of the Weights and Bias parameters - The value calculated in the first step is added to/deducted from these two parameters.
We have separated both steps into separate functions. The first step is implemented in the CalculateGradients function. The second - in UpdateParameters.
I created both functions in the Algorithm class.
First, I will explain the purpose of this function in more detail. The prediction/output of a neural network is actually represented by the values in the Output properties of all the neurons in the last layer - OutputLayer. An untrained network will have random output values. We need to adjust the Weights and Bias so that the output of the network has the desired/expected values.
For example:
We have a network with two neurons in the last layer - OutputLayer.
Neurons can take values in the range [0 - 1].
The network is untrained.
Following the prediction, the network has the value 0.9 at the first neuron and 0.4 at the second neuron.
Our desired values are 0 at the first neuron and 1 at the second neuron.
In the process of training this network, we will adjust the Weights and Bias for all the previous neurons (except those in the first layer) so that we have the desired values in the OutputLayer neurons.
To adjust the Weights and Bias, we need to calculate the gradients.
Calculating gradients is largely the difference between the network predictions (which are random at first) and the expected values.
C# code
This is the function signature and returned type:
void CalculateGradients(Layer[] layers, double[] targets)
Before we start writing the code, we will explore the purpose of the function parameters: layers and targets.
- layers is a vector of Layer objects, representing neural network layers. Each Layer is a class containing a vector of Neuron objects, representing the neurons in that layer. With this parameter, the function receives parameters from each neuron of the network.
- targets is a vector of double values, representing the desired values for the network output. This vector contains the expected results, against which the actual network output is compared to adjust the network parameters.
After defining the signature of the ForwardPropagation function, we will move on to its implementation.
Computing the gradients for the output layer:
They are calculated by:
multiplying
the difference between the actual output and the target output
by
the derivative of the activation function.
We used the Sigmoid function as an activation function “1.0 / (1.0 + Math.Exp(-weightedInput))”. Each activation function has its derivative. The derivative of the activation function used in our case is “output * (1 - output)”.
public void CalculateGradients(Layer[] layers, double[] targets)
{
for (int i = 0; i < layers[layers.Length - 1].Neurons.Length; i++)
{
Neuron neuron = layers[layers.Length - 1].Neurons[i];
neuron.Gradient = (neuron.Output - targets[i]) * (neuron.Output * (1 - neuron.Output));
}
In this way we calculated gradients for all neurons in the last layer - OutputLayer.
Next, we calculate gradients for the neurons of all HiddenLayers.
The gradient for a hidden neuron is calculated by:
multiplying
the sum of the gradients of the next neurons weighted by their respective weights
by
the derivative of the activation function.
In order to perform these operations, we just go through the HiddenLayers from the last to the first. In each HiddenLayer, we calculate the gradient for each neuron.
for (int layerIndex = layers.Length - 2; layerIndex >= 1; layerIndex--)
{
Layer currentLayer = layers[layerIndex];
Layer nextLayer = layers[layerIndex + 1];
for (int i = 0; i < currentLayer.Neurons.Length; i++)
{
Neuron neuron = currentLayer.Neurons[i];
double sumGradienttimesWeight = 0;
for (int j = 0; j < nextLayer.Neurons.Length; j++)
{
Neuron nextNeuron = nextLayer.Neurons[j];
sumGradienttimesWeight += nextNeuron.Weights[i] * nextNeuron.Gradient;
}
neuron.Gradient = sumGradienttimesWeight * (neuron.Output * (1 - neuron.Output));
}
}
And we close the body of the function “CalculateGradients”
}
This is the final result:
public void CalculateGradients(Layer[] layers, double[] targets)
{
for (int i = 0; i < layers[layers.Length - 1].Neurons.Length; i++)
{
Neuron neuron = layers[layers.Length - 1].Neurons[i];
neuron.Gradient = (neuron.Output - targets[i]) * (neuron.Output * (1 - neuron.Output));
}
for (int layerIndex = layers.Length - 2; layerIndex >= 1; layerIndex--)
{
Layer currentLayer = layers[layerIndex];
Layer nextLayer = layers[layerIndex + 1];
for (int i = 0; i < currentLayer.Neurons.Length; i++)
{
Neuron neuron = currentLayer.Neurons[i];
double sumGradienttimesWeight = 0;
for (int j = 0; j < nextLayer.Neurons.Length; j++)
{
Neuron nextNeuron = nextLayer.Neurons[j];
sumGradienttimesWeight += nextNeuron.Weights[i] * nextNeuron.Gradient;
}
neuron.Gradient = sumGradienttimesWeight * (neuron.Output * (1 - neuron.Output));
}
}
}
As its name suggests, this function is responsible for adjusting the Weights and Bias so that the values in the Output properties of all the neurons in the last layer (OutputLayer) are as close as possible to the desired/expected values. For this, we will use the gradients calculated by the CalculateGradients function explained above.
C# code
This is the function signature and returned type:
void UpdateParameters(Layer[] layers, double learnRate)
Before we start writing the code, we will explore the purpose of the function parameters: layers and targets.
- layers is a vector of Layer objects, representing neural network layers. Each Layer is a class containing a vector of Neuron objects, representing the neurons in that layer. Through this parameter, the function receives parameters from each neuron of the network.
- In order to approximate the values in Weights and Bias to the right values (remember that Weights and Bias are used to calculate Output, and to have the desired value in Output we adjust Weights and Bias), we use a random value called learnRate chosen from the [1 - 0] range; we can choose any value and experiment with it to see how the network speed and accuracy change. This should not be too high so as not to jump too much over the right value and not too low, so we can speed up the approach effectively. If the learning process is too slow, then we can adjust the learnRate and experiment with slightly higher values.
After defining the signature of the ForwardPropagation function, we will move on to its implementation.
First, we iterate through all the HiddenLayers. At each iteration, we need to access the current layer as well as the previous one.
public void UpdateParameters(Layer[] layers, double learnRate)
{
for (int layerIndex = 1; layerIndex < layers.Length; layerIndex++)
{
Layer currentLayer = layers[layerIndex];
Layer previousLayer = layers[layerIndex - 1];
Next, we iterate through each neuron of the current layer. At each iteration, we need to access the current neuron and its gradient, which was previously calculated by the function CalculateGradients.
for (int i = 0; i < currentLayer.Neurons.Length; i++)
{
Neuron neuron = currentLayer.Neurons[i];
Then, iterate through each neuron of the previous layer. At each iteration, we need to access the Output of the previous neuron to update the weights between the current neuron and the neurons in the previous layer, using the formula:
weight = weight - learnRate * gradient * previousOutput
This formula means that the weight is adjusted according to the learning rate (learnRate), the gradient of the current neuron and the output of the previous neuron. This causes the weight to approach the appropriate value, which when used in the calculation of the Output will give us the desired value. The next two lines of code implement this formula, using a for loop to go through all the weights of the current neuron:
for (int j = 0; j < previousLayer.Neurons.Length; j++)
neuron.Weights[j] -= learnRate * neuron.Gradient * previousLayer.Neurons[j].Output;
Finally, we also update the bias of the current neuron, using a formula similar to the one for weights:
bias = bias - learnRate * gradient
This formula means that the bias is adjusted according to the learning rate (learnRate) and the gradient of the current neuron. The following line of code implements this formula, using the Gradient property of the current neuron:
neuron.Bias -= learnRate * neuron.Gradient;
And finally, we close the for loops and the function body:
}
}
}
And the final result is this:
public void UpdateParameters(Layer[] layers, double learnRate)
{
for (int layerIndex = 1; layerIndex < layers.Length; layerIndex++)
{
Layer currentLayer = layers[layerIndex];
Layer previousLayer = layers[layerIndex - 1];
for (int i = 0; i < currentLayer.Neurons.Length; i++)
{
Neuron neuron = currentLayer.Neurons[i];
for (int j = 0; j < previousLayer.Neurons.Length; j++)
neuron.Weights[j] -= learnRate * neuron.Gradient * previousLayer.Neurons[j].Output;
neuron.Bias -= learnRate * neuron.Gradient;
}
}
}
So far, we have created the structure of the neural network and the two algorithms: ForwardPropagation and BackPropagation. In both algorithms, the network uses the values already existing in Weights and Bias. That is, before running these algorithms, the Weights and Bias parameters must be initialized with random values. As you already know, these parameters are in the Neuron class. So, the initialization code will also be located in this class – more precisely, in its constructor.
Next, we initialize the Weights parameter.
For this, we will create an array of type double with a length equal to the number of neurons in the previous layer. This array will store the values for each connection between the current neuron and the neurons in the previous layer. For example, if the previous layer has 3 neurons, then the array will have 3 elements:
Weights[0], Weights[1] and Weights[2].
public Neuron(int previousLayerNeuronsNumber)
{
if (previousLayerNeuronsNumber > 0)
{
Weights = new double[previousLayerNeuronsNumber];
“Weights” is a property of the Neuron class.
“previousLayerNeuronsNumber” is the number of neurons in the previous layer; as you can see in Image 1, each neuron connects through arrows (which represent Weights) with each neuron in the previous layer, so we can say that each neuron has as many Weights as there are neurons in the previous layer.
I used the verification “if (previousLayerNeuronsNumber > 0)” with only one purpose: to avoid initializing the Weights and Bias parameters in the neurons of the first InputLayer - if we don't calculate the Output for the neurons of the first layer, there is no point in initializing the parameters used in this operation, i.e. the Weights and Bias parameters.
Next, we initialize each position in the array Weights with random values.
for (int i = 0; i < Weights.Length; i++)
Weights[i] = InitializeRandom() / Sqrt(previousLayerNeuronsNumber);
Here is the implementation of the InitializeRandom function:
private double InitializeRandom()
{
double x1 = 1 - _random.NextDouble();
double x2 = 1 - _random.NextDouble();
double result = Sqrt(-2.0 * Log(x1)) * Cos(2.0 * PI * x2);
return result;
}
We used these mathematical functions for one purpose: to generate the most varied values for each parameter.
Then we also initialize the Bias parameter.
Bias = InitializeRandom() / Sqrt(previousLayerNeuronsNumber);
And finally, we close the body of the if statement and the constructor:
}
}
Here is the final result for the Neuron class:
using static System.Math;
namespace HandwrittenDigits.NetworkDefinition;
[Serializable]
internal class Neuron
{
private readonly Random _random = new();
public double Bias { get; set; }
public double[] Weights { get; set; }
public double Output { get; set; }
public double Gradient { get; set; }
public Neuron()
{
}
public Neuron(int previousLayerNeuronsNumber)
{
if (previousLayerNeuronsNumber > 0)
{
Weights = new double[previousLayerNeuronsNumber];
for (int i = 0; i < Weights.Length; i++)
Weights[i] = InitializeRandom() / Sqrt(previousLayerNeuronsNumber);
Bias = InitializeRandom() / Sqrt(previousLayerNeuronsNumber);
}
}
private double InitializeRandom()
{
double x1 = 1 - _random.NextDouble();
double x2 = 1 - _random.NextDouble();
double result = Sqrt(-2.0 * Log(x1)) * Cos(2.0 * PI * x2);
return result;
}
}
Since we need an object of type Random in the InitializeRandom function, we added this field to the class: “private readonly Random _random = new();”
Now we will adjust the other two classes in the network structure to send the necessary Weights and Bias initialization data to the Neuron class. For this, we will also use the class constructor.
The Layer class represents a layer of neurons (you can have as many layers as you want) in the neural network. It has a property called Neurons, which is an array of Neuron objects. The constructor of the Layer class takes two parameters: neuronsNumber and previousLayerNeuronsNumber. The first parameter specifies how many neurons are in the layer, and the second parameter specifies how many neurons are in the previous layer. The constructor initializes the Neurons array with the given size, and then creates a new Neuron object for each element of the array. The Neuron constructor receives the previousLayerNeuronsNumber as an argument, so that it can initialize the weights and bias of each neuron according to the number of connections from the previous layer.
This way, the Layer constructor creates a fully connected layer of neurons, where each neuron has a bias and a weight for each neuron in the previous layer.
Here is the final result for the Layer class:
namespace HandwrittenDigits.NetworkDefinition;
[Serializable]
internal class Layer
{
public Neuron[] Neurons { get; set; } = Array.Empty<Neuron>();
public Layer()
{
}
public Layer(int neuronsNumber, int previousLayerNeuronsNumber)
{
Neurons = new Neuron[neuronsNumber];
for (int i = 0; i < Neurons.Length; i++)
Neurons[i] = new Neuron(previousLayerNeuronsNumber);
}
}
And the NeuralNetwork class constructor:
public NeuralNetwork(params int[] layersData)
{
Layers = new Layer[layersData.Length];
Layers[0] = new Layer(layersData[0], 0);
for (int i = 1; i < layersData.Length; i++)
Layers[i] = new Layer(layersData[i], layersData[i - 1]);
}
In the parameter "params int[] layersData", we get the number of layers and the number of neurons in each layer. For example: for a neural network capable of identifying handwritten digits, with a single HiddenLayer with 350 neurons, we will have these values for layersData : {784, 350, 10}
The first element of the layersData array represents the number of neurons in the InputLayer, which is equal to the number of pixels in the processed image. In our case, the image is an array of 28 x 28 pixels, so the number of neurons in the InputLayer is 28 x 28 = 784.
The last element of the layersData array indicates the number of neurons in the OutputLayer, which corresponds to the number of options the network has available to make a prediction. In our case, these options are the digits 0 to 9, so the number of neurons in the OutputLayer is 10.
The intermediate elements of the layersData array represent the number of neurons in the HiddenLayers, which can be chosen arbitrarily. In our case, we chose a single HiddenLayer with 350 neurons.
Here is the final result for the NeuralNetwork class:
namespace HandwrittenDigits.NetworkDefinition;
[Serializable]
internal class NeuralNetwork
{
public Layer[] Layers { get; set; } = Array.Empty<Layer>();
public NeuralNetwork()
{
}
public NeuralNetwork(params int[] layersData)
{
Layers = new Layer[layersData.Length];
Layers[0] = new Layer(layersData[0], 0);/p>
for (int i = 1; i < layersData.Length; i++)
Layers[i] = new Layer(layersData[i], layersData[i - 1]);
}
}
So far, we have managed to create a fully functional neural network. We will use this structure to train a model capable of identifying handwritten digits. For training, we need a dataset containing images of handwritten digits and labels corresponding to the digits. We will use the MNIST dataset, which is a standard dataset for handwritten digit recognition. This dataset contains 60,000 training images and 10,000 test images, each with a size of 28 x 28 pixels and a numeric label between 0 and 9. You can download the MNIST dataset from this link:
https://www.kaggle.com/datasets/hojjatk/mnist-dataset
The set contains 4 files in byte format:
train-images-idx3-ubyte.gz: training set images (9912422 bytes)
train-labels-idx1-ubyte.gz: training set labels (28881 bytes)
t10k-images-idx3-ubyte.gz: test set images (1648877 bytes)
t10k-labels-idx1-ubyte.gz: test set labels (4542 bytes)
This is an example of an MNIST image.
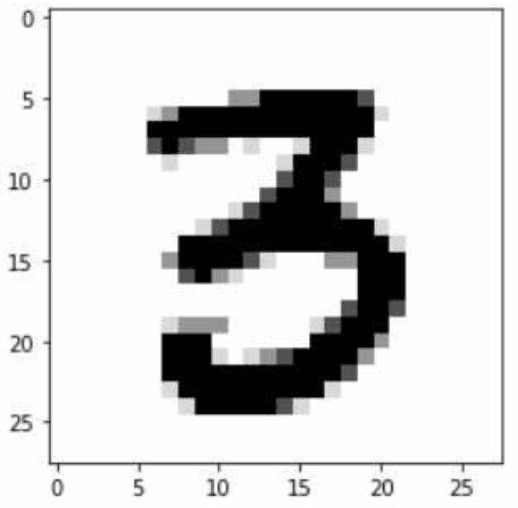
Image 9 - MNIST image of number 3
Next, we will load the training and test data into memory.
To deserialize these 4 files we will use the LoadImages function. Here is the complete code:
namespace HandwrittenDigits.Helpers;
internal class MNIST
public List<Sample> LoadImages(string imgFileName, string labelFileName, int imgCount)
{
var imageReader = File.OpenRead(imgFileName);
var byte4 = new byte[4];
imageReader.Read(byte4, 0, 4);
imageReader.Read(byte4, 0, 4);
Array.Reverse(byte4);
imageReader.Read(byte4, 0, 4);
imageReader.Read(byte4, 0, 4);
var samples = new Sample[imgCount];
var labelReader = File.OpenRead(labelFileName);
labelReader.Read(byte4, 0, 4);
labelReader.Read(byte4, 0, 4);
var targets = GetTargets();
for (int i = 0; i < imgCount; i++)
{
samples[i].Data = new double[784];
var buffer = new byte[784];
imageReader.Read(buffer, 0, 784);
for (int b = 0; b < buffer.Length; b++)
samples[i].Data[b] = buffer[b] / 256d;
samples[i].Label = labelReader.ReadByte();
samples[i].Targets = targets[samples[i].Label];
}
return samples.ToList();
}
private double[][] GetTargets()
{
var targets = new double[10][];
for (int i = 0; i < 10; i++)
{
targets[i] = new double[10];
targets[i][i] = 1;
}
return targets;
}
}
public struct Sample
{
public double[] Targets { get; set; }
public double[] Data { get; set; }
public int Label { get; set; }
}
We will put all this code in the file MNIST.cs in the folder Helpers.
The LoadImages function will return a list of Sample structures containing three fields: Date, Label and Targets.
The Date field is an array of 784 double values, representing the pixels of the image in grey format (grayscale).
The Label field is an integer value between 0 and 9, representing the handwritten digit in the image.
The Targets field is an array of 10 double values, which represents the desired output vector for the neural network. This vector has all elements equal to 0, except the element corresponding to the digit in the image, which is equal to 1. For example, if the digit in the image is 3, then the desired output vector is [0, 0, 0, 1, 0, 0, 0, 0, 0, 0].
To save learning progress, we will convert the NeuralNetwork class to binary format and write to disk each time we get better accuracy than before. We will define a method for this operation in the NetworkState class, which we will create in the Helpers folder. The NetworkState class has the following code:
using HandwrittenDigits.NetworkDefinition;
using MessagePack;
namespace HandwrittenDigits.Helpers;
internal class NetworkState
{
/// <summary>
/// Binary serialization using MessagePack lib.
/// </summary>
public void SaveNetworkState(NeuralNetwork neuralNetwork, string folderPath, int epoch, double accuracy, string lyersData)
{
var path = $"{folderPath}/Layers-{lyersData}--Epoch-{epoch}--Accuracy-{accuracy:P}--{DateTime.Now:yyyy-MM-dd-HH-mm}.binary";
if (!Directory.Exists(folderPath))
Directory.CreateDirectory(folderPath);
string[] files = Directory.GetFiles(folderPath);
foreach (string file in files)
{
string name = Path.GetFileName(file);
if (name.Contains($"{lyersData}"))
{
double fileAccuracy = double.Parse(name.Split('-')[7].Split('%')[0]);
if (double.Parse(accuracy.ToString("P").Split('%')[0]) > fileAccuracy)
{
Task.Run(async () => { await FileDelete($"{folderPath}/{name}"); });
}
else
{
Console.WriteLine($"There is a file with better accuracy for these layer combinations.");
Console.WriteLine($"Existing file name : {name}");
Console.WriteLine($"Existing file accuracy : {fileAccuracy}%");
Console.WriteLine($"New accuracy : {accuracy:P}");
return;
}
}
}
using (FileStream fileStream = new FileStream(path, FileMode.Create))
{
try
{
MessagePackSerializer.Serialize(fileStream, neuralNetwork);
Console.WriteLine("Network parameters saved successfully.");
}
catch (Exception ex)
{
Console.WriteLine("Error occurred while saving network parameters: " + ex.Message);
Task.Run(async () => { await FileDelete(path); });
}
}
}
private async Task FileDelete(string filePath)
{
int retryDelay = 100;
int retryCount = 0;
bool deleted = false;
while (!deleted && retryCount < 100)
{
try
{
File.Delete(filePath);
deleted = true;
}
catch (IOException ex)
{
Console.WriteLine($"Deleting ERROR on file: {filePath}");
Console.WriteLine($"ERROR: {ex.Message}");
await Task.Delay(retryDelay);
retryCount++;
}
}
if (deleted)
Console.WriteLine($"Deleted file: {filePath}");
else
Console.WriteLine($"Failed to delete file: {filePath}");
}
}
To convert the NeuralNetwork class to binary, we used the MessagePack library, available on the nuget platform. This library requires the NeuralNetwork, Layer and Neuron classes to have a parameterless constructor and also to be decorated with the "[Serializable]" attribute.
Here we can find the MessagePack nuget pack:
Now that we have defined the network structure, implemented the learning/prediction algorithm, and added all the adjacent functionality, we can use these components to train our network on a real dataset.
We will define a neural network composed of 3 layers: the first layer (InputLayer) with 784 neurons, one single hidden layer with 350 neurons, and the last layer (OutputLayer) with 10 neurons.
var neuralNetwork = new NeuralNetwork(new int[] { 784, 350, 10 });
We will use the MNIST dataset (those 4 files you downloaded in the "Neural Network Additional Functionality/Train Dataset" section), which contains images of handwritten digits and their corresponding labels. To be able to access the files, you need to set the correct/full file path in these two lines of code:
///TODO: Set the correct/full file path for the dataset files.
List<Sample> trainSamples = mnist.LoadImages("train-images-idx3-ubyte", "train-labels-idx1-ubyte", 60000);
List<Sample> testSamples = mnist.LoadImages("t10k-images-idx3-ubyte", "t10k-labels-idx1-ubyte", 10000);
Our goal is to make our network recognize the digits from the test set images as well as possible. To do this, we will load the training dataset and apply the learning algorithm to each image individually. We will also save the state of the network to disk each time we get a higher accuracy than the previous one.
The full code in the Program class is as follows:
using HandwrittenDigits.Helpers;
using HandwrittenDigits.NetworkAlgorithm;
using HandwrittenDigits.NetworkDefinition;
using MessagePack;
using MessagePack.Resolvers;
namespace HandwrittenDigits;
internal class Program
{
public static void Main()
{
IFormatterResolver resolver = CompositeResolver.Create(TypelessContractlessStandardResolver.Instance, StandardResolver.Instance);
MessagePackSerializer.DefaultOptions = MessagePackSerializerOptions.Standard.WithResolver(resolver);
var algorithm = new Algorithm();
var networkState = new NetworkState();
var mnist = new MNIST();
///TODO: Set the correct/full file path for the dataset files.
List<Sample> trainSamples = mnist.LoadImages("train-images-idx3-ubyte", "train-labels-idx1-ubyte", 60000);
List<Sample> testSamples = mnist.LoadImages("t10k-images-idx3-ubyte", "t10k-labels-idx1-ubyte", 10000);
var neuralNetwork = new NeuralNetwork(new int[] { 784, 350, 10 });
string lyersData = string.Join("_", neuralNetwork.Layers.Select(x => $"[{x.Neurons.Length}]"));
var bestResult = 0d;
for (int epoch = 1; epoch < 100; epoch++)
{
for (int i = 0; i < trainSamples.Count; i += 1)
{
algorithm.ForwardPropagation(neuralNetwork.Layers, trainSamples[i].Data);
algorithm.CalculateGradients(neuralNetwork.Layers, trainSamples[i].Targets);
algorithm.UpdateParameters(neuralNetwork.Layers, 0.9);
}
var result = GetAccuracy(neuralNetwork, testSamples, algorithm);
Console.WriteLine();
Console.WriteLine($"Lyers {lyersData} Epoch {epoch} Accuracy {result:P} {(bestResult > 0 ? result > bestResult ? "BETTER" : "WORST" : string.Empty)} -- {DateTime.Now} --");
if (result > bestResult)
{
bestResult = result;
Task.Run(() =>
networkState.SaveNetworkState(neuralNetwork, "C:/_NetworkState", epoch, bestResult, lyersData)
);
}
}
Console.WriteLine("----------- TRAINING COMPLETED. -----------");
}
private static double GetAccuracy(NeuralNetwork neuralNetwork, List<Sample> testSamples, Algorithm algorithm)
{
var match = 0d;
for (int i = 0; i < testSamples.Count; i++)
{
var outputs = algorithm.ForwardPropagation(neuralNetwork.Layers, testSamples[i].Data);
var max = outputs.Max();
int digit = outputs.ToList().IndexOf(max);
var expectedMax = testSamples[i].Targets.Max();
var expectedDigit = testSamples[i].Targets.ToList().IndexOf(expectedMax);
if (digit == expectedDigit)
match++;
}
var result = match / testSamples.Count;
return result;
}
}
This is what the console would look like during the learning process:
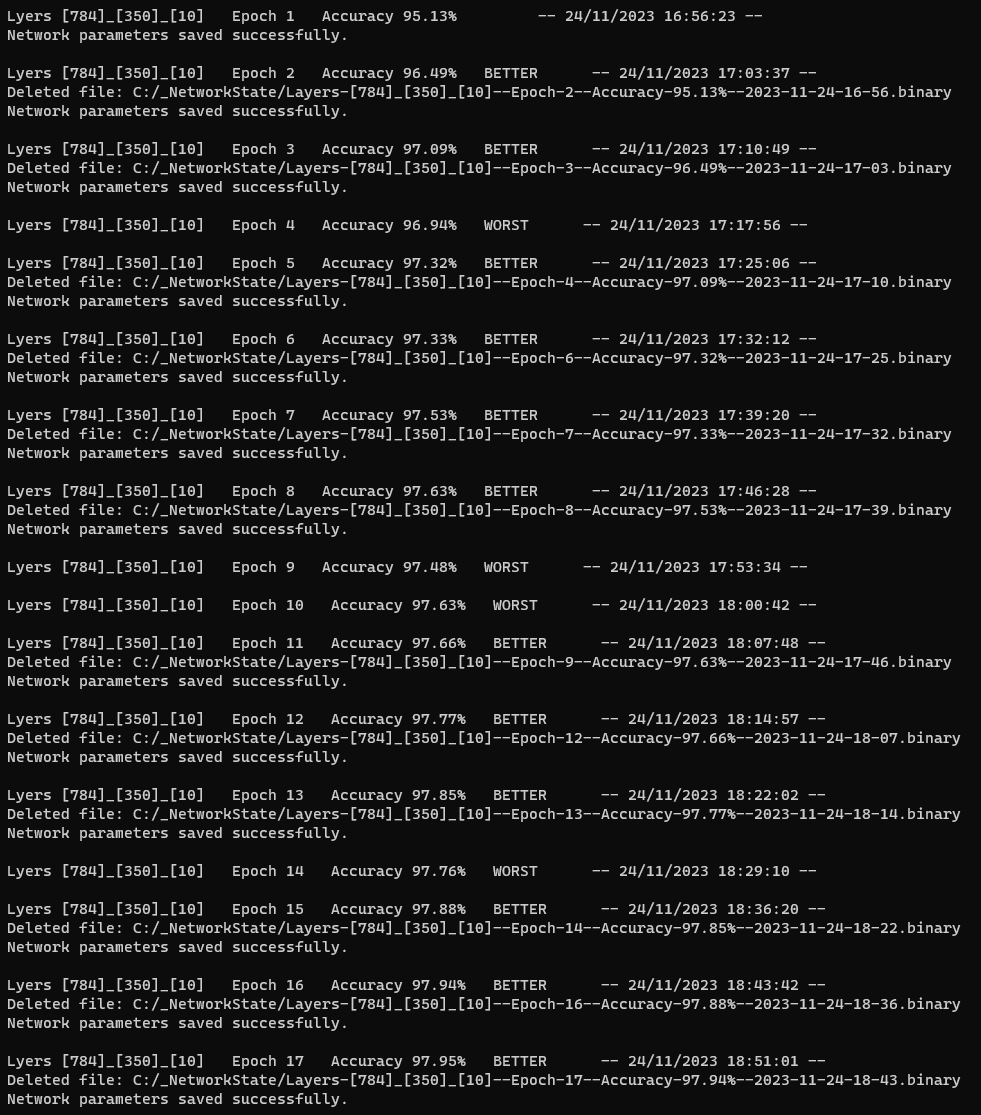
Image 10 - Console Output
And finally, here is the trained model of our network:

Image 11 - Trained model
Here's what the final solution structure looks like in Visual Studio Solution Explorer.

Image 12 - The Final Solution Structure
In this blog post, I have outlined the steps needed to create a fully functional neural network from scratch using the C# programming language. I explained the structure of the network, the training and prediction algorithms, and the methods for loading data and saving network parameters, and I applied all these concepts to a real dataset - MNIST, which contains images with handwritten digits. We demonstrated that our network is able to recognize digits from images with fairly good accuracy after a relatively short training process.
The purpose of this blog post was to convey the idea that creating a fully functional neural network from scratch is much simpler than people think and how it is explained by tutorials on the net. You don't need external libraries, complex frameworks or advanced mathematical knowledge to understand and implement the basic principles of machine learning. All you need is clear logic, correct syntax and creative curiosity. I hope this blog post has been helpful and inspired you to experiment with your own neural network.
If you have any questions, suggestions or feedback, do not hesitate to contact us.
Thank you for reading!


