Read time: 11 minutes
Introduction
Inspiration and talent are words that usually come from people who appreciate the work of an artist. Nevertheless, these attributes are non-existent and are just an empty shell that is sadly used by some so called artists to shield them from any criticism.
So how can we create art if there is no talent or inspiration involved in the process? The answer is rather simple and extremely complex at the same time: hard work and an increasing understanding of the surrounding world.
From the simplest task of drawing a circle to complex models, with enough practice you can achieve the desired results. At the same time you can have all the “inspiration” in the world, but if you don’t have a good understanding of the human anatomy and proportions, for example, you will never be able to create a good 2D/3D character.
The beauty of understanding the inner workings is that you can truly express your personality and project your view of the world and in the process expand your universe.
Designing a character is the perfect example of creation at a very personal level and in the following presentation I will go through this process.
Stylized character design: Fundamentals of developing a character concept
The first and the most crucial step in creating a character concept is to craft the world behind your character. He needs to have emotion, story and personality, in other words he needs to be alive. For this example I wanted to sculpt a stylized boxing bunny.
I sought to picture a fighter that despite his downs, keeps rising up and never gives up. In many aspects a great inspiration for his personality was found in the movie Rocky.

Fig.1 Rocky the boxing bunny
The next step in the creation process is the gathering of inspiration and reference materials. This step is a must for every artist ranging from beginners to even the titans of the industry. Avoiding this step limits your creation potential and it eliminates the possibility of expanding your overall knowledge.
At the same time we should understand the difference between reference and inspiration. They both focus on expanding your vision but the way they are used is different. References are used to inform a design, to incorporate them into the model and inspiration materials are used to create the style, tone and the overall feeling of the model.
In my case, for references I used lots of images from boxing ranging from gloves, pants, hand bandages to actual boxers and, of course, bunnies. For inspiration, I looked up character designs from Pixar to better enforce the tone I had in mind for the character.
Due to the fact that I knew I wanted to concept a stylized humanoid character I had to ground myself into a set of visual rules mainly focused on a very sensitive subject: the distortion of proportions. The proportion of your character can make or break the model especially when we are talking about humanoid models.
On one side, creating a stylized fantasy creature requires to play with the proportions to achieve the intended feel, but at the same time, breaking them can create undesired effects. More or less this is a juggling act between expressiveness and common sense.
The final fundamental notion and an actual creation process is to focus on iteration over finalization. I cannot stress enough how important it is to create a good number of rough concepts and never focus on just modeling a single one. One way to help you achieve this goal is to allocate a maximum time of 1 hour per rough concept/sketch. The level of detail and unique elements of three rough concepts will surpass any single model created in the same amount of time.
Structure: A.R.C.H
How do we tackle a complex model? As with all the problems, we need to fragment the work into small chunks and start building into a logical order. In the industry (visual effects and gaming) there are a set of guidelines and steps that can make your life a lot easier and increase the quality and speed of your work.
So let’s start with the first one: angles. If we backtrack at the beginning of the presentation, I talked about the importance of references and inspirational content. Especially in the case of references, it’s hard to understand all of the elements and transfer them into your work. This is where angles come to the rescue. By analyzing and creating flow lines you can identify the landmarks and box them so you can create a wireframe that will help you into the creation process.
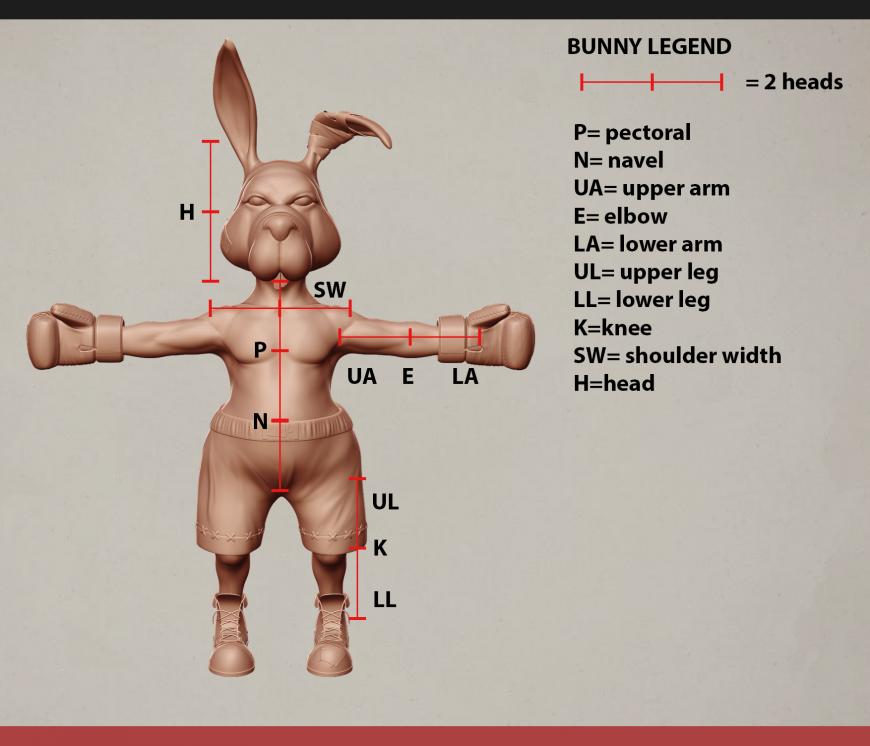
The next step is represented by relationships. It is very common, especially in humanoid models, to get critiques about the proportion of your character. I am not talking about the intended distortion, I am talking about errors in your model that occur due to the fact that elements of a piece do not respect the relationship with other components. This is why it’s important to understand how modifying a piece influences other elements of the model and do the required adjustments. For the boxing bunny I went for a stylized 7 ½ head's human high proportions.I focused on keeping the relationship between the lower and upper arms and the same with the upper and lower legs. At the same type I went for shorter overall legs length compared to the upper body and an exaggerated head size.

Fig.2 Bunny proportions
Cross section is a term that for many people relate to the medical field but it’s one of the most important tests to see if you truly comprehend the volume you are creating. If you understand the cross-section of a shape, especially going down a form like an arm, a leg or a torso you will become more confident in playing with the forms.
The last element of the A.R.C.H is the hierarchy. This is a practical matter, because just like in traditional sculpting where you block forms from large to small and check them every step along the way, the same thing must be done for digital sculpting. Many beginner artists start modelling and focus right away on the small details without building a solid base. Without a solid structure all of these details are just thrown there without any purpose and even reinforce the poor quality of the model.
The blob, the ugly, the model and the details
And here we are at the actual sculpting process of the boxing bunny. I use Zbrush, but the method is similar for other sculpting software such as Mudbox, 3D Coat, Modo and so on. I will not go into technical details, but rather I will talk about the four stages that all need to go through in creating their concept model.
Trying to jump over one or more of them means a lesser understanding of the concept process and of course it limits you in achieving the desired results. To better visualize these steps, I will show the evolution of one of the eight rough sketches I did for the boxing bunny. The exact flow is used for the presentation concept but in his case I use more than one subtool, polygroups and focus on a good topology.
The first step, as I like to call it, is the blob. Basically I start every rough concept from a simple sphere and start sculpting from there. This is a great way for free flow sculpting, but is just as good for when you have a clear target in mind. This is the step where you have full freedom of experimentation and you should play with it until you reach the next step, the ugly.

Fig.3 Blob to ugly
Here is where most of the frustration and desperation appear. You have the basic form, the idea you want to express but everything is out of place and it looks wrong and ugly. Here is where A.R.C.H comes to the rescue. Step by step you need to correct and tweak until you get the desired overall shape and reach the model stage.

Fig.4 Ugly to model
In this later stage you have an almost complete concept ready for presentation and most of the work focuses on tweaking proportions, shapes, adding final structure elements until you reach last stage, the details.
The details are the stage where you add the finishing touches and better imprint your design into the character. As you may have guessed this is the stage where all want to work on but at the same time this is where you can really uplift or break your model. A very important element is to understand that this stage should not exist in the rough sketches and just on the presentation concept.
God is in the details
I knew from the start the story of my boxing bunny and step by step I sculpted him around that story. It’s important to understand that before you reach the final stage (the details) of the modeling process, your character needs to be alive.
When I talk about the finishing touches, I see them as elements that add originality to the story, but at the same time their absence does not cripple the character. To give you an actual example, I will take the boxing gloves of the bunny.
From a structural point of view I knew I wanted to play around with their size for a stylized look, add a handmade feel to them (stitches), cloth wrinkle effect and a little wear and tear. At the final stage of modeling I wanted to express the idea that he is a right handed fighter. So for the left handed glove I used two buttons and a cloth patch to create a sad emoticon and for the primary glove I used two “x” shape stitches and another patch for a dead emoticon.

Fig.5 Bunny side view
I could have just as easily used these elements in random way just to keep my original target of a wear and tear effect, but you can easily add extra personality to your character with a little imagination.
The devil is in the details
Is it possible put too much detail in your model? The short answer is yes and I will present some common situations in which this fact occurs.
In hard surface modeling, there is a lot of focus on creating extremely complex details, with beautiful flow and even an organic feel to them but it’s of equal importance to give the viewer resting places on the model. Adding detail elements just for the sake of it without taking in consideration proportion, size, actual functional purpose is even worse than having a slightly naked model. One of the greatest artists that truly masters hard surface modeling is Vitaly Bulgarov and I encourage you to see his work gallery.
In digital sculptures that focus on realism and naturalness, the most common “mistake” is to hide errors in anatomy and proportions in high frequency details. Adding skin wrinkles, veins and so on will not do any good if, for example, your pectoralis major muscles don’t span out to the humerus( the result being an non-functional bio-mechanical model). A titan in this field is Scott Eaton, who combines the lessons learned at the Florence Academy of Art with the modern computer graphics and his classes are a must for anyone who wants to expand their knowledge of this field. I also recommend a very famous Italian sculptor and architect, Gian Lorenzo Bernini, whose marble sculptures capture the dynamic of the human body.
Stylized modeling may seem the easiest thing compared to the above presented, but it’s quite the hardest thing you can do. You cannot hide behind high frequency details; you need to have a deep understanding of shapes and proportions and every detail you create needs to be powerful enough to push forward your model and musn’t fight others for space. It is a true balancing act that drives your creativity and knowledge to the limit. A great inspiration source both for 2d and 3d digital artists is Tiago Hoisel.
Concept presentation and preparing for production
If you are extremely lucky, one of the concepts will pass your art director, lead concept artist without major modifications and you will prepare the model for production. When presenting the model is nice to reinforce the thematic with a good background, even add text information and render images from all sides for a better visualization.

Fig.6 Front Back view
The character needs to be constructed in a modular manner so any modifications will not impact the entire model. For the boxing bunny the final concept is divided in 15 Zbrush subtool(body, left glove, right glove, pants and so on) and some of them have multiple polygroups for easier low poly retopology and map extraction.

Fig.7 Boots structure
It is very important to create a model that is flexible enough to represent the high poly version for a wide range of platforms (mobile, console, pc) and purposes (real-time or CGI renders). This is why you must understand the pipeline involved in creating a game or CGI ready character and appreciate the work that is done by the entire team to deliver a finished product.
One last thing that concept artists need to understand is that a model finishes being a concept at the end of production until then modifications can and will occur in every stage and it’s your job to work with the team in solving all problems that appear along the way.
Conclusions
You have seen a small piece of the process behind crafting a stylized character concept but the most important thing you need to remember is to never stop creating. It does not matter how good or bad it appears, learn from your mistakes, grow and never think you have reached perfection, but always aim for it.
And the next time someone asks you what you do, respond with: I am a 3d character modeler, 2d environment modeler, 3d animator, C# programmer… and leave it to others to call you an artist.
→ If you want to find out more about the author of the article click play on the below video.
Subscribe on YouTube


