Easy Gateway Payment Integration with Stripe

Date published: February 20, 2023
14 min read
Title Easy Gateway Payment Integration Stripe
1. Introduction

When I first decided to write this blog post, I kept thinking about how to explain, in great detail, how this service provider works. But the more I thought about it, the more I was searching for definitions and explanations on the internet, and eventually I realized that if I were to include all that information here, it would end up becoming a monolith of a post. No one would be interested in reading it.

So I decided to remove all the “boilerplate” text and keep it concise and easy to follow.

2. What is Stripe?

Today, mobile devices are not only miniature malls with all you can buy listings but also wallets. As a consumer, you can make purchases in seconds, and it’s all thanks to the evolution and innovation of the payment industry. 

Buying and selling goods on the internet most often involves an intermediary called a payment gateway. PayPal is a payment gateway example, but it’s not the one some of the major companies use. 

Stripe is the payment gateway used by Twitter, Facebook and Amazon and is regarded as a top solution in the industry. Not to mention that developers review the Stripe API as easy-to-use. Stripe lets companies accept credit and debit cards as a form of payment inside their applications.

An account on the Stripe website is required in order to obtain a PUBLISHABLE_KEY and a SECRET_KEY. All the payments will be logged on the dashboard, which will be available as soon as you create your account. For our intended purpose, we will need a Backend application and an Android application.

3. Setting up a Node.js Stripe server

Without further ado, let’s see how to integrate stripe payment gateway in Node.js. This will handle all the requests made from the mobile application and will pass them to the Stripe dashboard. In other words, the Backend will act as a middleware between the Android application and the Stripe dashboard.

First you will need to create a server.js file as you can see in Code Snippet 1. This is the central point of the application. Here you will specify on what port the server will be running and from here, you will be able to start the server.

To start the server, you can run one of the following commands inside a terminal:

  • npm start
  • node server.js

const http = require('http');
const service = require('./service');
const dotenv = require('dotenv');
dotenv.config();
const port = 8080;

const server = http.createServer(service);

server.listen(port, () => {
    console.log('Server is up and running on port number ' + port);
});

Code Snippet 1 - Server.js

The service.js file from Code Snippet 2 will contain all the endpoint definitions that are necessary to enable the communication between the mobile application and the Stripe dashboard.

The /greet endpoint can be used to see if the server is up and running. The only purpose of this endpoint is to print a message.

const bodyparser = require('body-parser')
const express = require('express');
const stripeServer = require('./stripeServer');
const app = express();

// Body-parser middleware
app.use(bodyparser.urlencoded({extended:false}))
app.use(bodyparser.json())

app.get('/greet', stripeServer.greetUser);
app.get('/config', stripeServer.config);
app.post('/create-payment-intent', stripeServer.createPaymentIntent)
module.exports = app;

Code Snippet 2 - Service.js

The result for the greet endpoint can be seen in Image 1.

Easy Gateway Payment Integration with Stripe
Image 1 - Greet Endpoint

The /config endpoint has a more practical use. This one will send to the mobile application the PUBLISHABLE_KEY for the Stripe account that was set. For safety reasons, the key is not stored on the mobile device but instead it is sent from the server.

The response for the /config endpoint can be seen in Image 2.
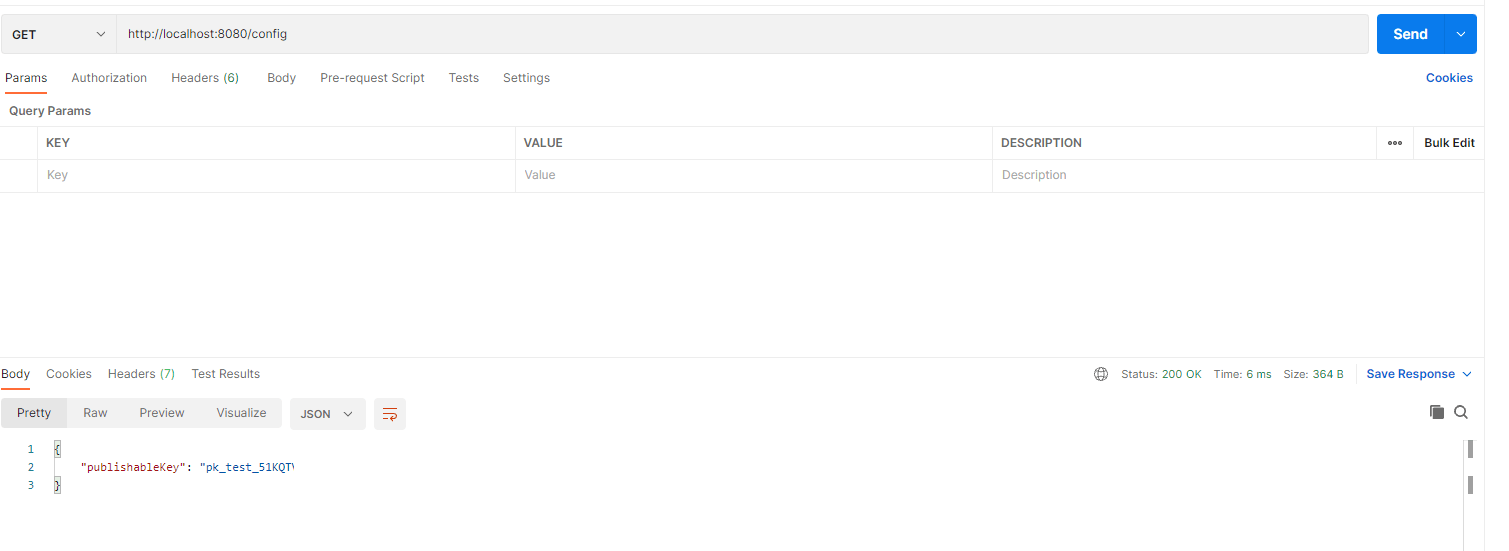
Stripe Publishable Key

Image 2 - Config Endpoint

The /createa-payment-intent endpoint is responsible for creating the payment intent from the user using the currency, payment amount and payment method. By creating this payment intent, the payment is registered on the Stripe dashboard with the status Incomplete. This is because at this time, the payment is not fully finalized because the user has not provided their credit/debit card information. At this early stage, the payment has a unique Id that will be later used to finalize the payment process.

As a response for executing this endpoint, we will receive the payment intent secret key. This is a unique identifier for each individual payment, and it will later be saved on the Stripe dashboard. To see this response, check out Image 3 below.
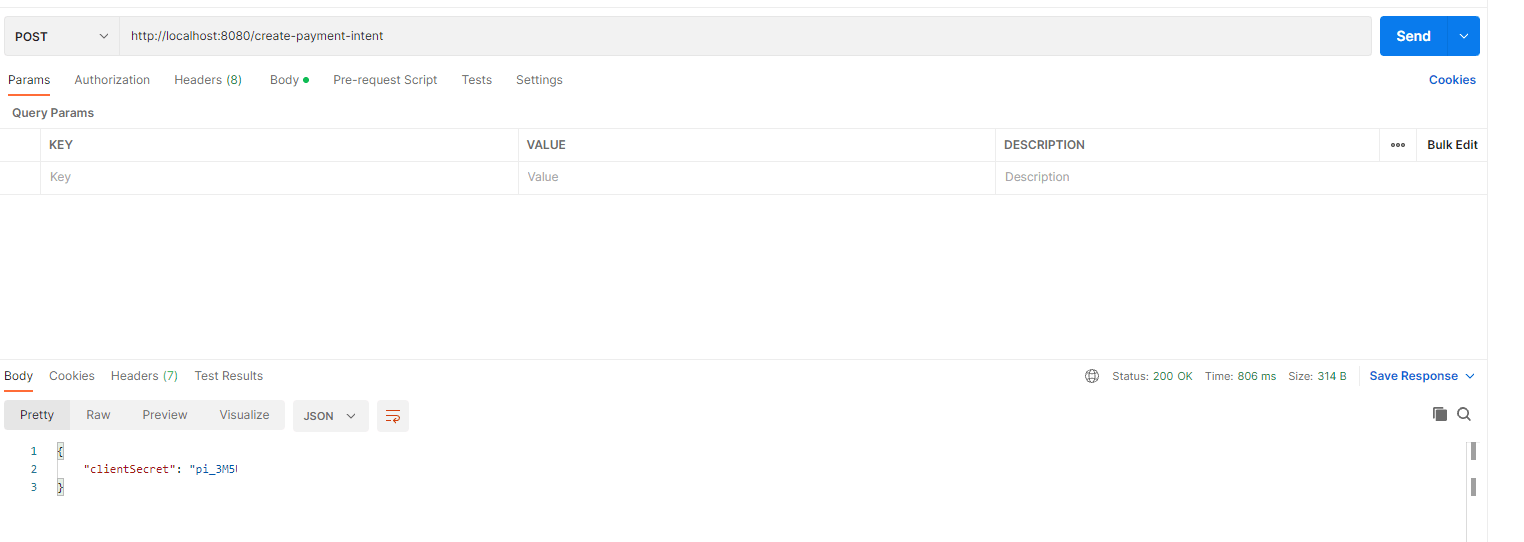
Payment Intent Stripe

Image 3 - Create payment intent

The next file is stripeServer.js. We can consider this the brains of the entire application. Each method from this file is responsible for the corresponding endpoint. Here we define what data is expected from the mobile application and what data we send in return.

The code for this file can be seen below in Code Snippet 3.

'use stric'
const constants = require('./constants/constants');
const express = require("express");
const app = express();
const { resolve } = require("path");
const dotenv = require('dotenv');
dotenv.config();
const SECRET_KEY = “SECRET_KEY”
const PUBLISHABLE_KEY = “PUBLISHABLE_KEY”
    // This is your real test secret API key.
const stripe = require(constants.stripe)(SECRET_KEY);
app.use(express.static("."));
app.use(express.json());

module.exports = {
    greetUser: function(req, res) {
        return res.status(200).json({ 'message': constants.greet_message });
    },

    config: function(req, res) {
        return res.status(200).json({ 'publishableKey': PUBLISHABLE_KEY });
    },

    createPaymentIntent: async function(req, res) {

        // Create a PaymentIntent with the order amount and currency

        try {
            const { amount, currency, paymentMethodType } = req.body;

            const paymentIntent = await stripe.paymentIntents.create({
                amount: amount,
                currency: currency,
                payment_method_types: [paymentMethodType]
            });

            return res.status(200).json({ clientSecret: paymentIntent.client_secret });
        } catch (e) {
            return res.status(400).json({ error: { message: e.message } });
        }
    }
}

Code Snippet 3 - StripeServer.js

Last but not least, we have the constants.js file. Here we store all the necessary constants that are used all throughout the application. This file is mostly used to remove redundancies with strings or other values that do not need to change. The code for this file can be seen below in Code Snippet 4.

const stripe = "stripe";
const greet_message = "It is working fine";

module.exports = {
    stripe: stripe,
    greet_message: greet_message
};

Code Snippet 4 - Constant.js

4. Setting up Stripe Android Application

For the Android application, we will create a simple project composed of two activities with their corresponding XML files and an additional class file that handles the payment intent creation.

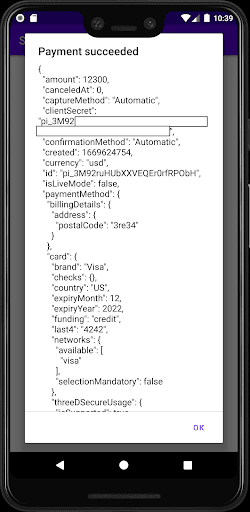
In Code Snippet 5, we can see the above-mentioned class that handles the creation of the payment intent. This method requires some parameters like the transaction amount, the currency, the payment method and a completion callback that is triggered when the server approves the payment and the Stripe dashboard marks it as completed as shown in Image 4.

Sum money Stripe Payment

Image 4 - Completed Transaction

class ApiClient {
  private val httpClient = OkHttpClient()

  fun createPaymentIntent(
      amount: Double,
      paymentMethodType: String,
      currency: String,
      completion: (paymentIntentClientSecret: String?, error: String?) -> Unit
  ) {
      val mediaType = "application/json; charset=utf-8".toMediaType()
      val requestJson = """
          {
          "amount": $amount,
          "currency": "$currency",
          "paymentMethodType": "$paymentMethodType"
          }
      """.trimIndent()
      val body = requestJson.toRequestBody(mediaType)
      val request = Request.Builder().url("$backendUrl/create-payment-intent").post(body).build()
      httpClient.newCall(request).enqueue(object : Callback {
          override fun onFailure(call: Call, e: IOException) {
              completion(null, "$e")
          }

          override fun onResponse(call: Call, response: Response) {
              if (response.isSuccessful) {
                  val responseData = response.body?.string()
                  val responseJson = responseData?.let { JSONObject(it) } ?: JSONObject()
                  var paymentIntentClientSecret: String = responseJson.getString("clientSecret")
                  completion(paymentIntentClientSecret, null)
              } else {
                  completion(null, "$response")
              }
          }
      })
  }
}

Code Snippet 5 - Api Client

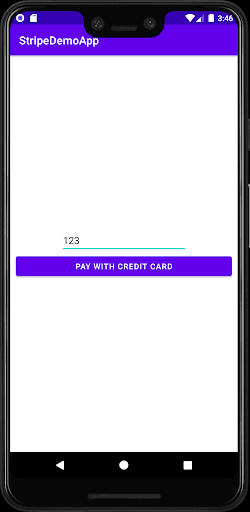
Next on the chopping block is the MainActivity. Here we fetch the publishable key from the server and we create a method that will take the transaction amount from the user. If you want to see the Main Activity code, you can direct your attention to Code Snippet 6 and if you want to see the XML file, you can refer to Code Snippet 9. If you’re expecting some super futuristic design, you will be disappointed because this activity only has one button and one edit text field as shown in Image 7. The user can enter the transaction amount in the edit text and after pressing the ‘PAY WITH CREDIT CARD’ button, they will be redirected to a screen where they will be required to enter their credit card information. Don’t worry; there is no need to enter real credit card information here during the development/testing stages, but more on this at the appropriate time.

Because the Stripe platform works with the smallest monetary unit in each currency, if we want for example to use USD for the transaction, we will need to multiply the user input (which is in cents) by 100 to get the amount in dollars. This applies for any other currencies, and this can be seen in Code Snippet 6.

After a successful transaction, the application will come back to this screen and show an alert dialog with a JSON Object that contains all the information about the freshly completed transaction. This dialog can be seen in Image 5.
 

private val httpClient = OkHttpClient()
private lateinit var publishableKey: String

override fun onCreate(savedInstanceState: Bundle?) {
  super.onCreate(savedInstanceState)
  setContentView(R.layout.activity_launcher)

  fetchPublishableKey()
  initComponents()
}

private fun initComponents() {
  paymentMethodCard.setOnClickListener {
      if (!transactionAmount.text.toString().isEmpty()) {
          val intent = Intent(this, CardActivity::class.java)
          intent.putExtra(
              "transactionAmount",
              transactionAmount.text.toString().toDouble() * 100
          )
          startActivity(intent)
      } else {
          Toast.makeText(this, "Insert payment amount", Toast.LENGTH_LONG).show()
      }
  }
}

private fun displayAlert(title: String, message: String) {
  runOnUiThread {
      val builder = AlertDialog.Builder(this)
          .setTitle(title)
          .setMessage(message)

      builder.setPositiveButton("Ok", null)
      builder.create().show()
  }
}

//Fetch publishable key from server and initialize the Stripe SDK
private fun fetchPublishableKey() {
  val request = Request.Builder().url("$backendUrl/config").build()

  httpClient.newCall(request).enqueue(object : Callback {
      override fun onFailure(call: Call, e: IOException) {
          displayAlert("Request failed", "Error: $e")
      }

      override fun onResponse(call: Call, response: Response) {
          if (response.isSuccessful) {
              val responseData = response.body?.string()
              val responseJson = responseData?.let { JSONObject(it) } ?: JSONObject()
              publishableKey = responseJson.getString("publishableKey")

              PaymentConfiguration.init(applicationContext, publishableKey)
          } else {
              displayAlert("Request failed", "Error: $response")
          }
      }
  })
}

Code Snippet 6 - MainActivity

Stripe Payment

Image 5 - Completed Transaction Dialog

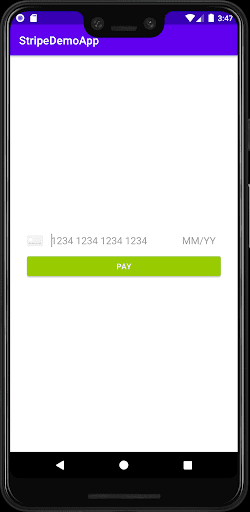
Last but not least, we have the CardActivity visible in Code Snippet 7. The XML file for this screen contains a predefined widget requiring the credit card information and a simple button to initiate the payment. The XML code can be seen in Code Snippet 8 and the final result can be seen in Image 6. The card widget is a component of the Stripe library that must be implemented in the Gradle file. Simply add the latest version like so: implementation 'com.stripe:stripe-android:19.1.1'. As I mentioned earlier, there is no need to enter real credit card information because Stripe provides some testing cards in order to ease the development and testing process. These cards can be found in their documentation under the Testing section or by using this link: https://stripe.com/docs/testing.

The widget used is the default one for easy integration. But the Stripe documentation describes a method to create your own custom widgets based on the theme of your application.

If you are using your own computer to host the server presented in the beginning of this article and if you are using the Android emulator to test your app, I recommend that you use the local IP address presented in Code Snippet 7. This is stored in the backendUrl variable. Just make sure that this is a global variable inside the CardActivity class. If you are hosting your server on another machine or on Heroku, then you will use the IP address provided by that platform.

The default credit card widget provides some validations such as that the credit card number must have the correct number of digits and the expiration date should be in the future based on the current date.

//val backendUrl = "http://10.0.2.2:4242" //For local testing with an emulator

class CardActivity : AppCompatActivity() {

  private lateinit var paymentIntentClientSecret: String
  private lateinit var stripe: Stripe

  override fun onCreate(savedInstanceState: Bundle?) {
      super.onCreate(savedInstanceState)
      setContentView(R.layout.activity_card)

      stripe = Stripe(this, PaymentConfiguration.getInstance(applicationContext).publishableKey)

      var amount = intent.getDoubleExtra("transactionAmount", 0.0)

      startCheckout(amount)
  }

  override fun onActivityResult(requestCode: Int, resultCode: Int, data: Intent?) {
      super.onActivityResult(requestCode, resultCode, data)

      //Handle the result of stripe.confirmPayment
      stripe.onPaymentResult(requestCode, data, object : ApiResultCallback<PaymentIntentResult> {
          override fun onSuccess(result: PaymentIntentResult) {
              val paymentIntent = result.intent
              if (paymentIntent.status == StripeIntent.Status.Succeeded) {
                  val gson = GsonBuilder().setPrettyPrinting().create()
                  displayAlert("Payment succeeded", gson.toJson(paymentIntent))
              } else if (paymentIntent.status == StripeIntent.Status.RequiresPaymentMethod) {
                  displayAlert(
                      "Payment failed",
                      paymentIntent.lastPaymentError?.message.orEmpty()
                  )
              }
          }

          override fun onError(e: Exception) {
              displayAlert("Error", e.toString())
          }
      })
  }

  private fun startCheckout(amountPay: Double) {
      ApiClient().createPaymentIntent(
          amountPay,
          "card",
          "usd",
          completion = { paymentIntentClientSecret, error ->
              run {

                  paymentIntentClientSecret?.let {
                      this.paymentIntentClientSecret = it
                  }
                  error?.let {
                      displayAlert("Failed to load PaymentIntent", "Error: $error")
                  }
              }
          })

      // Confirm the PaymentIntent with the card widget
      payButton.setOnClickListener {
          cardInputWidget.paymentMethodCreateParams?.let { params ->
              val confirmParams = ConfirmPaymentIntentParams.createWithPaymentMethodCreateParams(
                  params,
                  paymentIntentClientSecret
              )
              stripe.confirmPayment(this, confirmParams)
          }
      }
  }

  private fun displayAlert(title: String, message: String) {
      runOnUiThread {
          val builder = AlertDialog.Builder(this)
              .setTitle(title)
              .setMessage(message)

          builder.setPositiveButton("Ok") { _, _ ->
              val intent = Intent(applicationContext, LauncherActivity::class.java)
              startActivity(intent)
          }
          builder.create().show()

      }
  }

Code Snippet 7 - CardActivity

<?xml version="1.0" encoding="utf-8"?>
<androidx.constraintlayout.widget.ConstraintLayout xmlns:android="http://schemas.android.com/apk/res/android"
  xmlns:app="http://schemas.android.com/apk/res-auto"
  xmlns:tools="http://schemas.android.com/tools"
  android:layout_width="match_parent"
  android:layout_height="match_parent"
  android:layout_marginLeft="30dp"
  android:layout_marginRight="30dp"
  tools:context=".CardActivity">

  <com.stripe.android.view.CardInputWidget
      android:id="@+id/cardInputWidget"
      android:layout_width="match_parent"
      android:layout_height="wrap_content"
      app:layout_constraintBottom_toTopOf="@id/payButton"
      app:layout_constraintEnd_toEndOf="parent"
      app:layout_constraintStart_toStartOf="parent"
      app:layout_constraintTop_toTopOf="parent"
      app:layout_constraintVertical_chainStyle="packed" />

  <Button
      android:id="@+id/payButton"
      android:layout_width="match_parent"
      android:layout_height="wrap_content"
      android:backgroundTint="@android:color/holo_green_light"
      android:text="@string/pay"
      app:layout_constraintBottom_toBottomOf="parent"
      app:layout_constraintEnd_toEndOf="parent"
      app:layout_constraintStart_toStartOf="parent"
      app:layout_constraintTop_toBottomOf="@id/cardInputWidget"
      app:layout_constraintVertical_chainStyle="packed" />

</androidx.constraintlayout.widget.ConstraintLayout>

Code Snippet 8 - CardActivity.xml

Demo Stripe App Card

Image 6 - Card Activity Screen

<?xml version="1.0" encoding="utf-8"?>
<androidx.constraintlayout.widget.ConstraintLayout xmlns:android="http://schemas.android.com/apk/res/android"
  xmlns:app="http://schemas.android.com/apk/res-auto"
  xmlns:tools="http://schemas.android.com/tools"
  android:layout_width="match_parent"
  android:layout_height="match_parent"
  tools:context=".LauncherActivity">

  <EditText
      android:id="@+id/transactionAmount"
      android:layout_width="wrap_content"
      android:layout_height="wrap_content"
      android:hint="@string/transaction_amount"
      app:layout_constraintBottom_toTopOf="@id/paymentMethodCard"
      app:layout_constraintEnd_toEndOf="parent"
      app:layout_constraintStart_toStartOf="parent"
      app:layout_constraintTop_toTopOf="parent"
      app:layout_constraintVertical_chainStyle="packed" />

  <Button
      android:id="@+id/paymentMethodCard"
      android:layout_width="0dp"
      android:layout_height="wrap_content"
      android:layout_marginStart="10dp"
      android:layout_marginEnd="10dp"
      android:text="@string/pay_with_credit_card"
      app:layout_constraintBottom_toBottomOf="parent"
      app:layout_constraintEnd_toEndOf="parent"
      app:layout_constraintStart_toStartOf="parent"
      app:layout_constraintTop_toBottomOf="@id/transactionAmount"
      app:layout_constraintVertical_chainStyle="packed" />

</androidx.constraintlayout.widget.ConstraintLayout>

Code Snippet 9 - MainActivity.xml

Main Activity Screen

Image 7 - Main Activity Screen


5. Conclusions

This article aimed to help you create a basic application to learn how to integrate the Stripe SDK inside your Android application. Also, as I stated in the beginning of the article, you will need to create a server application to act as a middleware between the Android application and the Stripe platform. This post will get you up and going on that part too even if you don’t know any server side languages. Just watch a tutorial on how to create a basic Node.js server and create the required files presented in the first part of this blog post and you will be on your merry way.

As for the Android application, I opted for a simple project without complex UI files, in order to focus on the integration and functionality of the Stripe SDK.

So, could you use one of the payment gateway alternatives instead of Stripe? Sure. But why would you do that? Let me know in the comments!

In the end, there is nothing more to say on my part than be careful where you enter your personal information and especially your credit card details.


Share on:

I have read and understood the ASSIST Software website's Terms of Use and Privacy Policy.

Want to stay on top of everything?

Get updates on industry developments and the software solutions we can now create for a smooth digital transformation.

Frequently Asked Questions

1. Can you integrate AI into an existing software product?

Absolutely. Our team can assess your current system and recommend how artificial intelligence features, such as automation, recommendation engines, or predictive analytics, can be integrated effectively. Whether it's enhancing user experience or streamlining operations, we ensure AI is added where it delivers real value without disrupting your core functionality.

2. What types of AI projects has ASSIST Software delivered?

We’ve developed AI solutions across industries, from natural language processing in customer support platforms to computer vision in manufacturing and agriculture. Our expertise spans recommendation systems, intelligent automation, predictive analytics, and custom machine learning models tailored to specific business needs.

3. What is ASSIST Software's development process?  

The Software Development Life Cycle (SDLC) we employ defines the stages for a software project. Our SDLC phases include planning, requirement gathering, product design, development, testing, deployment, and maintenance.

4. What software development methodology does ASSIST Software use?  

ASSIST Software primarily leverages Agile principles for flexibility and adaptability. This means we break down projects into smaller, manageable sprints, allowing continuous feedback and iteration throughout the development cycle. We also incorporate elements from other methodologies to increase efficiency as needed. For example, we use Scrum for project roles and collaboration, and Kanban boards to see workflow and manage tasks. As per the Waterfall approach, we emphasize precise planning and documentation during the initial stages.

5. I'm considering a custom application. Should I focus on a desktop, mobile or web app?  

We can offer software consultancy services to determine the type of software you need based on your specific requirements. Please explore what type of app development would suit your custom build product.   

  • A web application runs on a web browser and is accessible from any device with an internet connection. (e.g., online store, social media platform)   
  • Mobile app developers design applications mainly for smartphones and tablets, such as games and productivity tools. However, they can be extended to other devices, such as smartwatches.    
  • Desktop applications are installed directly on a computer (e.g., photo editing software, word processors).   
  • Enterprise software manages complex business functions within an organization (e.g., Customer Relationship Management (CRM), Enterprise Resource Planning (ERP)).

6. My software product is complex. Are you familiar with the Scaled Agile methodology?

We have been in the software engineering industry for 30 years. During this time, we have worked on bespoke software that needed creative thinking, innovation, and customized solutions. 

Scaled Agile refers to frameworks and practices that help large organizations adopt Agile methodologies. Traditional Agile is designed for small, self-organizing teams. Scaled Agile addresses the challenges of implementing Agile across multiple teams working on complex projects.  

SAFe provides a structured approach for aligning teams, coordinating work, and delivering value at scale. It focuses on collaboration, communication, and continuous delivery for optimal custom software development services. 

7. How do I choose the best collaboration model with ASSIST Software?  

We offer flexible models. Think about your project and see which model would be right for you.   

  • Dedicated Team: Ideal for complex, long-term projects requiring high continuity and collaboration.   
  • Team Augmentation: Perfect for short-term projects or existing teams needing additional expertise.   
  • Project-Based Model: Best for well-defined projects with clear deliverables and a fixed budget.   

Contact us to discuss the advantages and disadvantages of each model. 

1. Is ASSIST Software a reliable company for custom engineering?

Absolutely. Our partners have given us great recommendations and reviews, leading us to win The Manifest Award for Most Reviewed Software Developers. Further proof comes from our 97% employee retention rate and ongoing client partnerships for over 8 years.  

2. Are the ASSIST Software Romanian software engineers certified?

Yes. 85% of our software programmers are certified.  

At a company level, ASSIST Software is certified and recognized by industry players such as Microsoft, AWS, Google Cloud, Adobe, Drupal, Fujitsu, ISTQB, and others.  

Our employee certifications are tremendously important as they reflect the shared commitment to long-term growth.

3. Why should I choose Romania for custom software development? 

Romania has become a significant player in custom software development, attracting businesses worldwide. Romania boasts the highest number of certified IT specialists in Europe and ranks sixth globally, surpassing even the US in tech specialists per capita.  

At ASSIST Software, what sets us apart is our team and our location: our engineers are certified, experienced, and flexible, while being in the +2 GMT time zone allows us to easily facilitate meetings with clients all over the world.

4. What team will work on my project, and where will it be located?

ASSIST Software's headquarters is in Romania, a prime country for software development outsourcing. Our 350+ software engineers speak English and have a deep passion for innovation.  

We provide regular project updates through reports, meetings, and online dashboards. Generally, you'll have access to a dedicated project manager who will be your point of contact for any questions or concerns.  

5. How much will my project cost me?

Our prices are competitive, and as per our working model, we guarantee you will be satisfied with the result. Frequent meetings, check-ins, and a great communication structure will ensure this outcome.   

Project costs depend on various factors, including complexity, scope, required technologies, and team size. We'll gather detailed information about your project during the initial consultation to provide a customized quote and we guarantee that you will be able to see the benefits of bespoke software.  

1. What technologies do you work with?

ASSIST Software tackles your projects with a robust tech stack. We build native and cross-platform mobile apps, craft user-friendly web experiences, and create stunning visuals. 

Our wide-ranging expertise starts from Java, Python, and JavaScript frameworks to cutting-edge solutions like AR/VR, blockchain, and AI/ML. We also manage databases, leverage cloud platforms, and ensure flawless project execution. We're your one-stop shop for exceptional software development from concept to deployment. You can view our expertise for more details.   

2. Are you experienced in AI/ML development?

Yes. We have extensive experience in data engineering and machine learning operations (MLOps). We can employ neural networks, computer vision, and AI models to benefit your ideas.   

You can trust our long-term experience with big data, NLP, and sentiment analysis, as over the past three years, we led a European security project with 15 partners focused on detecting radicalization on social media and the dark web.

3. Do you have a research and development department and work on European Projects?

We know R&D is crucial for businesses to stay competitive and thrive in dynamic markets. Successful R&D efforts lead to developing exceptional products or services, improved efficiency and effectiveness in operations, and enhanced market positioning.   

We have established solid partnerships with 160+ European research companies, universities, and research centers (e.g., Fraunhofer, TWI, University of Heidelberg, REWE Group, SINTEF, etc.) and have participated as technical partners in over 25 EU-funded projects.  

4. Besides custom software solutions, what other services do you offer?

  • Design Thinking for Breakthrough Products:  

    We craft user experiences that resonate. Our design process is an immersive collaboration, starting with workshops to uncover your vision and user needs. We conduct market research, analyze the competition, and guide you toward cutting-edge solutions in accordance with your business requirements.  

  • Digital Transformation to Reimagine Your Business:

    Digital transformation is nothing less than a strategic shift. We empower you to become more agile and data-driven, optimizing core processes for the digital age.  

  • Scale with Confidence as We Build for Growth:  

    We understand that business success and development mean new challenges. Our solutions are built to scale seamlessly, accommodating increasing user bases and data volumes without sacrificing performance or security.  

5. As a company, does ASSIST have its own software products?

Yes, ASSIST Software teams have been involved in designing and developing innovative products that address community needs. One such example is the web and mobile platform Autisma. This therapy assistant enables continued learning for children diagnosed with autism spectrum disorder.   

Our extensive knowledge of the Unity and Unreal engines has allowed us to develop two mobile games, Elly and the Ruby Atlas and Hooman Invaders, as well as various Unity Assets, such as the Real-Time Weather PRO and Easy Sky. These two Unity assets allow Unity developers to control the weather and sky in their projects.   

1. Is ASSIST Software hiring right now?

We are always looking for great people to join our team, whether you're a senior software engineer or a new talent seeking an IT career. Please check our careers page and contact us. Our HR department will contact you as soon as possible.   

2. Is ASSIST Software organizing internships?

Yes. Each year, we organize individual and group internships for students. Our long-term partnership with the Stefan cel Mare University of Suceava allows us to put together great events for students and help them get started in the industry. 

3. What type of learning culture does ASSIST Software encourage?

Our focus on innovation comes from a 'can do' attitude and the continuous learning we encourage our colleagues to pursue. We frequently organize workshops, learning sessions, presentations, and masterclasses. All these events are free and open to our colleagues and aim to support their professional and personal development. 

4. How does ASSIST Software focus on teamwork?

The key to stellar teamwork is the quality time we spend together. ASSIST employees and their families are frequently invited to participate in all activities. We encourage a healthy lifestyle by promoting and organizing hikes, bike riding sessions, marathons, volleyball, football and tennis matches, ping-pong championships, and many more.   

We show our care for the environment through reforestation campaigns and forest cleaning activities.   

We also have an English-speaking club, e-sports gaming nights, tech discussions, networking parties, and board game sessions.   

5. How does ASSIST Software give back to the community?

Volunteering and charity are essential to us, which is why we founded the ASSIST Humanitarian Foundation. We genuinely care about our community and want to improve the future. We invest in IT equipment for schools and award excellent teachers. We also help hospitals and fire departments enter the 21st century.   

We sponsor cultural events and deliver humanitarian aid to those in need. If you agree with our views, you can also donate.   

ASSIST Software Team Members