1. Intro
Based on my work experience, this tutorial is meant to help you will learn the basic principles in creating a game-ready model for Unity 3D and understand all the steps required in this process of hard surface modeling with PBR texturing.
My task was to model a set of control panels from an Abraham M1 Tank for a proof of concept application in Unity 3D. The focus was in creating high fidelity models that simulate the real-life model as accurately as possible. A problem was finding good references due to the fact that military vehicles have most of their components/blueprints classified.
First I had to do some basic 3D mockups for the Unity development team, due to the fact that the programmers need to work on the functionality before the final assets are ready.
The focus was on creating the set of 3D models that are optimized for mobile and WebGL and at the same time have the high poly versions that can be used to create assets for other platforms.
2. High poly Modeling
For the high poly modeling, I used box modeling with stacks and open subdivision.
I start the modeling from a simple shapes, and I add progressively detail as I work on it. At the same time using symmetry helps you cut in half the time spent in modeling details on your model.
I work with stacks due to the fact that is easier to work non-destructive and test different approaches. When you work with stacks it’s easier to correct or delete something you did wrong without losing the work you did until then.

After you finish the basic form you can think of adding details inside of the model. It's important to think ahead and understand what details will be in the high poly and if they are transferred as textures or as 3D geometry.
Due to the fact that the high poly model is created with stacks, it is very easy to extract the low poly version from it giving the designer even more flexibility.
Working with open subdivision (that adds geometry to the model) helps you create organic and smooth models without a complex and heavy geometry in the model.
3. Low poly
As presented in the high poly modeling process, working with stacks gives the designer the opportunity to extract the low poly model and with a little clean up you have done a time consuming work in a fraction of the time required if the model was done from scratch.
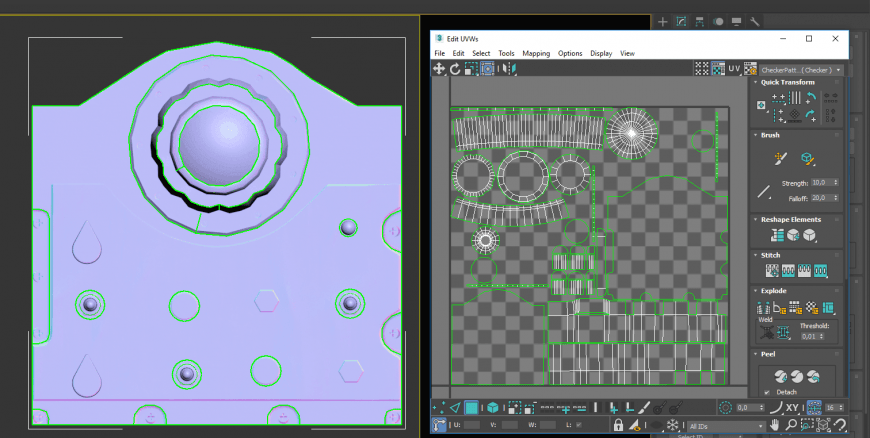
After you finish creating the low poly version you have to do the Uv maps. Basically, you will “skin” the 3D object on a 2D plane. Is important to have a good Uv map because when you will start the texturing you need to know where every object is placed.

4. Preparing assets for texture baking
After you did the high poly-low poly and the Uv map of an object you have to prepare the assets for texture baking. You create the normal, ambient occlusion, diffuse, emissive, metallic, and roughness map (that is in the alpha channel of the metallic map for Unity 3D engine).
The normal map texture extracts all the 3D details from the high poly model on the low poly version. Basically all the details you model in the high poly model it will be transposed as a texture in the low poly version of the model.

The AO map is a shading map that calculates how exposed each point in the scene is to ambient light and creates interior shadows on the 3D object that would be very expensive to be created in real-time rendering conditions.
The metallic map defines what components are metallic or nonmetallic on you object. For example, the buttons on the object are from plastic and in the image, they are colored in black.
Albedo map represents the basic color you give to your object without any physical properties. The texts on the panels have been created in Photoshop and exported in Substance Painter, our 3D texturing application.
5. PBR texturing
For the texturing, I used Substance Painter, a 3D texturing program that you can bake the input maps (extract all the details from the high poly to the low poly model) and texture the final assets with physical-based shading. What that means is that each material can accurately simulate its real-life counterpart from the way the light interacts with it. This produces models that look as close as possible to the real-life models giving a sense of immersion to the user.
6. Functionality
Before you do the UV map and the texturing you have to prepare the final models for the game engine. This process implies a set of tasks to be done by the designer. First, we need to reset the scale of the models so they have their real-life size. This step is important because depending on the actual size of the models the lighting is different.
Each element must have a proper name and the components grouped in a logical way. Every pivot point has to be centered on the object, with some exceptions where depending on the required animations the buttons need to have different pivots.

Due to the fact that all animations have been done in Unity by scripting, it was crucial to get right all of the pivots and link the components together (parent-child nodes) to get the expected results.
7. Conclusion
One of the most important rules for modeling game-ready assets is to work organized and understand the developing pipeline and how you fit in there. This is why is important for the designer to understand the functionality behind what he is modeling and be an integrated part of the developing process.
From a modeling point of view, it is critical to work as modular and as nondestructive as possible, with the focus on delivering high-quality assets as fast as possible, but at the same time being able to modify on the run the design in case changes occur in the developing life cycle.


