
How to draw an outline around a non-closed polygon

So we have an arbitrary line made up of n points (Fig. 1), we want to draw an outline around this line, so we need to calculate the contour points of the surrounding line (Fig 2).
The idea is: if you have the points of the line segments, you can easily create two parallel lines for each segment and calculate the connection point where they intersect with the next.
What we need is the equation of the line represented by two points, a series of transformations of each point (translate/ rotate/ scale). In this section, we are going to focus on the description of the line.
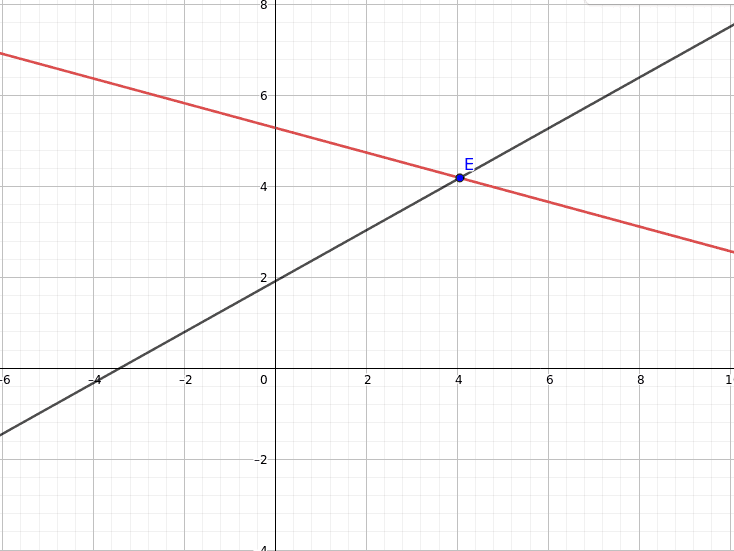
The equation of the line is defined by:
y = m * x + n,
where m is called slope or gradient which is a real number that describes the direction and steepness of the line, and n is called y-Intercept, also refers to the starting value of the line (Fig. 3).
If we have a point A (Xa, Ya), then a line which goes through A point is defined by :
y - Ya = m * (x - Xa)
y = m * x + (Ya - m * Xa)
Also, the slope is equal to the rising value divided by run.
m = rise / run,
and if we know two points on the same line, the slope is also equaled with:
m = (Yb - Ya) / (Xb - Xa)
“And then Satan said: <Let’s put the alphabet in the math>”... so we got the description of the line if we know two points from it:
Let’s talk about the 2D rotation around a point.
Imagine a point located at (x, y). If we want to rotate that point around the origin, the coordinates of the new point would be located at (x1, y1), you can see it in (Code sample 1).
x1 = x * cos(A) - y * sin(A)
y1 = y * cos(A) + x * sin(A)
where A is the angle of rotation.
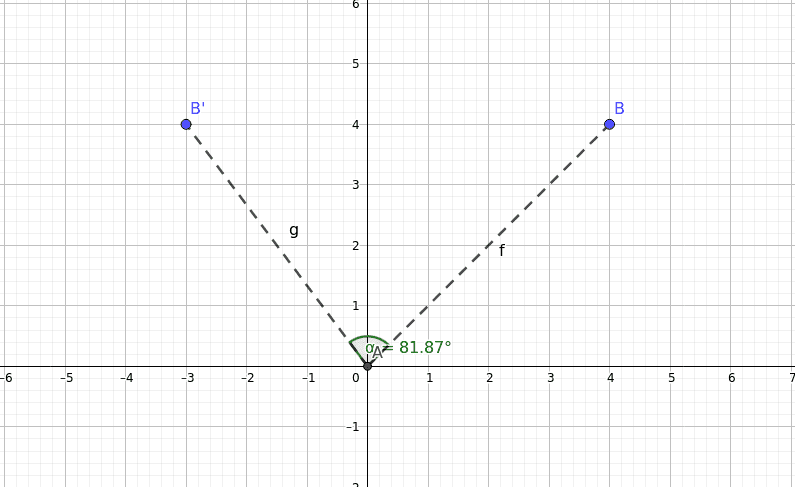
Fig. 5
If you wanted to rotate the point around something other than the origin:
struct ScreenPoint
{
	float x;
	float y;
}
Code sample 1
For the first and the last point from a non-closed polygon defined by a user, we do not have a previous/next point, so we just calculate the contour points for those points (Code sample 1) using the rotation from the consecutive points (first point - next point and previous point - last point).
void CreateFirstLastContourPoints(const std::vector<ScreenPoint> points, std::vector<ScreenPoint>& contourPoints)
{
	const int kPointsCount = points.size();
	const int kContourPointsCount = contourPoints.size();
	if (kContourPointsCount == 2 * kPointsCount)
	{
		// TODO: log error
		return;
	}

	const ScreenPoint kFirstScreenPoint = points[0];
	const ScreenPoint kLastScreenPoint = points[kPointsCount - 1];

	// Local variables for calculate the contour point
	ScreenPoint rightContourPoint = { 0.0f, 0.0f };
	ScreenPoint leftContourPoint = { 0.0f, 0.0f };

	float radAngleSlope = 0.0f;
	float cosValue = 0.0f;
	float sinValue = 0.0f;

	// Create contour points for the first point
	// Left point will be the symmetric point of the right
	radAngleSlope = atan2(points[1].y - kFirstScreenPoint.y, points[1].x - kFirstScreenPoint.x);
	cosValue = cos(radAngleSlope);
	sinValue = sin(radAngleSlope);

	rightContourPoint = { kFirstScreenPoint.x + kWidth * cosValue, kFirstScreenPoint.y - kWidth * sinValue };
	leftContourPoint = { -(rightContourPoint.x - kFirstScreenPoint.x) + kFirstScreenPoint.x, -(rightContourPoint.y - kFirstScreenPoint.y) + kFirstScreenPoint.y };

	contourPoints[0] = rightContourPoint;
	contourPoints[kContourPointsCount - 1] = leftContourPoint;

	// Create contour points for the last point
	// Left point will be the symmetric point of the right
	radAngleSlope = atan2(kLastScreenPoint.y - points[kPointsCount - 2].y, kLastScreenPoint.x - points[kPointsCount - 2].x);
	cosValue = cos(radAngleSlope);
	sinValue = sin(radAngleSlope);

	rightContourPoint = { kLastScreenPoint.x + kWidth * cosValue, kLastScreenPoint.y - kWidth * sinValue };
	leftContourPoint = { -(rightContourPoint.x - kLastScreenPoint.x) + kLastScreenPoint.x, -(rightContourPoint.y - kLastScreenPoint.y) + kLastScreenPoint.y };

	contourPoints[kPointsCount - 1] = rightContourPoint;
	contourPoints[kContourPointsCount - kControlPointsSize] = leftContourPoint;
}
Code sample 2
For the rest of the points, we calculate the contour points using the intersection of the two lines:
void CreateContourPoints(const std::vector<ScreenPoint> points, std::vector<ScreenPoint>& contourPoints)
{
	const int kPointsCount = points.size();
	const int kContourPointsCount = contourPoints.size();
	if (kContourPointsCount == 2 * kPointsCount)
	{
		// TODO: log error
		return;
	}

	// Create contour points for the first/last point
	CreateFirstLastContourPoints(points, contourPoints);

	// Create contour points for the rest of the points
	// Local variables for calculate the contour point
	ScreenPoint rightContourPoint = { 0.0f, 0.0f };
	ScreenPoint leftContourPoint = { 0.0f, 0.0f };

	float radAngleSlope = 0.0f;
	float cosValue = 0.0f;
	float sinValue = 0.0f;

	// Each line is defined by y = m*x + n
	// To determine the intersection of two lines: m1*x + n1 = m2*x + n2
	// The point from intersection will have (x = [n1 - n2 / m2 - m2], y = m1*x + n1)
	for (auto i = 1; i < kPointsCount - 1; i++)
	{

	  	ScreenPoint previousPoint = points[i - 1];
	  	ScreenPoint currentPoint = points[i];
	  	ScreenPoint nextPoint = points[i + 1];

		// Line between (previous, current)
		// Calculate m1, n1 parameters
		radAngleSlope = atan2(currentPoint.y - previousPoint.y, currentPoint.x - previousPoint.x);
		cosValue = cos(radAngleSlope);
		sinValue = sin(radAngleSlope);

		ScreenPoint kPoint1 = { previousPoint.x + kWidth * cosValue, previousPoint.y - kWidth * sinValue };
		float m1 = ((currentPoint.y - previousPoint.y) / (currentPoint.x - previousPoint.x + FLT_EPSILON));
		float yIntercept1 = kPoint1.y - m1 * kPoint1.x;


		// Line between (current, next)
		// Calculate m2, n2 parameters
		radAngleSlope = atan2(nextPoint.y - currentPoint.y, nextPoint.x - currentPoint.x);
		cosValue = cos(radAngleSlope);
		sinValue = sin(radAngleSlope);

		ScreenPoint kPoint2 = { nextControlPoint.x + kWidth * cosValue, nextPoint.y - kWidth * sinValue };
		float m2 = ((nextPoint.y - currentPoint.y) / (nextPoint.x - currentPoint.x + FLT_EPSILON));
		float yIntercept2 = kPoint2.y - m2 * kPoint2.x;

		// The point from intersection
		// Lines defined by: y = slope1*x +yIntercept1 and y = slope2*x + yIntercept2
		float xIntersect = (yIntercept1 - yIntercept2) / (m2 - m1 + FLT_EPSILON);
		float yIntersect = m1 * xIntersect + yIntercept1;

		rightPoint = { yIntersect, yIntersect };
		leftPoint = { -(rightPoint.x - currentPoint.x) + currentPoint.x, -(rightPoint.y - currentControlPoint.y) + currentControlPoint.y };

		contourPoints[i] = rightPoint
		contourPoints[kContourPointsSize - i - 1] = leftPoint;
	}
}
Code sample 3
If you enjoyed reading this, you can also check my previous article:


